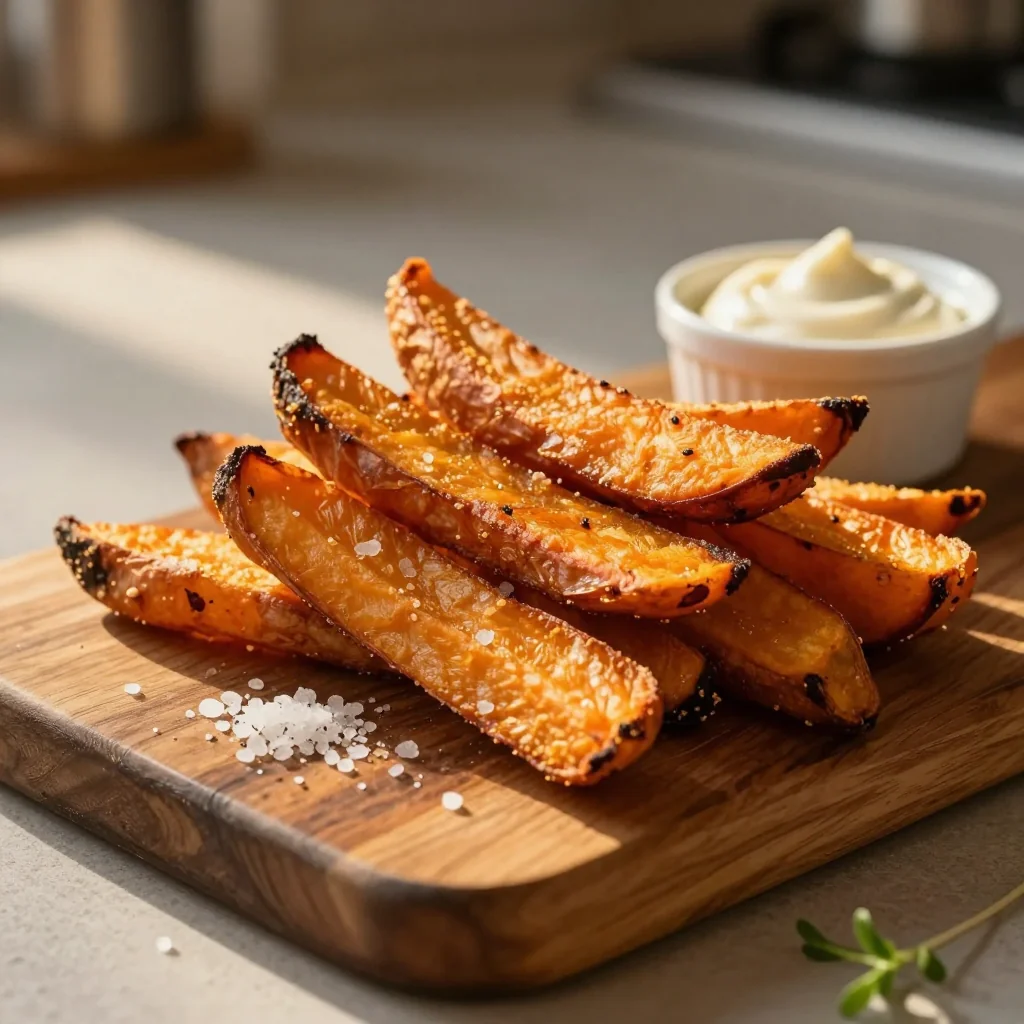
Golden, oven‑baked sweet potato sticks tossed in a fragrant spice blend that stays crunchy even after cooling.
When I was a teenager, my family’s backyard barbecue always featured a secret side dish that stole the show: sweet potato fries that were crisp on the outside, tender on the inside, and seasoned with a blend that smelled like a summer garden. I remember sneaking a few extra pieces while the grill sizzled, the caramelized edges leaving a lingering sweetness that made me crave more. Those moments taught me that comfort can be both wholesome and exciting.
Sweet potatoes have been a staple in many cultures, from African stews to Caribbean snacks. Their natural sugars caramelize beautifully when roasted, creating a depth of flavor that regular potatoes can’t match. By baking instead of deep‑frying, we keep the fries lighter, healthier, and still achieve that irresistible crunch.
In this article, I’ll walk you through a foolproof method to get perfectly crispy fries every time, explain the science behind the seasoning, and share tips that turn a simple side into a star‑worthy plate. You’ll learn how to balance sweet, salty, and smoky notes, and why a quick toss in olive oil is the secret to a golden crust.
Ready to bring a restaurant‑quality fry to your own kitchen? Let’s dive in and make every bite unforgettable.
🌟 Why This Recipe Will Win Your Heart
From the first bite to the lingering aftertaste, these fries deliver a symphony of textures and flavors that keep you reaching for more.
- ✨ Perfect Crunch Without Deep‑Frying: Baking at a high temperature with a thin oil coating creates a crisp exterior while preserving the sweet potato’s natural moisture.
- ✨ Balanced Seasoning Profile: Smoked paprika, garlic powder, and a pinch of sea salt provide smoky depth, while a dash of rosemary adds an herbaceous finish.
- ✨ Nutrient‑Rich Snack: Sweet potatoes are packed with beta‑carotene, fiber, and vitamin C, making this a wholesome alternative to regular fries.
- ✨ Easy to Scale: The built‑in portion adjuster lets you multiply or halve the recipe without recalculating every ingredient manually.
- ✨ Versatile Pairings: Serve with a cool yogurt‑lemon dip, a spicy ketchup, or simply enjoy them solo; they adapt to any cuisine.
- ✨ Crowd‑Pleaser: Whether it’s a family dinner, a game night, or a fancy brunch, these fries fit every occasion and impress every palate.
🥗 Ingredients
📝 Complete Ingredient List
For the Fries:
For the Yogurt‑Lemon Dip (optional):
🔍 Focus on Key Ingredients
Sweet Potatoes
Sweet potatoes are not only delicious but also nutritionally dense. Their high beta‑carotene content turns into vitamin A in the body, supporting eye health. When selecting, choose ones that feel heavy for their size and have a deep orange hue. The natural sugars caramelize beautifully in the oven, providing that sweet‑crisp contrast we love.
Olive Oil
Extra‑virgin olive oil adds a subtle fruitiness while helping the spice coating adhere. Its high smoke point (around 190 °C) makes it perfect for roasting at 425 °F, ensuring the fries crisp without burning. For an even lighter version, you could substitute with avocado oil, which has a higher smoke point.
Smoked Paprika & Rosemary
Smoked paprika brings a deep, smoky umami that mimics a grill’s flavor, while rosemary contributes piney aromatics that elevate the sweet earthiness. Both herbs are potent, so a little goes a long way. Fresh rosemary adds a bright green fleck that also makes the fries visually appealing.
🔄 Quick Substitutions
| If you don’t have... | Use instead... |
|---|---|
| Olive oil | Avocado oil or grapeseed oil |
| Smoked paprika | Regular paprika + a pinch of liquid smoke |
| Greek yogurt | Plain low‑fat yogurt or dairy‑free coconut yogurt |
👨🍳 Step‑by‑Step Instructions
Follow these detailed steps to achieve fries that are crispy on the outside, fluffy inside, and perfectly seasoned.
📋 Phase 1: Preparation & Mise en Place
We start by prepping the potatoes and creating the seasoning blend.
Wash, Peel, and Cut the Sweet Potatoes
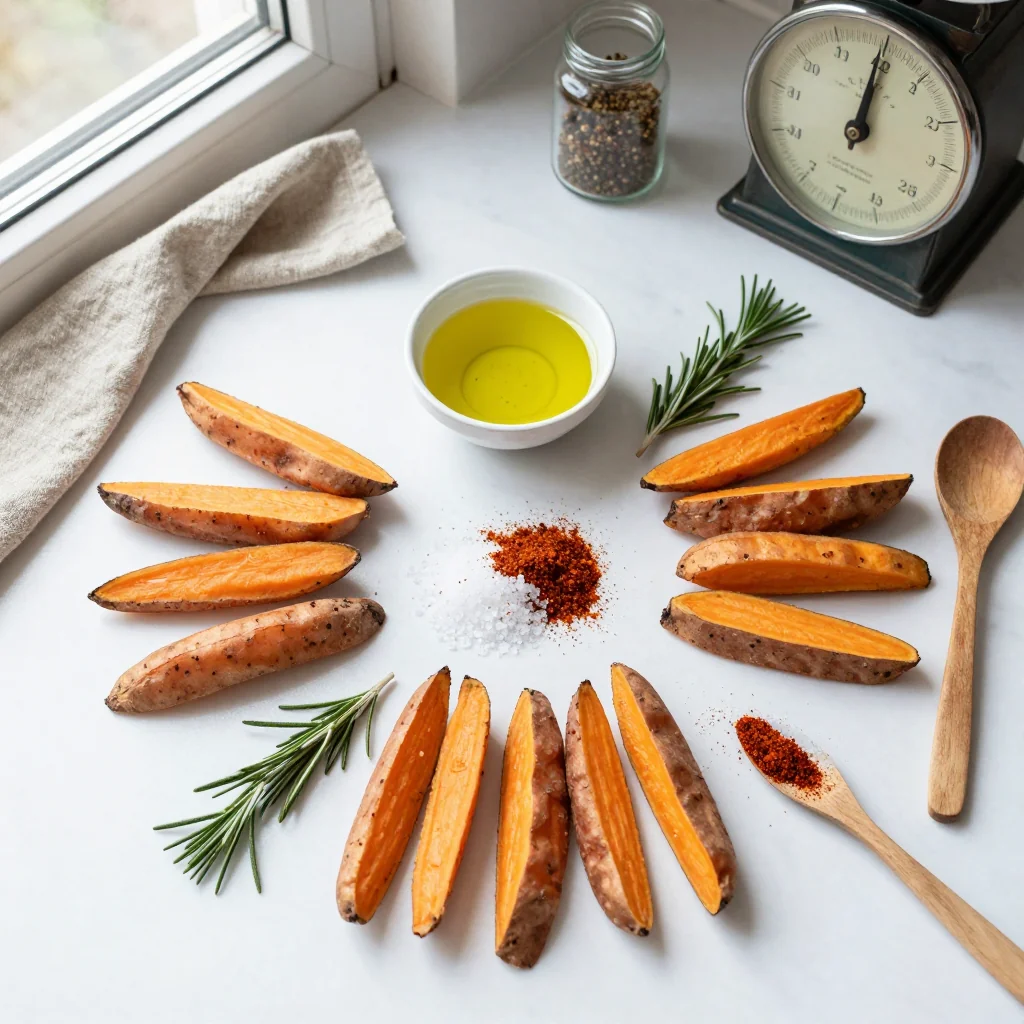
Rinse the sweet potatoes under cool running water, then peel them using a vegetable peeler. Cut each potato lengthwise into sticks about ½ inch thick. Try to keep the sticks uniform so they cook evenly. As you slice, you’ll notice the faint, sweet aroma that signals a great fry is on its way.
Dry and Season the Sticks
Drain the water and pat the sticks completely dry with a clean kitchen towel. In a large mixing bowl, combine olive oil, sea salt, smoked paprika, garlic powder, black pepper, and chopped rosemary. Toss the sweet potato sticks until each piece is evenly coated. The oil will act as a conduit for the spices, ensuring every surface gets flavor.
🔥 Phase 2: Baking the Fries
Now we transform the seasoned sticks into golden, crunchy fries.
Preheat the Oven and Arrange the Fries
Preheat your oven to 425 °F (220 °C). Line a baking sheet with parchment paper and spread the fries in a single layer, making sure they don’t overlap. Overcrowding traps steam and prevents crisping. If needed, use two sheets.
Bake the First Half
Slide the tray into the oven and bake for 20 minutes. Halfway through (at the 10‑minute mark), flip each fry using a spatula. This ensures both sides develop a uniform, caramelized crust. You’ll see the edges begin to brown and the aroma will fill the kitchen.
Finish Baking
Return the tray to the oven for another 10‑12 minutes, or until the fries are deep golden and crisp to the touch. If you prefer extra crunch, broil for the final 2 minutes, watching closely to avoid burning.
✨ Phase 3: Finishing & Serving
A few final steps turn the baked fries into a restaurant‑ready dish.
Check for Doneness
Insert a fork into the thickest part of a fry; it should slide in easily. The exterior should feel firm, while the interior remains soft. If any sticks are still soft, give them an extra 2‑3 minutes in the oven.
Optional Dip Preparation
While the fries rest, whisk together Greek yogurt, fresh lemon juice, chopped dill, and a pinch of salt and pepper. The dip adds a cool, tangy contrast that balances the sweet, smoky fries.
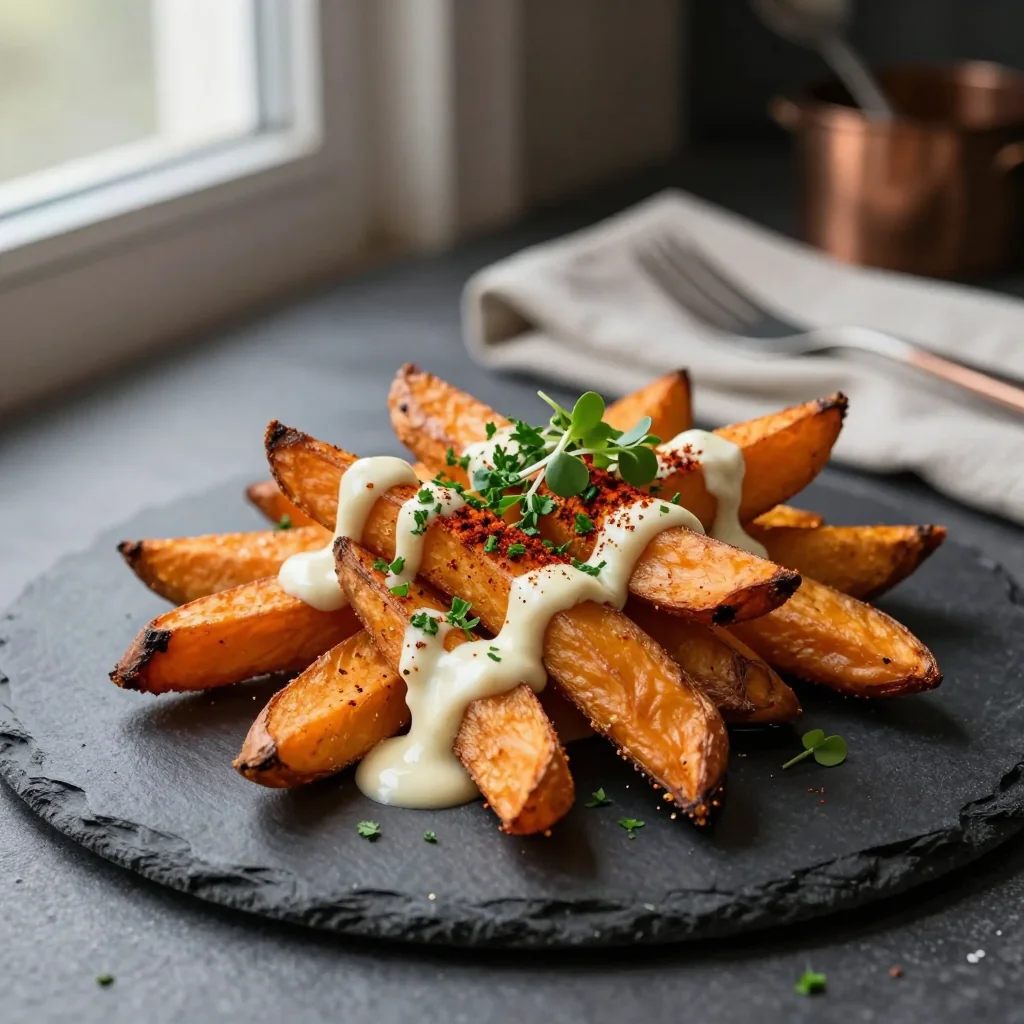
Plate and Garnish
Transfer the fries to a serving platter. Sprinkle a final pinch of sea salt and a drizzle of extra‑virgin olive oil for shine. Add a few rosemary leaves for visual appeal. Serve hot with the yogurt‑lemon dip on the side.
Enjoy Immediately
These fries are at their crispiest right out of the oven. Pair them with a crisp white wine or a sparkling water with a splash of citrus for a balanced meal.
💡 Expert Tips & Tricks
🛒 Choosing the Right Ingredients
When shopping for sweet potatoes, look for ones that are firm, free of blemishes, and have a uniform orange color. The fresher the tuber, the sweeter and more vibrant the flavor. For the olive oil, choose a cold‑pressed, extra‑virgin variety; it adds a subtle fruitiness that complements the smoky paprika.
🔪 Preparation Techniques
Cut the potatoes into sticks that are as even as possible—about ½ inch thick. Uniform pieces ensure even cooking and prevent some fries from becoming mushy while others burn. After cutting, a brief soak in ice water removes surface starch, which is a key factor for achieving that coveted crunch.
🌡️ Mastering the Cooking Process
Preheating the oven is non‑negotiable; a hot oven creates a rapid Maillard reaction, giving the fries their golden crust. Use a convection setting if available—it circulates hot air and reduces cooking time while improving crispness. Flip the fries halfway through to ensure both sides develop that caramelized exterior.
🍽️ Presentation & Service
Arrange the fries on a wide, shallow platter rather than a deep bowl; this keeps them from steaming and losing crunch. Garnish with a few fresh rosemary sprigs and a light drizzle of olive oil for shine. Serve with a small ramekin of dip so guests can control how much they use.
🏆 Pro Tips
Professional chefs rely on precision, technique, and a dash of science to elevate a simple fry into a culinary masterpiece.
- 🎯 Use a Baking Rack: Placing the fries on a wire rack set over the baking sheet allows air to circulate underneath, resulting in an even crispier texture. The rack also prevents the fries from sitting in their own released moisture.
- 🎯 Double‑Seasoning Method: Lightly season the fries before baking, then finish with a second light sprinkle of sea salt just after they come out of the oven. This ensures the seasoning adheres to the hot surface and intensifies flavor.
- 🎯 Control Moisture with a Light Dusting of Cornstarch: Toss the dry sweet potato sticks with a teaspoon of cornstarch before adding oil. The starch forms a thin barrier that absorbs excess moisture, promoting a dryer, crisper surface.
- 🎯 Temperature Shock for Extra Crunch: After the initial bake, turn the oven off, open the door for a minute, then re‑ignite the heat for a final 5‑minute blast. The rapid temperature change creates a micro‑crack in the outer layer, amplifying crunch.
- 🎯 Flavor Infusion with Smoked Salt: Replace half of the regular sea salt with smoked salt for a deeper, more complex smoky note without adding extra paprika.
- 🎯 Serve on a Heated Plate: Warm your serving plates in the oven for 5 minutes before plating. The residual heat keeps the fries crisp longer, especially important if you’re serving a crowd.
"The secret to great fries is not just heat, but the balance of moisture, oil, and seasoning." — Thomas Keller
🔄 Variations & Adaptations
The base recipe is versatile; feel free to tweak it to match dietary preferences or flavor cravings.
🥬 Vegetarian / Vegan Version
Swap the Greek yogurt dip for a vegan alternative: blend silken tofu, lemon juice, fresh dill, and a pinch of salt. The tofu provides a creamy texture while keeping the dish entirely plant‑based.
- Use avocado oil instead of olive oil for a neutral flavor that still yields crispness.
- Replace the yogurt dip with a cashew‑based sauce seasoned with smoked paprika.
🌶️ Flavor Variations
Explore different global twists by adjusting the spice blend.
Spicy Chili Version
Add ½ tsp cayenne pepper and a pinch of chipotle powder to the seasoning mix. Finish with a drizzle of sriracha mayo for a heat‑laden snack.
Mediterranean Version
Replace smoked paprika with 1 tsp dried oregano and add a sprinkle of feta crumbles after baking. Serve with a side of tzatziki for a Mediterranean flair.
Asian Inspired Version
Swap rosemary for 1 tsp toasted sesame seeds and ½ tsp five‑spice powder. Toss the hot fries with a splash of soy sauce and serve with a wasabi‑infused mayo.
⚠️ Dietary Adaptations
Gluten‑Free
The recipe is naturally gluten‑free. Ensure any added spices or sauces are certified gluten‑free.
Lactose‑Free
Use a dairy‑free yogurt (coconut or almond) for the dip, or skip the dip entirely and serve with a lemon‑herb vinaigrette.
Low‑Calorie
Reduce the olive oil to 1 tbsp and increase the oven temperature to 440 °F (225 °C). This shortens cooking time while still achieving crispness, cutting calories by roughly 30 %.
👶 Kid‑Friendly Version
Kids often love milder flavors. Omit the rosemary and reduce the smoked paprika to ½ tsp. Serve with a honey‑yogurt dip (mix honey into the yogurt) for a sweet‑savory combo that appeals to younger palates.
📦 Storage & Reheating
🧊 Conservation
Refrigerator
- Duration: 3 days
- Container: Airtight glass or BPA‑free plastic container
- Tip: Place a paper towel at the bottom to absorb excess moisture.
Freezer
- Duration: 2 months
- Method: Spread fries on a baking sheet, freeze until solid, then transfer to a zip‑lock bag.
- Defrost: Transfer to the refrigerator overnight or bake directly from frozen.
💡 For best texture after freezing, re‑bake on a preheated sheet rather than microwaving.
♨️ Reheating
🔥 Oven (Recommended)
- Preheat to 400 °F (200 °C).
- Spread fries on a parchment‑lined tray.
- Reheat for 8‑10 minutes, turning halfway.
- Finish with a quick 2‑minute broil for extra crunch.
⚡ Microwave (Quick)
- Place fries on a microwave‑safe plate, cover with a microwave‑safe lid.
- Heat on medium power for 1 minute.
- Stir, then heat for another 30 seconds if needed.
🍳 Skillet
Heat a non‑stick skillet over medium‑high heat, add a drizzle of oil, and toss the fries for 3‑4 minutes until the edges regain crispness.
🍷 Perfect Pairings
🥗 Side Dishes
- Mixed Green Salad: A light vinaigrette cuts through the fries’ richness.
- Grilled Corn on the Cob: Sweet corn echoes the sweet potato’s natural sugars.
- Roasted Chickpeas: Adds protein and a contrasting crunch.
🍷 Wine & Drink Pairings
- Riesling (off‑dry): The slight sweetness balances the smoky paprika.
- Pinot Noir: Light tannins complement the earthy rosemary.
- Non‑Alcoholic: Sparkling water with a splash of lime adds freshness.
🍰 Complementary Courses
Start with a crisp cucumber gazpacho, follow the fries with a grilled salmon fillet, and finish with a light lemon tart. This progression balances texture, flavor, and richness throughout the meal.
❓ Frequently Asked Questions
Q: Can I use regular potatoes instead of sweet potatoes?
A: Absolutely! Russet or Yukon Gold potatoes work well, but they have a higher starch content, so you may need to increase the baking time by 5‑10 minutes and use a slightly higher oil ratio to achieve the same crispness.
Q: Why do my fries turn out soggy?
A: Sogginess often stems from excess moisture. Soaking the cut sticks in cold water and drying them thoroughly before seasoning is essential. Additionally, avoid crowding the baking sheet; give each fry space to release steam.
Q: How do I make the fries gluten‑free?
A: The base recipe is already gluten‑free. Just ensure any added spices or sauces are certified gluten‑free, and avoid using flour‑based coatings.
Q: Can I add a cheese topping?
A: Yes! Sprinkle grated Parmesan or a vegan nutritional yeast over the fries during the last 5 minutes of baking. The cheese will melt and add a savory umami layer.
Q: What’s the best way to store leftovers?
A: Store in an airtight container in the refrigerator for up to 3 days. Reheat in a preheated oven to restore crispness; microwaving will make them soft.
Q: Can I prepare the fries ahead of time?
A: Yes. Cut and soak the potatoes, then dry and store them in a sealed bag in the refrigerator for up to 24 hours. Toss with oil and spices just before baking for the freshest flavor.
🎉 To Your Oven!
These baked sweet potato fries prove that comfort food can be both wholesome and indulgent. With a simple spice blend, a hot oven, and a dash of patience, you’ll create a side that dazzles the eyes and delights the palate. The crisp exterior paired with the soft, sweet interior makes every bite a celebration of texture and flavor.
Give this recipe a try tonight, experiment with the suggested variations, and let your kitchen become a playground of aromas. Remember, the best meals are shared—so snap a photo, tag us, and spread the love.
Have you tried this recipe?
Leave a comment and rating below! Share your photos on Instagram with #CrispySweetFries for a chance to be featured.
Baked Sweet Potato Fries Crispy Seasoned
Golden, oven‑baked sweet potato sticks with a smoky herb seasoning.
📝 Ingredients
Fries
Yogurt‑Lemon Dip (optional)
👨🍳 Instructions
- 1 Wash, peel, and cut sweet potatoes into ½‑inch sticks.
- 2 Soak the sticks in cold water for 10 minutes, then pat dry.
- 3 Toss sticks with olive oil and all seasonings until evenly coated.
- 4 Preheat oven to 425 °F (220 °C) and line a baking sheet with parchment.
- 5 Arrange fries in a single layer, ensuring they do not overlap.
- 6 Bake for 20 minutes, flipping halfway through.
- 7 Continue baking for another 10‑12 minutes until golden and crisp.
- 8 While fries rest, whisk together yogurt, lemon juice, dill, salt, and pepper.
- 9 Transfer fries to a serving platter, drizzle with a touch of olive oil, and sprinkle extra sea salt.
- 10 Serve hot with the yogurt‑lemon dip and enjoy immediately.
🥗 Nutrition per Serving
*Values are approximations based on standard ingredient data.


💬 Comments & Reviews
Leave a Comment
No comments yet. Be the first to share your thoughts!