I still remember the night I tried to make a “simple” berry pastry for a midnight snack, only to end up with a soggy, jam‑laden mess that looked more like a fruit salad than a bakery treat. The kitchen was a battlefield—puff pastry sheets curled into themselves, jam spilled like a crimson river, and my oven timer screamed 12 minutes too early. I stared at the chaos, realizing that a handful of tweaks could turn this disaster into a showstopper. That moment sparked a daring experiment, and what emerged was a crisp, buttery twist that melts in your mouth while the jam bursts with bright, tart sweetness.
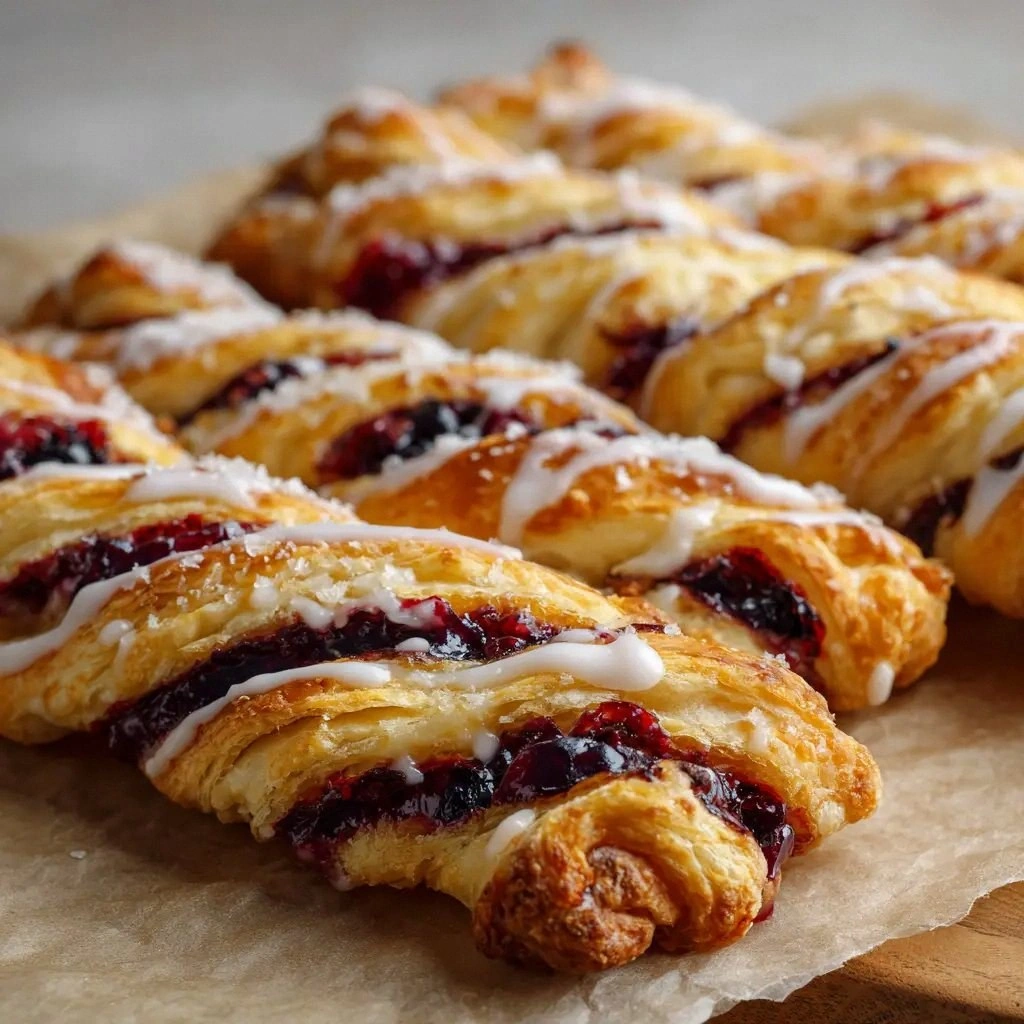
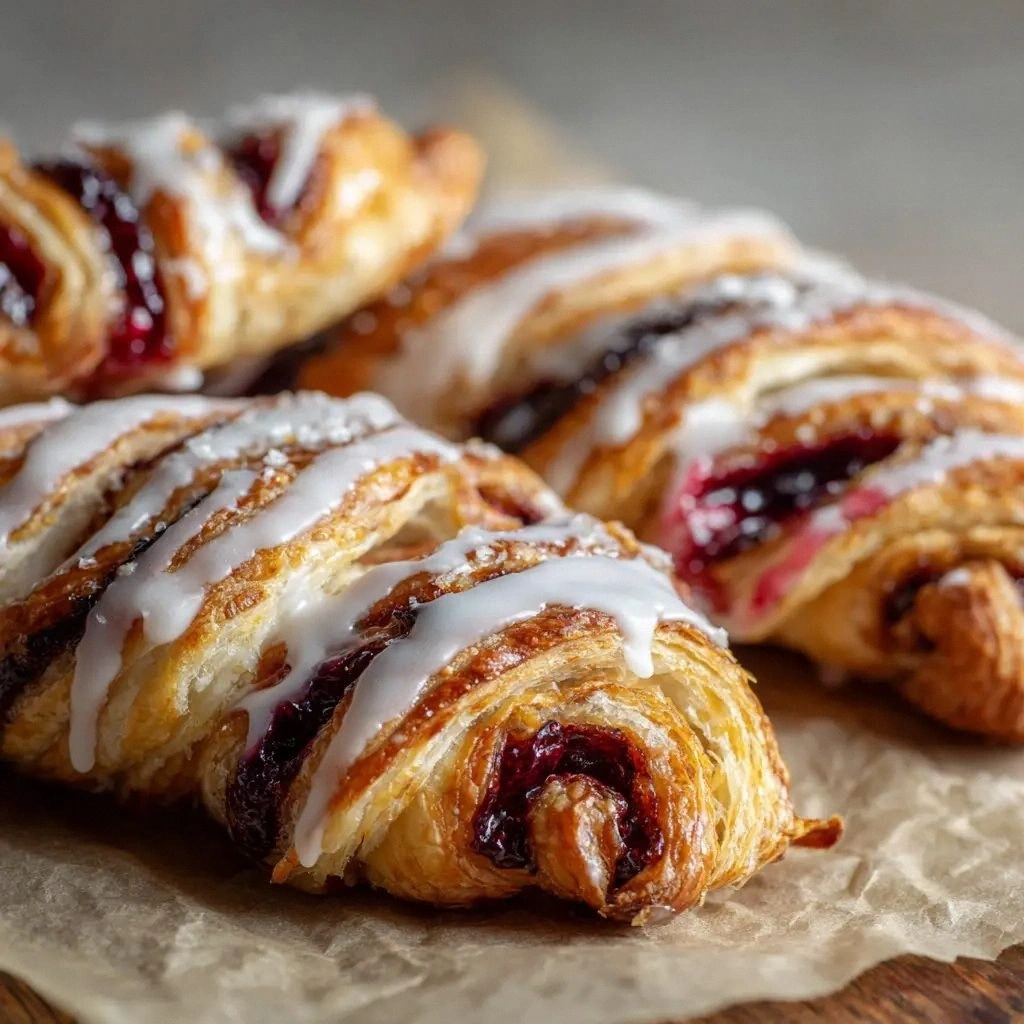
Picture this: a golden‑brown spiral curling like a ribbon, the aroma of toasted pastry mingling with the sweet perfume of dark red berries. You hear that satisfying crack as the edges crisp, and the first bite releases a burst of velvety jam that coats your tongue like silk. The texture is a play between flaky layers and a soft, jam‑filled center, while the buttery bite gives you a comforting, almost nostalgic feel. The sound of the oven timer, the gentle clink of the pastry sheet on the baking tray—every sensory detail is a reminder that this isn’t just baking; it’s a culinary performance. You’re not just eating; you’re experiencing a moment of pure, buttery bliss.
What makes this version stand out is that it takes the classic puff pastry twist and elevates it with a few clever tricks: a cornstarch‑flour coating that locks in the jam’s juices, a subtle vanilla whisper that balances the berry acidity, and a precise baking technique that keeps the pastry crisp without over‑browning. I dare you to taste this and not go back for seconds—once you bite into that first twist, you’ll know the difference between a good pastry and a great pastry. Most recipes get this completely wrong, either by over‑filling or under‑baking, but here, each twist is a perfectly balanced bite of sweet, buttery, and slightly tart flavors. If you've ever struggled with sticky pastry or uneven baking, you're not alone—and I've got the fix.
I’ve spent countless evenings experimenting with pastry, and this particular recipe is hands down the best version you'll ever make at home. The secret? A simple cornstarch and flour coating that creates a barrier, preventing the jam from seeping through the pastry while still allowing the flavors to mingle. The result is a pastry that stays flaky and buttery, with a jam center that’s jam‑like, not jam‑soaked. It’s a game‑changer, and I’m excited to walk you through every single step, so by the end, you’ll wonder how you ever made it any other way.
Imagine pulling these out of the oven, the kitchen smelling incredible, and watching the twists steam slightly as they cool. The first bite is a burst of sweet berry that coats your palate like velvet, followed by a buttery crunch that echoes the crispness of a well‑toasted croissant. The texture is layered, with a slight give from the jam and a firm, flaky exterior that shatters like thin ice when you bite. The aroma alone is enough to make anyone in the house want a second bite. And the best part? You can make them ahead, store them, and reheat them to almost the same crispness—making this a perfect treat for busy mornings or spontaneous dessert cravings.
Picture the kitchen: the oven preheated to 200°C (400°F), the pastry sheets spread on a parchment‑lined tray, and a small bowl of jam ready to be spooned in. I’ll show you how to assemble the twists so each one is a perfect little package of buttery pastry and sweet berry. You’ll learn how to fold, twist, and bake the pastry so that the edges seal perfectly, creating a crisp, golden shell that holds the jam inside. I’ll also share a few micro‑challenges—like trying to keep the twists from sticking together—that will test your pastry skills and keep you on your toes.
We’ll dive into the ingredients next, breaking them down into groups that make sense for the flavor, texture, and overall experience. The jam is the star, but the cornstarch and flour coating, the egg wash, and the powdered sugar glaze all play essential roles. By understanding each component’s purpose, you’ll gain confidence in tweaking the recipe for your own taste or dietary preferences. And trust me, you’ll be amazed at how simple swaps can elevate the entire experience.
This recipe is more than just a pastry—it’s a celebration of buttery layers, bright berry flavors, and the joy of creating something that looks like a piece of art and tastes like a slice of heaven. It’s the kind of treat that turns an ordinary afternoon into something special. If you’re ready to make your own bakery‑quality twists at home, read on. I promise you’ll be amazed by how easy it is to achieve professional results.
Let me walk you through every single step—by the end, you'll wonder how you ever made it any other way. The journey starts with the right ingredients, moves through precise assembly techniques, and ends with a glaze that adds that final touch of sweetness and shine. Along the way, I’ll sprinkle in a few hacks and watch‑out notes to help you avoid common pitfalls. Ready? Let's get twisting!
What Makes This Version Stand Out
- Flaky Perfection: The pastry is baked until it achieves a golden, flaky texture that feels almost like a croissant, yet remains light and airy. The layers separate with each bite, giving you that satisfying crunch.
- Jam‑Sealing Coating: A simple blend of cornstarch and flour creates a barrier that locks in the jam, preventing leakage while still allowing the flavors to mingle. This trick keeps the pastry crisp and the center juicy.
- Balanced Sweetness: The dark red mixed berry jam is rich but not overpowering, and a dash of vanilla extract softens the acidity, creating a harmonious sweet‑tart balance.
- Easy Assembly: The twists are simple to roll and fold, making them approachable for beginners while still delivering a professional finish.
- Make‑Ahead Friendly: You can prepare the twists ahead of time, freeze them, and bake them later without losing texture or flavor.
- Versatile Presentation: Serve them warm with a dusting of powdered sugar, or let them cool for a crisp, snack‑ready treat that looks like a piece of art.
- Time Efficiency: The entire process takes less than an hour, from prep to finish, making it a perfect quick dessert or brunch item.
- Ingredient Quality: Using high‑quality puff pastry and real berry jam elevates the flavor profile, turning a simple recipe into a gourmet experience.
Inside the Ingredient List
The Flavor Base
The heart of these twists is the dark red mixed berry jam, which brings a deep, fruity sweetness that cuts through the buttery pastry. The jam should be thick yet pourable; if it’s too runny, it will seep through the pastry, ruining the crispness. A high‑quality jam made from real berries offers a natural tartness that balances the sugar, giving the twists a nuanced flavor profile. If you’re craving a spicier kick, a pinch of cinnamon or a splash of lemon zest can elevate the jam’s brightness.
When selecting jam, look for one that contains real fruit pieces or at least a high fruit content percentage. Avoid jams with excessive sugar or artificial additives, as they can make the pastry too sweet and sticky. A dark berry jam also offers a beautiful color contrast against the golden pastry, making the twists visually stunning. The jam’s acidity also helps tenderize the pastry slightly, preventing it from becoming too hard during baking.
The Texture Crew
Cornstarch and all‑purpose flour form a fine coating that seals the pastry, preventing the jam from leaking. The cornstarch gives the coating a glossy sheen, while the flour adds structure, ensuring the twist holds its shape. Together, they create a barrier that keeps the pastry crisp and the jam inside. If you skip this step, the pastry will become soggy and the jam will spill out, ruining the texture.
The large egg is whisked and brushed over the pastry before baking, giving the twists a beautiful golden hue and a slightly chewy texture. The egg wash also helps the powdered sugar glaze adhere properly, ensuring a sweet, glossy finish. A single egg is enough for the entire batch; over‑eggning can make the pastry too heavy.
Water, though a small component, helps the cornstarch and flour mixture bind together. It also prevents the coating from drying out too quickly, which could lead to a brittle crust. The small splash of water is a subtle but essential part of the process, ensuring the coating stays pliable during assembly.
The Unexpected Star
Whole milk, in a modest amount, is used to thin the powdered sugar glaze, creating a silky, glossy finish that coats the twists like a fine frosting. The milk also adds a hint of richness, balancing the tartness of the jam. If you’re lactose intolerant, a plant‑based milk can be used without compromising flavor or texture.
Vanilla extract, though used sparingly, brings depth to the overall flavor. It’s the subtle whisper that ties the sweet, tart, and buttery elements together. A dash of vanilla can make the difference between a good pastry and a memorable one. If you don’t have vanilla extract, a few drops of almond or coconut extract can offer a similar aromatic lift.
Everything’s prepped? Good. Let’s get into the real action.
The Method — Step by Step
- Preheat and Prep: Heat your oven to 200°C (400°F). Line a baking sheet with parchment paper, ensuring there’s enough space between each twist so they don’t merge. This step is crucial to prevent the twists from sticking together, which can ruin the presentation.
- Thaw the Puff: Let the frozen puff pastry sit at room temperature for 10 minutes. The pastry should be pliable but not too soft; if it’s too warm, it will lose its layered structure. A quick roll between two sheets of parchment can help loosen it.
- Cut the Sheets: Slice the pastry into 12 equal rectangles, each about 3.5 cm by 7 cm. Consistency in size ensures even baking. If you’re short on time, a pizza cutter will give you clean, straight cuts.
- Coat the Pastry: Mix cornstarch and flour in a shallow bowl. Lightly dust each pastry rectangle with the mixture, tapping off any excess. The coating locks in the jam and gives the twist a subtle sheen.
- Fill the Center: Spoon about 1 tablespoon of jam onto the center of each rectangle. Don’t overfill—too much jam will seep through during baking. A small, even amount keeps the pastry crisp.
- Fold and Twist: Fold each rectangle in half lengthwise, then twist the halves around each other twice to create a spiral. The twist should be tight enough to hold the jam but loose enough to allow steam to escape.
- Seal the Edges: Press the ends together with a fork, creating a small seam that seals the jam inside. This step prevents the jam from leaking and gives the twists a polished look.
- Egg Wash: Whisk the egg with a tablespoon of water, then brush the top of each twist with the mixture. The egg wash gives the twists a golden, glossy finish. If you’re vegan, a splash of soy milk can serve as a substitute.
- Bake: Place the twists on the prepared baking sheet and bake for 18–20 minutes, or until the pastry is puffed and golden brown. Keep an eye on the edges; they should start pulling away from the parchment. The aroma during this stage is the scent of butter and baked fruit.
- Cool Slightly: Let the twists cool on a wire rack for 5 minutes before glazing. This brief cooling period ensures the jam sets slightly, making the glaze stick better.
- Glaze: In a small bowl, whisk powdered sugar with milk and vanilla extract until smooth. Brush or drizzle the glaze over each twist, allowing any excess to drip back onto the pastry. The glaze adds a sweet sheen and a final burst of flavor.
- Serve: Serve warm or at room temperature. The twists are best enjoyed fresh, but they also make an excellent grab‑and‑go snack for the next day.
That’s it—you did it! But hold on, I've got a few more tricks that will take this to another level. These insider tips will help you master the twists, avoid common pitfalls, and elevate the flavor profile even further.
Insider Tricks for Flawless Results
The Temperature Rule Nobody Follows
Many bakers bake at 180°C (350°F), but this temperature can cause the pastry to brown unevenly. Baking at 200°C (400°F) ensures a crisp exterior while keeping the interior soft. The higher heat also helps the jam set faster, preventing it from leaking. If you’re using a convection oven, reduce the temperature by 20°C to avoid over‑browning.
Why Your Nose Knows Best
The first aroma that rises from the oven is a strong indicator of doneness. A buttery, sweet scent that lingers in the air signals that the pastry is perfectly baked. If the scent is faint or overly sugary, it’s a sign you need more time. Trust your nose; it’s a reliable judge of pastry quality.
The 5-Minute Rest That Changes Everything
After removing the twists from the oven, let them rest for exactly five minutes. During this short pause, the jam sets slightly, and the pastry’s steam condenses, preventing sogginess. The glaze also sets, giving the twists a glossy finish. Skipping this step can lead to a sticky, uneven texture.
The Secret to a Perfect Seal
When sealing the edges, press gently but firmly. A tight seal keeps the jam inside, while a loose seal can cause leakage. A quick test: press the seam, then run a finger along the edge; if it feels smooth, you’re good. If you notice any gaps, re‑seal before baking.
The Power of a Light Dusting
A light dusting of powdered sugar before glazing can help the glaze adhere better. The sugar creates a slightly tacky surface that holds the glaze in place. This trick is especially useful if you’re using a thicker glaze or if the pastry is slightly warm.
The Magic of a Cold Oven
Preheating the oven for at least 15 minutes ensures a stable baking environment. A cold oven can cause the pastry to rise unevenly, leading to a flat or uneven finish. By giving the oven time to reach the target temperature, you guarantee consistent results.
The Quick Chill Trick
If you need to bake a large batch, chill the twists in the refrigerator for 10 minutes before baking. The cold pastry will stay flaky and less likely to collapse under the jam’s weight. It also speeds up the baking process slightly.
The Final Glaze Touch
When glazing, use a small whisk or a fine‑tipped brush to apply the glaze evenly. A swirling motion ensures an even coat and prevents drips. The glaze should be thick enough to cling but thin enough to be silky. This final touch turns ordinary twists into a show‑stopping treat.
Creative Twists and Variations
This recipe is a playground. Here are some of my favorite ways to switch things up:
Chocolate‑Berry Fusion
Swap the jam for a dark chocolate ganache and add a sprinkle of sea salt. The bittersweet chocolate pairs beautifully with the buttery pastry, while the salt adds a surprising pop. Serve warm for a decadent treat.
Citrus Burst
Replace the berry jam with a citrus marmalade, like orange or lemon. The bright acidity cuts through the richness of the pastry, creating a refreshing flavor. A hint of zest on top adds an extra zing.
Nutty Delight
Add chopped toasted almonds or walnuts into the jam before filling. The crunch contrasts with the soft pastry, and the nutty flavor complements the berry sweetness. A drizzle of honey afterward adds a caramel note.
Spiced Berry Twist
Mix a pinch of ground cinnamon or cardamom into the jam for a warm, aromatic twist. The spices elevate the berry flavor and add depth. Pair with a dollop of vanilla yogurt for a complete dessert.
Almond‑Flavored Glaze
Replace powdered sugar glaze with an almond milk glaze sweetened with maple syrup. The nutty flavor of the glaze complements the pastry, and the maple adds a subtle caramel undertone. This version is gluten‑free and vegan.
Savory Variation
Use a savory filling like caramelized onions and goat cheese instead of jam. The pastry still crisps up beautifully, and the savory filling makes for a unique appetizer. A sprinkle of fresh herbs tops the twist for a finishing touch.
Miniature Bite‑Size
Cut the pastry into smaller 2 cm squares and fill with a single teaspoon of jam. Bake until golden and serve as an elegant finger food for parties. The bite‑size format is perfect for a crowd and showcases the pastry’s flaky layers.
Berry‑Mint Fusion
Add a few fresh mint leaves into the jam before filling. The mint’s cool freshness balances the sweet berry, creating a refreshing treat. A drizzle of lime zest enhances the bright flavors.
Chocolate‑Berry Layered
Layer a thin spread of chocolate ganache between two slices of pastry before filling with jam. The resulting twist offers a chocolate‑berry explosion in every bite. The extra chocolate adds richness and depth.
Storing and Bringing It Back to Life
Fridge Storage
Store uncooked twists in an airtight container in the refrigerator for up to 24 hours. Keep them in a single layer to avoid crushing. When ready to bake, let them come to room temperature for 10 minutes before placing them in the oven.
Freezer Friendly
Place uncooked twists on a parchment‑lined tray and freeze until solid. Transfer them to a freezer bag or airtight container for up to 3 months. When baking, add a few extra minutes to the original time to ensure they’re fully cooked.
Best Reheating Method
Reheat in a preheated oven at 180°C (350°F) for 5–7 minutes, or until the pastry is crisp again. If the twists were glazed, add a light dusting of powdered sugar after reheating to restore the shine. Avoid microwaving; the pastry will become soggy.
Quick Refresh
If you’re short on time, toss the twists in a hot skillet over medium heat for 30 seconds on each side. This method revives the crispness quickly and adds a subtle toastiness. Just be careful not to over‑cook.
Add a Splash of Water
Before reheating, lightly spritz the twists with water. The moisture creates steam inside the pastry, helping it regain its airy texture. This trick works particularly well for frozen or refrigerated twists.