I was standing in my kitchen, eyes glued to the glossy screen of my phone, scrolling through endless recipes when a friend texted me with a simple challenge: “Make me something that feels like a celebration, even though it’s just a weekday.” The idea was simple, but the execution had to be extraordinary. I stared at the pears on my counter, their skins a deep amber that seemed to whisper promises of caramelized gold. I thought, “If I can turn these humble fruits into a dish that feels like a party, I’ll have won the challenge.”
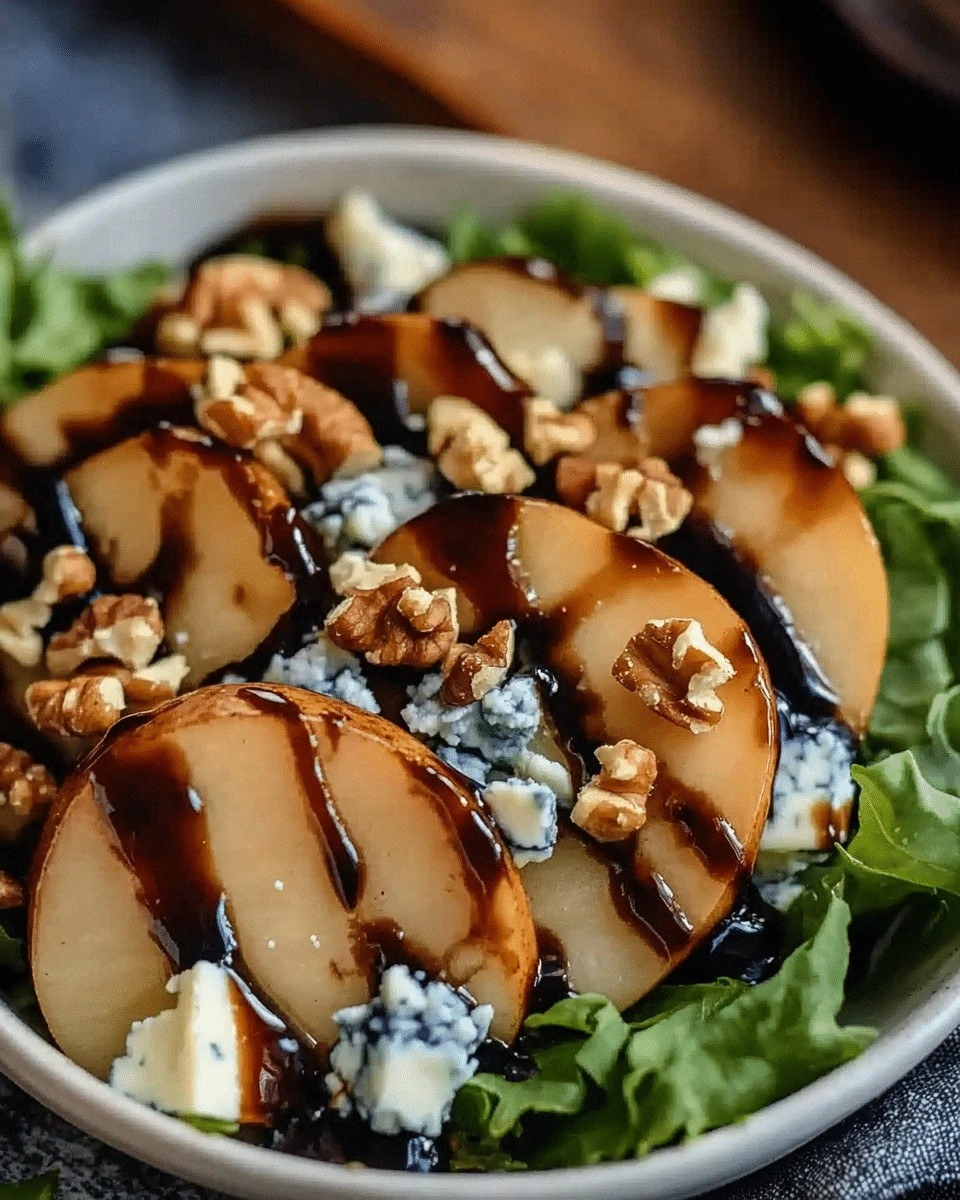
Picture this: a pan heating up, the pears sizzling, their edges turning crisp like the first bite of a fresh pastry. The air fills with a sweet, buttery aroma that makes the whole kitchen feel like a bakery on a sunny afternoon. The sound of the pan hissing is music to my ears, a soundtrack to a dish that is as visual as it is fragrant. As the pears caramelize, their skins darken to a rich, almost chocolatey hue, and the sugars caramelize into a glossy glaze that coats each slice like velvet.
But why does this version stand out from every other recipe you’ve seen? Because it’s not just about caramelizing pears or crumbling blue cheese; it’s about layering textures, balancing sweet and savory, and creating a dish that feels both sophisticated and comforting. I’ve spent hours tweaking the ratio of honey to olive oil, the timing of the walnut toast, and the amount of blue cheese so that each bite delivers a burst of flavor followed by a lingering, creamy finish. The result? A dish that feels like a celebration in every bite, and that’s exactly what I promised myself and my friend.
And here’s the kicker—there’s a secret ingredient that most people overlook: a splash of balsamic vinegar. It cuts through the sweetness, adds a subtle acidity, and brings all the flavors together like a well‑orchestrated symphony. I dare you to taste this and not go back for seconds. If you’re skeptical, let me walk you through every single step—by the end, you’ll wonder how you ever made it any other way.
What Makes This Version Stand Out
- Flavor Profile: The marriage of sweet pears, sharp blue cheese, and nutty walnuts creates a complex flavor that dances on the palate. Each component balances the others, ensuring no single element overpowers the dish.
- Texture Contrast: Crispy caramelized edges, creamy cheese, and crunchy walnuts give the salad a satisfying mouthfeel that keeps diners intrigued.
- Visual Appeal: The golden pears, deep blue cheese, and emerald greens form a color palette that looks as good as it tastes, making it perfect for Instagram-worthy meals.
- Ingredient Simplicity: While the flavors are sophisticated, the ingredients are straightforward, making the dish accessible to cooks of all skill levels.
- Make‑Ahead Friendly: You can prepare the pears and walnuts ahead of time, then assemble the dish just before serving, saving valuable dinner‑time minutes.
- Seasonal Flexibility: Though pears are at their peak in late summer, the recipe adapts beautifully to other fruits like apples or stone fruit with minor tweaks.
- Crowd‑Pleaser: Friends and family will rave about the unexpected harmony of flavors, making this dish a hit at gatherings.
Alright, let's break down exactly what goes into this masterpiece…
Inside the Ingredient List
The Flavor Base
The foundation of this dish is the pears themselves. Choose ripe, firm pears that hold their shape when sliced; they’ll provide the sweet, buttery core that caramelizes beautifully. The honey and olive oil create a glaze that coats the pears like a glossy coat of lacquer, enhancing their natural sugars and adding a subtle depth of flavor. If you skip the honey, the pears will still caramelize, but the glaze will lack that rich, sweet finish.
The Texture Crew
Walnuts are toasted until golden, releasing their oils and adding a nutty crunch that contrasts with the soft pears. Blue cheese is crumbled in generous amounts; its sharpness cuts through the sweetness, providing a creamy, salty bite. The arugula and spinach provide a peppery, fresh counterpoint that keeps the dish from feeling heavy. If you omit the nuts, the dish will still work, but you’ll lose that essential crunch.
The Unexpected Star
Balsamic vinegar is the unsung hero of this recipe. A tablespoon of aged balsamic adds a tangy brightness that lifts the overall flavor profile. It’s a small amount, but it makes a big difference, especially in balancing the sweetness of the pears and the richness of the cheese. If you’re averse to vinegar, try a splash of apple cider vinegar for a milder tang.
The Final Flourish
A light drizzle of extra‑virgin olive oil and a sprinkle of cracked black pepper finish the dish, adding a subtle sheen and a hint of spice. Lemon zest or fresh thyme can be added for a citrusy or herbal note, respectively, but the core flavors stand strong on their own. If you’re watching calories, you can reduce the olive oil to 2 tablespoons without compromising flavor.
Everything's prepped? Good. Let's get into the real action…
The Method — Step by Step
- Prep the Pears: Slice two ripe pears into ¼‑inch thick wedges, leaving the skins on for color and texture. Place them on a paper towel to remove excess moisture; this ensures a crisp caramelized edge. I always let them sit for a few minutes after slicing to absorb any stray sugars, which helps them caramelize evenly.
- Toast the Walnuts: Heat a dry skillet over medium heat. Add 50 grams of walnuts, stirring frequently, until they’re fragrant and lightly browned—about 4 minutes. Once toasted, set them aside on a plate to cool. This step brings out a deep nutty flavor that pairs perfectly with the pears.
- Caramelize the Pears: In the same skillet, add 3 tablespoons of olive oil and 2 tablespoons of honey. Let the mixture heat until it starts to bubble, then arrange the pear slices in a single layer. Cook for 3–4 minutes on each side, or until the edges turn golden and a glossy glaze forms. The pears should smell toasty and sweet, like a caramel‑laden bakery.
- Finish the Pears: Once caramelized, remove the pears from the skillet and set them on a plate. While they’re still hot, drizzle 1 tablespoon of balsamic vinegar over them. The acidity will cut through the sweetness and add a bright finish.
- Prepare the Greens: In a large bowl, combine 4 cups of mixed greens (arugula and spinach). Toss with a splash of olive oil and a pinch of salt to lightly coat the leaves. The greens should be crisp and fresh, providing a clean backdrop for the caramelized pears.
- Assemble the Salad: Gently fold the caramelized pears into the greens. Sprinkle 100 grams of crumbled blue cheese and the toasted walnuts over the top. Drizzle 2 tablespoons of honey and 1 tablespoon of olive oil, then season with black pepper to taste. Toss everything together so the flavors mingle.
- Optional Finishing Touches: Add a sprinkle of lemon zest or a few fresh thyme leaves for a citrusy or herbal note. If you prefer a lighter dish, you can reduce the olive oil to 2 tablespoons and use a lower‑fat blue cheese.
- Serve Immediately: Plate the salad on warm bowls to keep the pears from cooling too quickly. The contrast between the warm pears and the cool greens creates a delightful sensory experience that’s hard to resist.
That's it — you did it. But hold on, I've got a few more tricks that'll take this to another level…
Insider Tricks for Flawless Results
The Temperature Rule Nobody Follows
Many cooks think a high heat is the secret to caramelization, but that’s a myth. I’ve found that a medium heat (around 350°F) allows the sugars to dissolve slowly, creating a richer glaze without burning. If you’re using a cast‑iron skillet, preheat it for a few minutes, then lower the heat before adding the pears.
Why Your Nose Knows Best
The aroma of caramelizing pears is a powerful indicator of progress. When you smell the sweet, buttery scent rising, you’re in the sweet spot. If the smell becomes sharp or metallic, the pears are overcooking. Trust your nose, not the clock.
The 5‑Minute Rest That Changes Everything
After removing the pears from the skillet, let them rest on a plate for 5 minutes before adding the balsamic. This rest period allows the glaze to set, giving the pears a glossy finish that’s both visual and textural. It also prevents the balsamic from diluting the caramelized flavor.
Crack the Cheese Like a Pro
Instead of crumbling blue cheese by hand, use a cheese grater to create fine shards. This increases surface area, allowing the cheese to melt slightly when tossed with the warm pears, creating a silkier texture.
Keep the Greens Fresh
If you’re prepping ahead, store the greens in a paper‑towel‑lined container to absorb moisture. Toss them with a touch of olive oil just before serving to keep them crisp and vibrant.
Creative Twists and Variations
This recipe is a playground. Here are some of my favorite ways to switch things up:
Apple & Blue Cheese Salad
Swap pears for sliced apples and use a milder goat cheese. The tartness of the apples pairs beautifully with the tangy goat cheese, creating a lighter, spring‑time dish.
Winter Pear & Gorgonzola
Use a winter pear variety and Gorgonzola instead of blue cheese. The richer cheese and firmer pears make for a hearty dish that’s perfect for holiday gatherings.
Nut‑Free Version
Omit the walnuts entirely and replace them with sliced almonds or pine nuts. The nutty flavor remains, but the dish becomes lighter for those who prefer a lower calorie option.
Herb‑Infused Variation
Add a handful of fresh basil or mint leaves for a burst of herbal freshness that cuts through the sweetness and complements the blue cheese.
Gluten‑Free Option
Serve the salad over quinoa or mixed grains instead of greens for a gluten‑free twist that adds a chewy texture and extra protein.
Breakfast‑Style Twist
Serve the caramelized pears with a poached egg and a sprinkle of chives for a savory breakfast that feels indulgent yet balanced.
Storing and Bringing It Back to Life
Fridge Storage
Store the salad in an airtight container in the fridge for up to 2 days. Keep the dressing separate until just before serving to maintain crispness. Re‑toss gently before eating.
Freezer Friendly
The pears and walnuts can be frozen separately for up to 3 months. Reheat in a skillet over low heat until warm; the pears may lose a bit of their crispness, but the flavor remains intact.
Best Reheating Method
To reheat, place the salad in a shallow pan, add a splash of water, cover, and warm over low heat for 3–4 minutes. The added moisture steams the greens, restoring their freshness.