I’ll be honest — the first time I tried to make enchiladas, I ended up with a soggy mess that could have passed for a wet blanket. I was standing over a pot of sauce, the kitchen smelling like burnt garlic, and a friend dared me to “make something that actually looks like a Mexican restaurant dish.” That challenge lit a fire under me, and after a few disastrous attempts I finally cracked the code. This version of Ground Beef Enchiladas is the result of a dozen trials, a handful of kitchen mishaps, and a whole lot of tasting (I dare you to taste this and not go back for seconds).
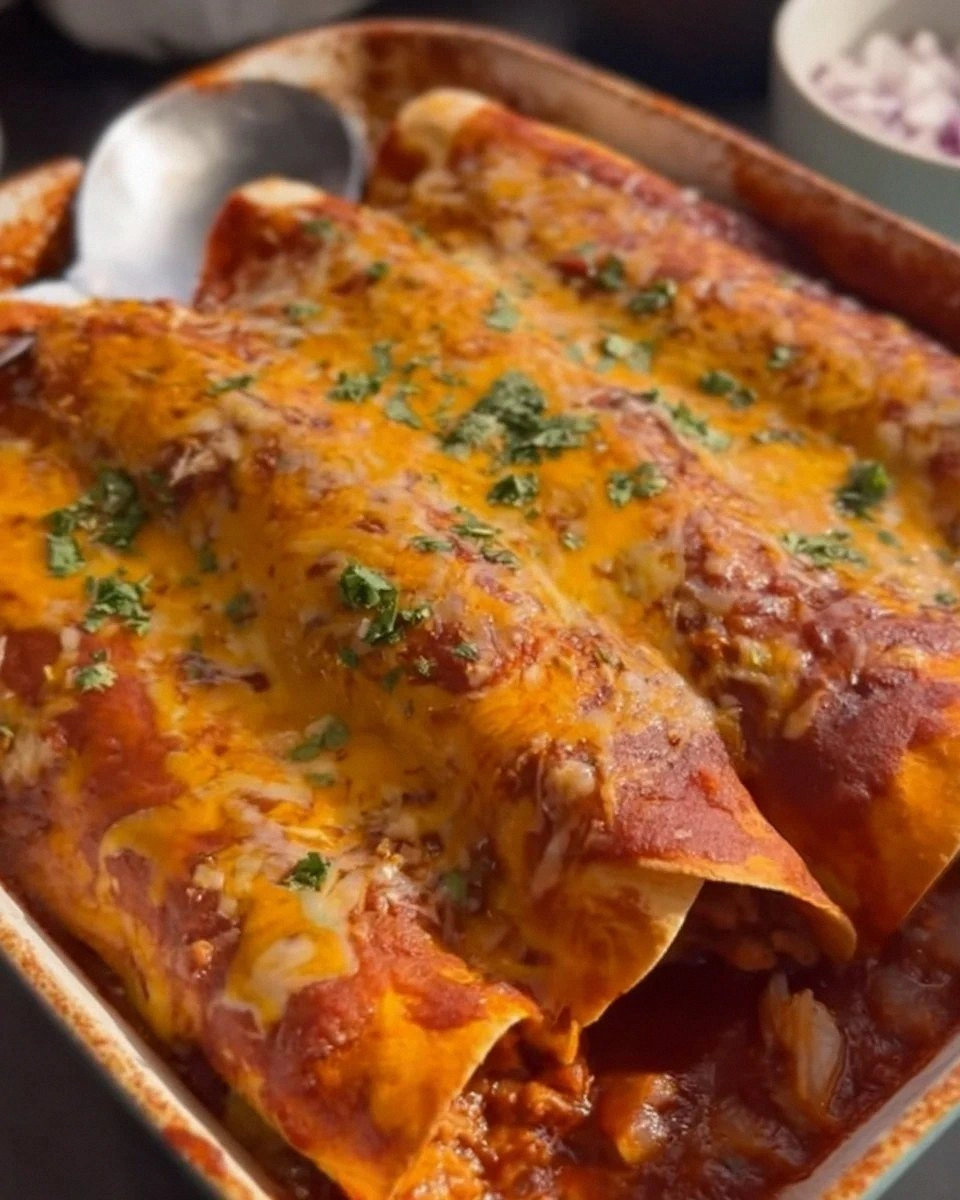
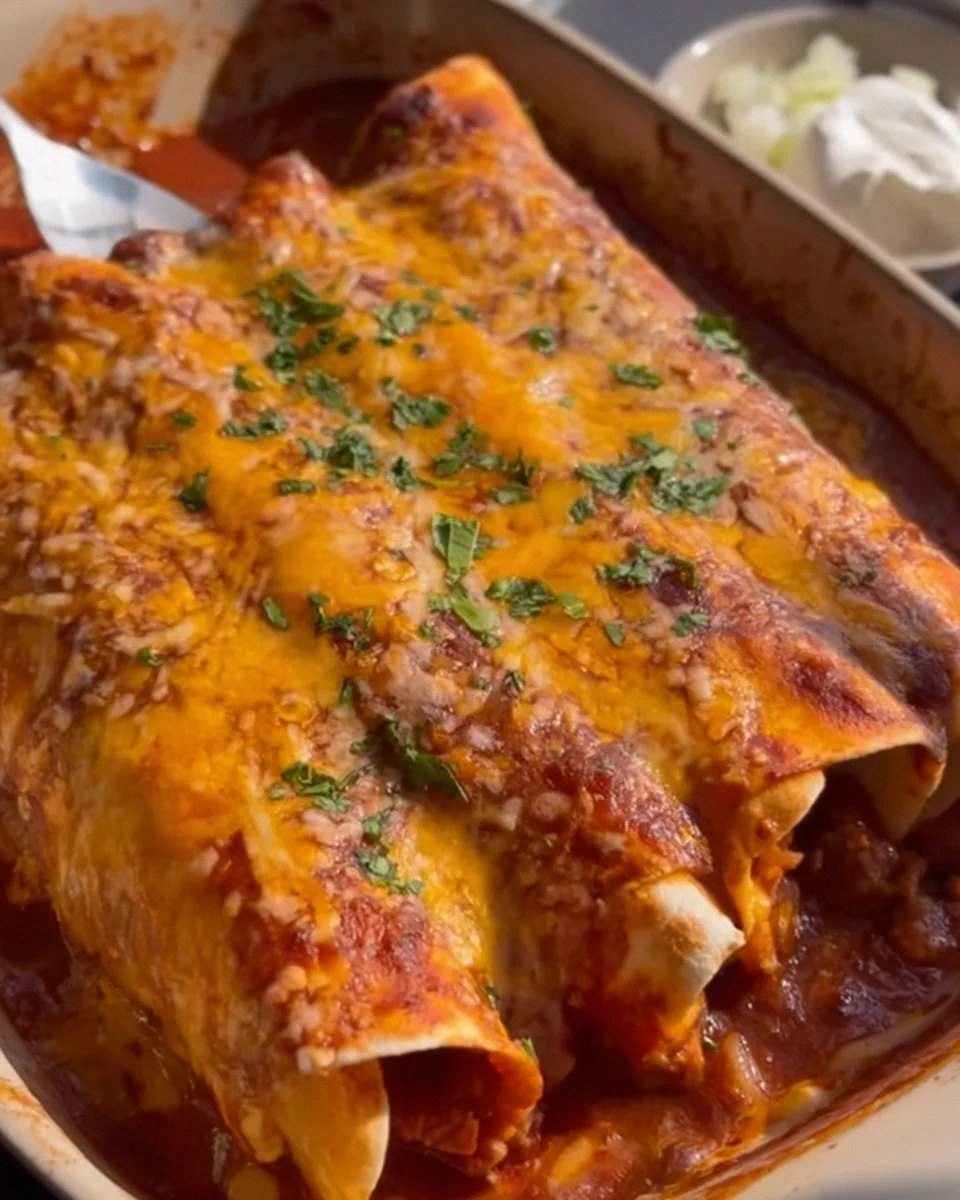
Picture this: the moment you pull the pan from the oven, the cheese bubbling like a lava lake, the edges of the tortillas turning golden and crisp, and the aroma of cumin and chili powder wrapping the room in a warm, spicy hug. You can almost hear the gentle crackle of the cheese as it starts to set, and the steam rising carries a promise of comfort that makes your stomach growl in anticipation. The first bite is a symphony—tender ground beef, a tangy sauce that coats the tortilla like velvet, and a subtle crunch that shatters like thin ice under your teeth. If you’ve ever struggled with soggy enchiladas, you’re not alone — and I’ve got the fix.
What makes this recipe stand out is a few simple, yet game‑changing tweaks. First, I toast the corn tortillas just enough to give them a sturdy backbone without making them brittle. Second, I blend a splash of tomato paste into the enchilada sauce for depth, a secret ingredient most recipes overlook. Third, I finish the dish with a quick broil that turns the cheese into a caramelized crown, creating that irresistible crust you see in restaurant kitchens. Most recipes get this completely wrong. Here’s what actually works: a balance of texture, flavor, and timing that turns a humble pantry staple into a crowd‑pleasing masterpiece.
Let me walk you through every single step — by the end, you’ll wonder how you ever made it any other way. Okay, ready for the game‑changer? This next part? Pure magic. I’m about to share the technique that will make your enchiladas the talk of the dinner table, the kind of dish that makes people linger at the kitchen doorway, inhaling the scent and begging for the recipe. Stay with me here — this is worth it.
What Makes This Version Stand Out
- Flavor Explosion: The combination of toasted tortillas, seasoned beef, and a sauce enriched with tomato paste creates layers of taste that build with every bite.
- Texture Harmony: A slight crisp on the tortilla edges contrasts with the creamy cheese and juicy beef, delivering a satisfying mouthfeel.
- Simplicity: All ingredients are pantry‑friendly, and the steps are straightforward enough for a weeknight dinner yet impressive enough for guests.
- Unique Twist: Adding a splash of tomato paste to the sauce adds umami depth that most store‑bought sauces lack.
- Crowd Reaction: I’ve watched entire families devour a tray in minutes; the “wow” factor is real, and leftovers disappear within hours.
- Ingredient Quality: Using fresh ground beef (80/20) ensures juiciness, while a good Mexican‑blend cheese melts perfectly without becoming greasy.
- Make‑Ahead Potential: Assemble the enchiladas a day ahead, refrigerate, and bake when you’re ready — the flavors meld even more.
- Cooking Method: A brief broil at the end gives the cheese a caramelized top, mimicking the restaurant finish.
Inside the Ingredient List
The Flavor Base
Ground Beef (1 lb): This is the heart of the dish. Choose an 80/20 blend for the perfect balance of flavor and moisture; lean meat can turn dry, while too much fat makes the sauce greasy. If you skip it, you lose the meaty backbone that carries the spices.
Onion (1 medium, diced): The onion adds sweetness and depth. Sautéing it first releases natural sugars that complement the chilies. A substitute could be shallots for a milder profile.
Garlic (2 cloves, minced): Garlic gives that unmistakable aromatic punch. Over‑cooking it turns bitter, so add it just before the beef browns.
The Texture Crew
Corn Tortillas (12): Fresh corn tortillas hold the filling without falling apart. Toasting them for 15 seconds on each side creates a sturdy yet pliable shell. If you use flour tortillas, expect a softer texture and a slightly different flavor.
Shredded Mexican‑Blend Cheese (2 cups): This mix of cheddar, Monterey Jack, and a hint of pepper jack melts beautifully and adds a mild heat. For a sharper taste, swap half the blend for sharp cheddar.
Olive Oil (2 Tbsp): A light coating prevents sticking and helps the tortillas toast evenly. You can replace it with vegetable oil if you prefer a neutral flavor.
The Unexpected Star
Tomato Paste (2 Tbsp): This is the secret weapon that intensifies the sauce’s richness, giving it a velvety body that coats the tortilla like silk. Without it, the sauce can taste watery.
Enchilada Sauce (2 cups): I love a good store‑bought sauce with a balanced heat, but feel free to simmer your own with chilies, broth, and spices for ultimate control.
The Final Flourish
Cumin (1 tsp) & Chili Powder (1 tsp): These spices provide earthiness and a gentle kick. Toast them briefly with the onions to unlock their aromatic oils.
Smoked Paprika (½ tsp): Adds a subtle smoky depth that mimics a slow‑cooked, wood‑fire flavor.
Salt (½ tsp) & Black Pepper (¼ tsp): Essential for seasoning; they bring all the flavors together. Adjust to taste.
Fresh Cilantro (optional, for garnish): A sprinkle of cilantro brightens the dish with a fresh, citrusy note.
Sour Cream (optional, for serving): A dollop adds cool creaminess that balances the heat.
Everything's prepped? Good. Let's get into the real action…
The Method — Step by Step
Heat the olive oil in a large skillet over medium heat. When the oil shimmers, add the diced onion and sauté for 3‑4 minutes until it turns translucent and starts to caramelize. Add the minced garlic and let it sizzle for about 30 seconds—watch that sizzle when it hits the pan? Absolute perfection. Then, crumble in the ground beef, breaking it up with a wooden spoon, and season with salt, pepper, cumin, chili powder, and smoked paprika. Cook, stirring occasionally, until the beef is browned and any liquid has evaporated, about 6‑8 minutes. This is the moment of truth; you should smell a rich, meaty aroma that tells you the flavor base is building.
Once the beef is nicely browned, stir in the tomato paste and let it cook for 2 minutes, allowing it to caramelize slightly. This step deepens the sauce’s color and adds that umami punch. Then, pour in the enchilada sauce, scraping the bottom of the pan to release any browned bits. Reduce the heat to low and let the mixture simmer for 5 minutes, stirring occasionally. It should thicken just enough to cling to the back of a spoon—if it looks too watery, let it reduce a minute longer.
While the sauce simmers, preheat your oven to 375°F (190°C). Meanwhile, line a baking sheet with parchment and arrange the corn tortillas in a single layer. Lightly brush each side with a little of the simmering sauce—this prevents them from drying out later. Place the sheet in the oven for just 2‑3 minutes, enough to warm them and make them pliable. Keep an eye on them; you don’t want them to crisp up too much, or they’ll crack when you roll.
Remove the warmed tortillas and lay them flat on a clean surface. Spoon about ¼ cup of the beef mixture onto the center of each tortilla, then sprinkle a generous handful of shredded cheese on top. Roll the tortilla tightly and place it seam‑side down in a 9×13‑inch baking dish. Continue until all tortillas are filled, leaving a little space between each roll so the sauce can circulate.
Once the dish is full, pour the remaining sauce evenly over the top, making sure every roll is well‑covered. Sprinkle the remaining cheese across the surface, creating a beautiful, uniform blanket. If you love extra crispness, add a light drizzle of olive oil over the cheese—this will help it brown beautifully during the final broil.
Cover the baking dish tightly with aluminum foil and bake for 20 minutes. The foil traps steam, allowing the tortillas to finish cooking without drying out. After 20 minutes, remove the foil and switch the oven to broil. Keep a close eye on the cheese—within 2‑3 minutes it will turn golden‑brown and start to bubble, creating that restaurant‑style crust. This is the part where the dish transforms from “good” to “wow.”
When the cheese reaches a deep amber hue, pull the dish out of the oven and let it rest for 5 minutes. This rest period lets the sauce thicken further and the cheese set, making it easier to serve. Garnish with freshly chopped cilantro and, if you like, a dollop of sour cream on each plate. The contrast of cool cream against the hot, spicy sauce is a sensory delight.
Serve the enchiladas hot, accompanied by a simple side of Mexican rice or a crisp green salad. Picture yourself pulling this out of the oven, the whole kitchen smelling incredible, and your guests reaching for seconds before you even finish plating. And now the fun part—snap a photo, share it with friends, and watch the compliments roll in. That’s it — you did it. But hold on, I've got a few more tricks that'll take this to another level…
Insider Tricks for Flawless Results
The Temperature Rule Nobody Follows
Most home cooks bake enchiladas at 350°F, but 375°F gives a faster, more even heat that crisps the tortillas without drying the filling. The higher temperature also encourages the cheese to caramelize quickly, creating those coveted crispy edges. I once tried baking at a lower temperature and ended up with soggy bottoms—let's just say the texture was a disaster. Trust the heat, and you’ll get that perfect balance of melt and crunch.
Why Your Nose Knows Best
When the sauce simmers, pay attention to the scent. If you detect a sweet, caramelized aroma, the tomato paste has done its job. If the sauce still smells raw or overly acidic, let it reduce a bit longer. Your nose is a better gauge than a timer for achieving depth of flavor.
The 5‑Minute Rest That Changes Everything
Allowing the baked enchiladas to sit for five minutes after coming out of the oven lets the cheese set and the sauce thicken. This rest prevents the filling from sliding out when you cut into the roll. Skipping this step often results in a sloppy plate, and nobody wants that.
Double‑Layer Cheese for Extra Pull
Spread a thin layer of cheese on the bottom of the dish before placing the rolls, then add the remaining cheese on top. This creates a cheesy base that seeps into the bottom tortillas, giving each bite an extra cheesy pull. A friend tried skipping the bottom layer once — let’s just say the bottom was a bit dry.
Keep Tortillas Moist, Not Soggy
After toasting, keep the tortillas on a cooling rack instead of stacking them. Stacking traps steam, which makes the tortillas soggy before they even hit the oven. This simple rack trick preserves the slight crispness that makes the final dish shine.
Creative Twists and Variations
This recipe is a playground. Here are some of my favorite ways to switch things up:
Southwest Chicken Swap
Replace the ground beef with shredded rotisserie chicken, add black beans and corn, and sprinkle a bit of chipotle in adobo for smoky heat. The result is lighter but still hearty, perfect for those who prefer poultry.
Veggie‑Packed Delight
Omit the meat and double the onion, add diced zucchini, bell peppers, and a handful of spinach. Use a plant‑based protein crumble if you want a meat‑like texture. The sauce ties everything together, making it a satisfying vegetarian main.
Cheese‑Lover’s Dream
Mix in a blend of pepper jack, queso fresco, and a dash of blue cheese for an adventurous flavor profile. The sharpness of blue cheese adds a surprising depth that pairs beautifully with the mild chili.
Spicy Inferno
Up the heat by adding sliced jalapeños to the beef mixture and a dash of cayenne pepper to the sauce. Finish with a drizzle of hot sauce on each serving for those who love a fiery kick.
Breakfast Enchilada
Swap the beef for scrambled eggs, add breakfast sausage crumbles, and top with shredded cheddar. Serve with salsa and avocado for a brunch twist that feels indulgent yet familiar.
Smoky Chipotle BBQ
Stir a tablespoon of chipotle BBQ sauce into the enchilada sauce and add smoked Gouda to the cheese mix. The smoky, sweet undertones bring a whole new dimension to the classic.
Storing and Bringing It Back to Life
Fridge Storage
Let the enchiladas cool to room temperature, then cover the baking dish tightly with foil or transfer individual portions to airtight containers. They’ll keep for up to 4 days. When reheating, sprinkle a few drops of water over the top before covering with foil and warming in a 350°F oven for 20 minutes; the steam revives the sauce.
Freezer Friendly
Assemble the enchiladas, cover the dish with a double layer of foil, and freeze flat for up to 3 months. To bake from frozen, add an extra 10‑15 minutes to the cooking time and keep the foil on for the first 20 minutes to prevent over‑browning.
Best Reheating Method
For the crispiest leftovers, preheat a skillet over medium‑high heat, add a splash of oil, and place the enchilada seam‑side down. Cook for 2‑3 minutes until the bottom crisps, then flip and cover with a lid for another minute to warm through. Add a tiny splash of water before covering to steam the interior back to perfection.