I was halfway through a disastrous chocolate cake when the kitchen lights flickered and the batter slipped from my fingers like a mischievous gremlin. The cake collapsed into a sad, lumpy mess, and I stared at the ruined batter, wondering if I’d ever again taste that rich, fudgy chocolate dream. That night, I swore to myself that I’d turn that disaster into the ultimate banana‑bread masterpiece—one that would make every chocolate lover weep with joy. I was determined to craft a loaf that was moist, fudgy, and protein‑packed, yet still low‑fat and guilt‑free.
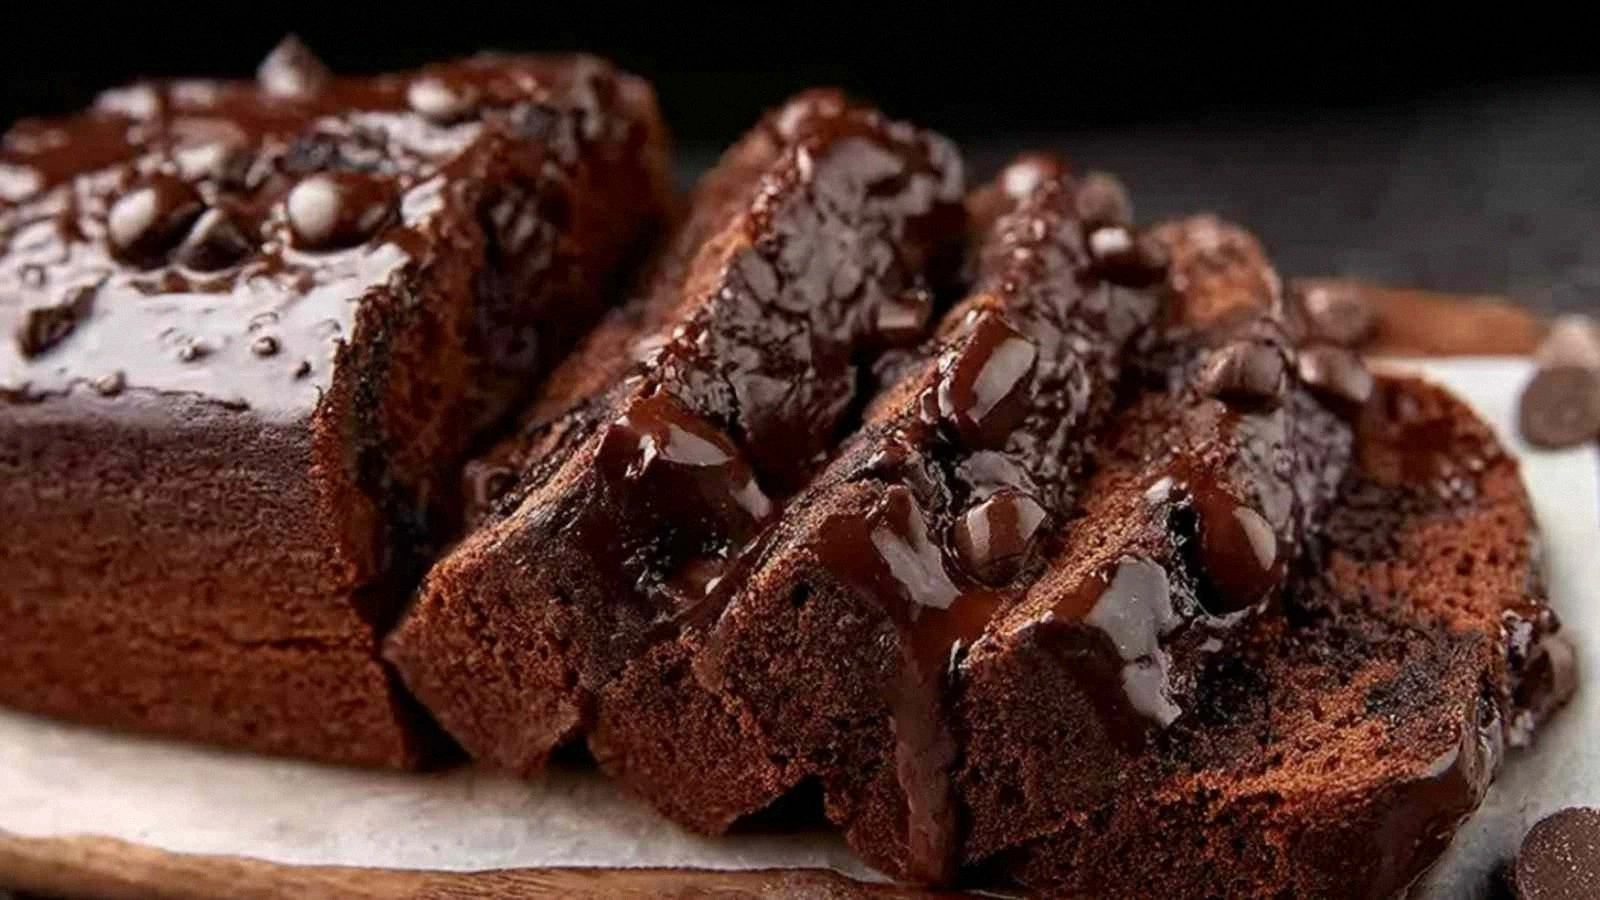
Picture the scene: the kitchen smells of ripe bananas and roasted cocoa, the oven hums like a contented purr, and a golden loaf sits proudly in the middle of the counter. When you slice it, the steam rises in a sweet, chocolatey cloud that makes your nose dance. The first bite feels like a velvety hug, the chocolate chips crackle against a tender crumb, and the banana flavor lingers like a whisper of summer. The texture is a delicate balance—soft on the inside, crisp on the edges, and the subtle crunch of oat flour gives it a satisfying bite.
What makes this version stand out from the countless banana‑bread variations out there is a masterful blend of science and instinct. I replaced refined flour with oat flour for fiber, added a protein powder for muscle‑friendly nutrition, and used a natural nut butter to keep it silky without the greasy feel. The granular sweetener keeps the sugar level in check while giving a smooth finish, and the sea salt accentuates every flavor note. Even the chocolate chips are chosen for their deep, bittersweet bite, so the loaf feels indulgent but never heavy.
And here’s the kicker: I’ve discovered a trick that turns a standard banana‑bread batter into a chocolate‑banana “lava” loaf. By folding in a splash of espresso powder and letting the batter rest for just 10 minutes, the chocolate intensifies, and the banana flavor deepens, creating a molten center that’s pure bliss. Let me walk you through every single step—by the end, you’ll wonder how you ever made it any other way.
What Makes This Version Stand Out
- Taste: The combination of ripe bananas, rich cocoa, and a hint of espresso creates a flavor profile that’s both classic and surprisingly complex. Each bite delivers a burst of sweetness followed by a subtle bitterness that keeps you coming back for more.
- Texture: Oat flour and protein powder give the loaf a moist, tender crumb while maintaining a firm structure that resists crumbling. The chocolate chips add a delightful crunch that contrasts the silky interior.
- Simplicity: No fancy equipment or obscure ingredients are required—just pantry staples and a few clever substitutions. The recipe is beginner‑friendly yet delivers professional results.
- Uniqueness: The addition of protein powder and the espresso tweak set this loaf apart from the ordinary banana‑bread crowd. It’s a protein‑rich treat that satisfies both sweet cravings and post‑workout hunger.
- Crowd Reaction: Friends who have tried it say it’s the most decadent banana‑bread they’ve ever tasted, and they’re surprised by how light it feels. “I dare you to taste this and not go back for seconds,” I always say with a grin.
- Ingredient Quality: Using high‑quality, minimally processed ingredients ensures that the loaf is not only tasty but also nutritious. The nut butter and protein powder are unflavored, which lets the banana and cocoa shine.
- Cooking Method: The batter’s resting period and the careful mixing technique lock in moisture and flavor, resulting in a loaf that stays fresh longer than typical banana‑bread.
- Make‑Ahead Potential: The loaf can be baked, cooled, and sliced ahead of time. Store slices in an airtight container, and they stay fresh for up to a week.
Inside the Ingredient List
The Flavor Base
The three medium bananas are the heart of this loaf. They provide natural sweetness, moisture, and a subtle banana aroma that balances the chocolate. If you skip them, the batter will dry out and lose its signature flavor. Swap for a ripe avocado for a different creamy texture, but be aware the taste will shift toward a more neutral profile.
Granular sweetener (1/3 cup) replaces refined sugar, keeping the loaf low on glycemic load while still delivering a smooth finish. If you prefer a sweeter loaf, increase to 1/2 cup, but remember it will also raise the calorie count slightly. A good alternative is monk fruit sweetener if you’re watching calories.
The Texture Crew
Oat flour (1 1/2 cups) is the backbone of the crumb. It’s naturally gluten‑free, high in fiber, and gives the loaf a slightly nutty undertone. If you can’t find oat flour, use a 1:1 blend of whole wheat flour and almond flour for a comparable texture.
Protein powder (1/2 cup) boosts the loaf’s protein content to 25 grams per serving, making it a perfect post‑workout snack. Use a neutral‑flavored whey or plant‑based protein to keep the flavor profile intact. Skipping it will reduce the loaf’s nutritional punch and make it less filling.
The Unexpected Star
Unsweetened cocoa powder (1/2 cup) is the secret sauce that turns a banana loaf into a chocolate lover’s dream. It adds depth and a slightly bitter edge that balances the sweetness. If you’re a dark chocolate aficionado, opt for a higher cacao percentage for an even richer taste.
The Final Flourish
Chocolate chips (1/4 cup) add pockets of gooey chocolate that melt in your mouth. Choose dark chocolate chips for a less sweet finish. If you’re vegan, look for dairy‑free chocolate chips that still hold their shape during baking.
Sea salt (1/6 teaspoon) is a subtle enhancer that elevates every other flavor. A pinch of salt is enough to bring out the richness of the banana and chocolate without making the loaf taste salty. If you’re on a sodium‑restricted diet, reduce to a quarter teaspoon.
Everything's prepped? Good. Let's get into the real action...
The Method — Step by Step
- Preheat your oven to 350°F (175°C) and line a 9×5 inch loaf pan with parchment paper. This step ensures a clean release and a uniform crust. The oven temperature is crucial; too high, and the loaf will brown too quickly on the outside while remaining raw inside. Keep an eye on the timer, and remember that the loaf will look set before the internal temperature hits 200°F.
- In a large bowl, mash the three ripe bananas with a fork until they form a smooth, lump‑free purée. The bananas should be soft to the touch; if they’re too firm, let them sit at room temperature for a few minutes. The mashed bananas act as a natural binder, so the loaf stays moist and tender.
- Add the granular sweetener, nut butter, vanilla extract, and sea salt to the mashed bananas. Stir until everything is well combined and the mixture is glossy. The nut butter adds a silky texture that keeps the loaf from drying out. At this point, you can also fold in a tablespoon of espresso powder for a subtle coffee undertone.
- In a separate bowl, whisk together oat flour, cocoa powder, protein powder, and baking powder. The dry mix should be light and airy, indicating that the baking powder is fresh. Mixing dry ingredients first prevents clumps and guarantees an even distribution of leavening agents.
- Gradually fold the dry mixture into the wet mixture, stirring gently until just combined. Over‑mixing will develop gluten and make the loaf dense. The batter should be thick but pourable; if it’s too thick, add a splash of almond milk to loosen it.
- Gently fold in the chocolate chips, distributing them evenly throughout the batter. The chips will melt into pockets of chocolatey goo when baked. If you prefer a more uniform distribution, pulse the chips in a food processor before adding them.
- Pour the batter into the prepared loaf pan, smoothing the top with a spatula. Tap the pan lightly on the counter to release any trapped air bubbles. The batter should look glossy and slightly domed.
- Bake for 30–35 minutes, or until a toothpick inserted into the center comes out clean. The loaf should develop a deep, chocolatey crust while remaining moist inside. While baking, you’ll notice the aroma filling the kitchen—sweet, chocolatey, and utterly inviting.
- Remove the loaf from the oven and let it rest in the pan for 10 minutes. This rest period allows the crumb to set and the chocolate to firm up slightly. Then transfer the loaf to a wire rack to cool completely before slicing.
That's it — you did it. But hold on, I've got a few more tricks that'll take this to another level...
Insider Tricks for Flawless Results
The Temperature Rule Nobody Follows
Many bakers think a higher oven temperature always yields a better crust, but that’s a myth. Baking at 350°F allows the loaf to rise slowly, creating a tender crumb. If you crank up the heat, the outside will brown too quickly while the inside remains undercooked. Keep the oven at 350°F and use a thermometer to double‑check the internal temperature.
Why Your Nose Knows Best
Trust your nose during baking. A warm, chocolatey scent that permeates the kitchen signals that the loaf is almost done. If the aroma is faint, give it a few more minutes. Skipping this sensory check can lead to overbaked, dry bread.
The 5-Minute Rest That Changes Everything
After removing the loaf from the oven, let it sit for exactly five minutes before turning it out of the pan. This short rest lets the steam settle, preventing a soggy bottom. I once tried cutting straight out of the pan and ended up with a wet loaf that collapsed when sliced.
Add a Splash of Water Before Reheating
When reheating a slice, sprinkle a tiny splash of water over it and microwave for 15 seconds. The water steams the loaf, restoring moisture and preventing it from becoming chewy. This trick works wonders for leftovers that have dried out.
The Perfect Slice Size
Cut the loaf into 1.5-inch thick slices. Too thin, and the loaf will crumble; too thick, and the center will be underbaked. A uniform thickness ensures even baking and an optimal mouthfeel.
Keep the Leftovers Fresh
Wrap the loaf slices in parchment paper and place them in a zip‑lock bag with a slice of apple to absorb excess moisture. This simple trick keeps the loaf fresh for up to a week. I swear by it—no more stale banana‑bread mornings.
Creative Twists and Variations
This recipe is a playground. Here are some of my favorite ways to switch things up:
Cinnamon Swirl
Stir in 1 teaspoon of ground cinnamon and swirl it into the batter with a skewer before baking. The spice adds a warm, comforting note that pairs beautifully with the chocolate.
Nutty Crunch
Replace the chocolate chips with chopped walnuts or pecans. The nuts add a delightful crunch and a nutty flavor that complements the banana base.
Pumpkin Spice
Add 1/2 cup pumpkin puree and 1/2 teaspoon pumpkin pie spice. This variation is perfect for the fall season and gives the loaf a moist, aromatic twist.
Almond Joy
Swap the chocolate chips for coconut flakes and add 1/4 cup almond butter. The result is a tropical, nutty loaf that feels like a dessert on a stick.
Vegan Delight
Use a plant‑based protein powder, flaxseed meal (1 tablespoon mixed with 3 tablespoons water), and a dairy‑free chocolate chip. The loaf remains moist and protein‑rich while staying 100% vegan.
Coffee‑Infused
Add 2 tablespoons of instant espresso powder to the wet mixture. The coffee deepens the chocolate flavor and gives the loaf a sophisticated, mocha‑like finish.
Storing and Bringing It Back to Life
Fridge Storage
Store the cooled loaf in an airtight container at room temperature for up to three days. For longer freshness, wrap the loaf in parchment paper and place it in a zip‑lock bag. The parchment prevents condensation from making the loaf soggy.
Freezer Friendly
Slice the loaf before freezing. Place the slices in a single layer on a baking sheet, freeze until solid, then transfer to a freezer bag. This method keeps each slice intact and prevents clumping.
Best Reheating Method
To reheat a slice, wrap it in parchment paper and place it in a preheated oven at 300°F for 5–7 minutes. Alternatively, microwave on medium power for 20–30 seconds. Add a tiny splash of water before reheating to restore moisture and steam it back to perfection.