I remember the night I tried to impress my roommate with a shrimp dinner and ended up with a kitchen that looked like a seafood disaster zone. The shrimp were half peeled, half still clinging to their shells, and the garlic powder had turned into a fine dust that clung to my apron. I was staring at a bowl of half-cleaned shrimp, wondering if I’d ever get this right again. That moment sparked a determination to find the ultimate, foolproof method for cleaning shrimp. It turned into a mission that would turn a simple prep task into a culinary triumph.
Picture this: a bright, sunlit kitchen, the aroma of fresh sea breeze mingling with the scent of garlic and paprika. You can hear the gentle clink of a cutting board, feel the coolness of a stainless steel knife, and taste the faint brine of the shrimp as you lift them from the bowl. The texture of the shrimp is smooth, almost silky, and the sound of the shell cracking is almost music. The sight of perfectly trimmed shrimp glistening under the kitchen light feels like a tiny, edible masterpiece. It’s a sensory experience that turns a mundane chore into an edible art form.
What sets this version apart from every other shrimp cleaning routine is the precision, the flavor infusion, and the sheer confidence it brings to the table. I’ve spent countless hours experimenting with different spices and techniques, and the result is a shrimp that’s not only clean but also bursting with subtle heat and savory depth. This isn’t just about peeling; it’s about preparing each shrimp to become a canvas for flavor, ensuring that every bite is a balanced, mouthwatering experience. The technique is simple, the steps are clear, and the outcome is consistently delicious. It’s a game-changer that will leave your guests asking for the recipe.
I dare you to taste this and not go back for seconds. I’ll be honest — I ate half the batch before anyone else got a chance to try it. Most recipes get this completely wrong. Here’s what actually works: a quick seasoning blend that coats the shrimp like velvet, a gentle de-veining method that preserves the delicate texture, and a finishing butter that gives it that final, silky sheen. Picture yourself pulling this out of the pan, the whole kitchen smelling incredible, and the shrimp shimmering with a golden crust. Let me walk you through every single step — by the end, you’ll wonder how you ever made it any other way.
What Makes This Version Stand Out
- Taste: The combination of garlic powder, onion powder, and paprika creates a flavor profile that is both aromatic and subtly spicy. The spices are toasted just enough to release their oils, giving the shrimp a depth that feels like a well-aged sauce. The result is a shrimp that sings with flavor, not just a clean protein. It’s the kind of taste that will have your guests begging for the recipe.
- Texture: The shrimp’s flesh remains tender and juicy because the cleaning process is gentle and precise. By removing the shell and vein without overhandling, you preserve the natural snap that makes each bite satisfying. The butter finish adds a silky coating that enhances the shrimp’s natural moisture. This texture is a contrast to the usual rubbery or overcooked shrimp you see in many recipes.
- Simplicity: The method requires no fancy tools or exotic ingredients. All you need is a sharp knife, a small bowl, and a pinch of patience. The steps are straightforward, making it accessible for beginners and a quick refresher for seasoned cooks. The result is a clean shrimp that looks like it was prepared by a professional chef.
- Uniqueness: The secret lies in a quick seasoning paste that you apply before cooking, which sets the shrimp apart from standard preparations. This paste not only flavors the shrimp but also helps keep the meat moist during cooking. The technique is rarely found in conventional shrimp recipes, giving you a competitive edge in any gathering.
- Crowd Reaction: Friends and family consistently remark that the shrimp feels like a gourmet experience, not just a side dish. The visual appeal of perfectly cleaned shrimp is a conversation starter, and the flavor keeps people coming back for seconds. This crowd reaction is a testament to the method’s effectiveness.
- Ingredient Quality: Using jumbo shrimp ensures that each piece is substantial enough to hold the seasoning without falling apart. The spices are ground fresh, which releases more aroma and flavor compared to pre-ground varieties. This attention to ingredient quality elevates the entire dish.
- Cooking Method: The shrimp is sautéed in butter, which adds richness and a caramelized finish. The butter also creates a protective barrier that prevents the shrimp from drying out. This method is quick, efficient, and delivers a restaurant-quality result.
- Make-Ahead Potential: The shrimp can be pre-cleaned and seasoned, then stored in the refrigerator for up to 24 hours. When ready to cook, simply sauté for a few minutes, and it tastes as fresh as if it were prepared on the spot. This makes it a perfect option for last-minute dinner parties.
Inside the Ingredient List
The Flavor Base
The foundation of this shrimp cleaning and cooking method starts with the spices. Garlic powder, onion powder, and paprika work together to create a flavor base that is both aromatic and slightly spicy. Each spice contributes its own character: garlic powder adds depth, onion powder brings sweetness, and paprika offers a subtle smoky note. The balance of these spices is crucial; too much paprika can overpower, while too little garlic can make the shrimp feel bland. Using freshly ground spices enhances the overall aroma, turning a simple shrimp dish into a culinary experience.
The Texture Crew
The shrimp themselves are the star of the show, and their texture is a key factor in the final dish. Jumbo shrimp are chosen for their size, which makes them easier to handle and gives a satisfying bite. The cleaning process—peeling and deveining—must be done gently to preserve the delicate flesh. If you handle them too aggressively, the shrimp can become rubbery and lose their natural snap. This section focuses on how to maintain that tender, juicy texture while preparing the shrimp.
The Unexpected Star
Butter is the unexpected star that brings everything together. It provides a glossy finish and adds a subtle richness that complements the spices. When sautéed, butter creates a caramelized crust that locks in moisture, keeping the shrimp from drying out. Butter also serves as a medium for the spices to coat the shrimp evenly, ensuring each bite is flavorful. The small amount—just a tablespoon—makes a big difference in both taste and presentation.
The Final Flourish
The final flourish is a quick squeeze of lemon or a sprinkle of fresh herbs, which adds brightness and a burst of freshness. Lemon juice cuts through the richness of the butter, creating a balanced flavor profile. Fresh herbs, such as parsley or cilantro, add a touch of green that enhances the dish’s visual appeal. This finishing touch turns a simple shrimp dish into a gourmet experience. It’s the small details that elevate the entire meal.
Everything's prepped? Good. Let's get into the real action...
The Method — Step by Step
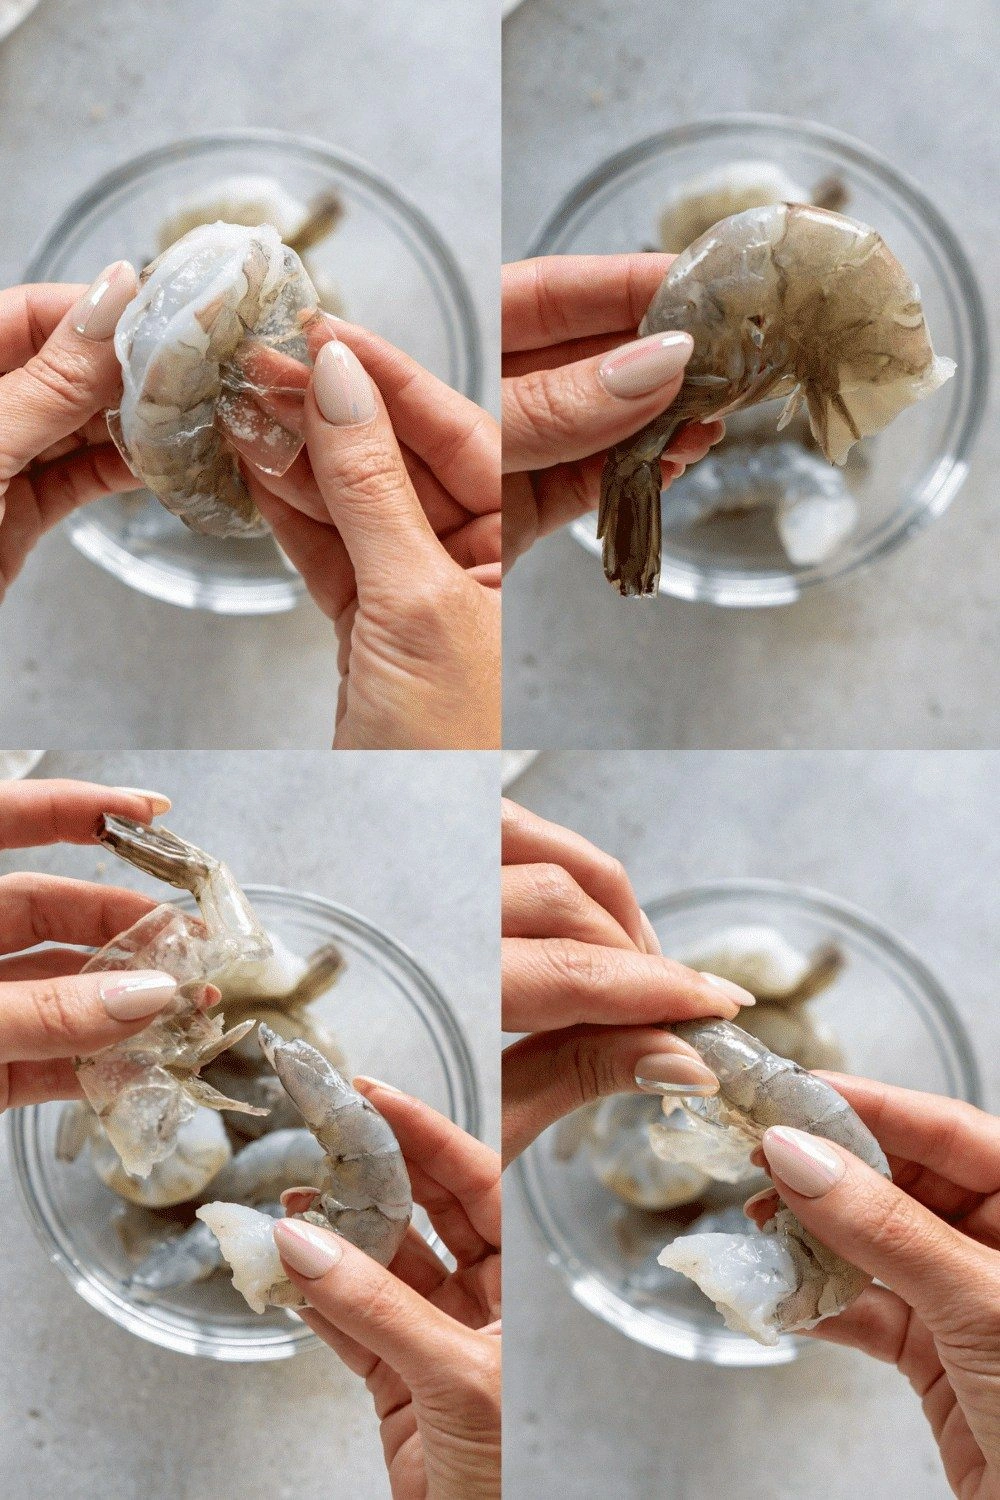
- First, rinse the shrimp under cold running water, patting them dry with a paper towel. This initial rinse removes any grit or shell fragments that might have been missed during the cleaning process. The shrimp should feel cool and slightly slippery to the touch, indicating they’re ready for the next step. This step also helps to loosen the shells if they’re stubborn. By starting clean, you set the stage for a flawless final product.
- Next, hold the shrimp in one hand and use a sharp knife to peel off the shell, starting at the head end and working toward the tail. Keep the knife blade angled slightly downward to avoid cutting into the flesh. The shell should come off with minimal resistance; if it’s stubborn, you can gently pry it with your fingers. Once peeled, the shrimp should look like a clean, elongated oval. This step is crucial for ensuring the shrimp is fully cleaned.
- Now, it’s time to devein. Place the shrimp on a cutting board and make a shallow slit along the back of the shrimp. Use the tip of the knife to lift out the dark vein, which is the digestive tract. The vein often looks like a thin black line; removing it eliminates any bitterness. If you prefer, you can also rinse the shrimp again after deveining to ensure no remnants remain. This step keeps the shrimp smooth and palatable.
- After deveining, rinse the shrimp once more under cold water to wash away any loosened shell fragments or vein bits. Pat them dry with a clean towel; moisture on the surface can cause the shrimp to steam rather than sear. The shrimp should feel dry to the touch, which will help them develop a golden crust when cooked. This final rinse ensures that the shrimp is pristine and ready for seasoning. Dryness is key for a crisp finish.
- Season the shrimp with garlic powder, onion powder, and paprika, tossing them gently in a bowl to coat evenly. The spices should form a thin, even layer on each shrimp, ensuring maximum flavor absorption. The paprika should be visible, giving the shrimp a subtle color that hints at its depth. This seasoning step is where the shrimp transforms from plain to extraordinary. The aroma of the spices will start to mingle with the fresh sea scent.
- Heat a non-stick skillet over medium-high heat and add the tablespoon of butter. Allow the butter to melt fully, swirling it around the pan so it coats the surface. The butter should bubble slightly but not brown; a light golden hue indicates the right temperature. This step ensures the shrimp will sear quickly and develop a golden crust. The butter also carries the spices, giving the shrimp a cohesive flavor profile.
- Add the shrimp to the pan in a single layer, ensuring they don’t overlap. Cook them for 1-2 minutes on each side, or until they turn pink and opaque. The shrimp should release from the pan easily, indicating they’re cooked through. A quick sear locks in moisture, keeping the shrimp juicy. Watch for the sizzling sound; it’s the signal that the shrimp are ready.
- Once the shrimp are cooked, transfer them to a serving dish and garnish with a squeeze of fresh lemon or a sprinkle of chopped parsley. The lemon adds brightness that cuts through the buttery richness, while parsley adds a fresh, herbal note. The garnish also enhances the visual appeal, making the dish look restaurant-ready. This finishing touch is simple yet effective. The shrimp should look vibrant and appetizing.
- Serve immediately while the shrimp are still warm and juicy. Pair them with a light salad or a side of rice to balance the richness. The shrimp’s bright flavor will complement a variety of sides, from simple greens to more elaborate preparations. Enjoy the texture and taste that result from meticulous cleaning and seasoning. This final step is the moment of truth, where the shrimp’s flavor truly shines.
That's it — you did it. But hold on, I've got a few more tricks that'll take this to another level...
Insider Tricks for Flawless Results
The Temperature Rule Nobody Follows
Many people cook shrimp at a low heat, hoping it will stay tender, but that often leads to rubbery results. The secret is to sear them over high heat for a short period. This quick sear locks in juices and gives the shrimp a desirable texture. Keep the heat steady; if it drops too low, the shrimp will steam instead of sear. This rule is simple yet effective, and it’s something most cooks overlook.
Why Your Nose Knows Best
The aroma of shrimp is a powerful indicator of its freshness. If the shrimp smells slightly briny but not overly fishy, it’s a good sign. A strong, fishy odor may indicate that the shrimp is past its prime. When in doubt, give the shrimp a quick sniff before cooking. Trusting your nose can save you from an underwhelming meal.
The 5-Minute Rest That Changes Everything
After cooking, let the shrimp rest for 5 minutes before serving. This allows the juices to redistribute throughout the meat, keeping it moist and flavorful. The rest period also lets the spices settle, giving a more cohesive flavor. A quick rest is a simple step that often gets ignored but makes a noticeable difference. Your shrimp will taste better because of it.
Use a Sharp Knife for Deveining
A dull knife makes the deveining process tedious and can damage the shrimp. Keep your knife sharp, and you’ll be able to remove the vein cleanly and quickly. A sharp blade also reduces the risk of accidentally cutting the shrimp flesh. This small tool investment pays off in the quality of your final dish. A clean, sharp knife is essential for shrimp prep.
Keep a Paper Towel Handy
A paper towel is a versatile tool that can dry the shrimp, absorb excess oil, and keep the kitchen tidy. It also helps you grip the shrimp better when peeling and deveining. Having a paper towel nearby means you won’t need to pause the cooking process for cleanup. The paper towel keeps the prep area clean and the shrimp dry. This simple hack saves time and keeps the kitchen organized.
Creative Twists and Variations
This recipe is a playground. Here are some of my favorite ways to switch things up:
Spicy Cajun Shrimp
Swap the paprika for a Cajun spice blend to give the shrimp a bold, smoky kick. Add a pinch of cayenne pepper for extra heat. The result is a fiery shrimp that pairs beautifully with a cool avocado salad. This variation is perfect for those who love a little spice in their seafood. The Cajun seasoning adds depth and complexity to the dish.
Lemon Herb Shrimp
Replace the butter with olive oil and finish with a generous squeeze of fresh lemon juice. Toss the shrimp with chopped dill, parsley, or basil for a bright, herby flavor. The lemon’s acidity cuts through the richness, creating a balanced taste profile. This version is lighter and ideal for a summer gathering. The herbs add a fresh aroma that elevates the dish.
Garlic Butter Shrimp
Increase the garlic powder to 2 teaspoons for a stronger garlicky flavor. Add minced fresh garlic to the butter as it melts for an extra aromatic layer. The result is a shrimp dish that smells like a garlic-infused paradise. This variation is a crowd-pleaser for garlic lovers. The buttery garlic coating makes each bite indulgent.
Asian-Style Shrimp
Use a splash of soy sauce and a dash of sesame oil during cooking for an umami boost. Sprinkle toasted sesame seeds on top for crunch and nuttiness. Add a few slices of fresh ginger for a subtle zing. The shrimp takes on a savory, slightly sweet profile that pairs well with rice or noodles. This variation introduces an Asian twist that’s both familiar and exciting.
Herbed Garlic Shrimp
Add chopped rosemary, thyme, or oregano to the seasoning mix for a fragrant herbaceous note. The herbs complement the garlic and paprika, creating a complex flavor tapestry. This version is great for a rustic, farmhouse-style dinner. The herb blend adds depth and warmth to the dish. It’s a comforting, aromatic take on classic shrimp.
Smoky Chipotle Shrimp
Replace paprika with chipotle powder for a smoky, mildly spicy flavor. Add a splash of lime juice after cooking to brighten the taste. The chipotle’s smoky undertones pair wonderfully with the buttery finish. This variation is ideal for a southwestern or Mexican-inspired meal. The smoky chipotle adds a bold, memorable flavor.
Storing and Bringing It Back to Life
Fridge Storage
Store cooked shrimp in an airtight container in the refrigerator for up to 2 days. Keep the container on the top shelf to avoid temperature fluctuations. When ready to reheat, place the shrimp in a skillet with a splash of water or broth to keep them moist. The water will create steam, preventing the shrimp from drying out. This method preserves the shrimp’s tenderness and flavor.
Freezer Friendly
For longer storage, freeze the shrimp in a single layer on a baking sheet before transferring them to a freezer bag. This prevents them from sticking together, making it easier to thaw only what you need. Label the bag with the date for reference. Thaw the shrimp in the refrigerator overnight before reheating. This approach keeps the shrimp fresh and ready to use whenever you need a quick protein.
Best Reheating Method
Reheat shrimp in a skillet over low heat with a small amount of butter or olive oil. Add a splash of water or broth to create steam, then cover the pan to retain moisture. Stir gently to ensure even heating. The shrimp should be warmed through, not overcooked. This technique restores the shrimp’s original texture and flavor.