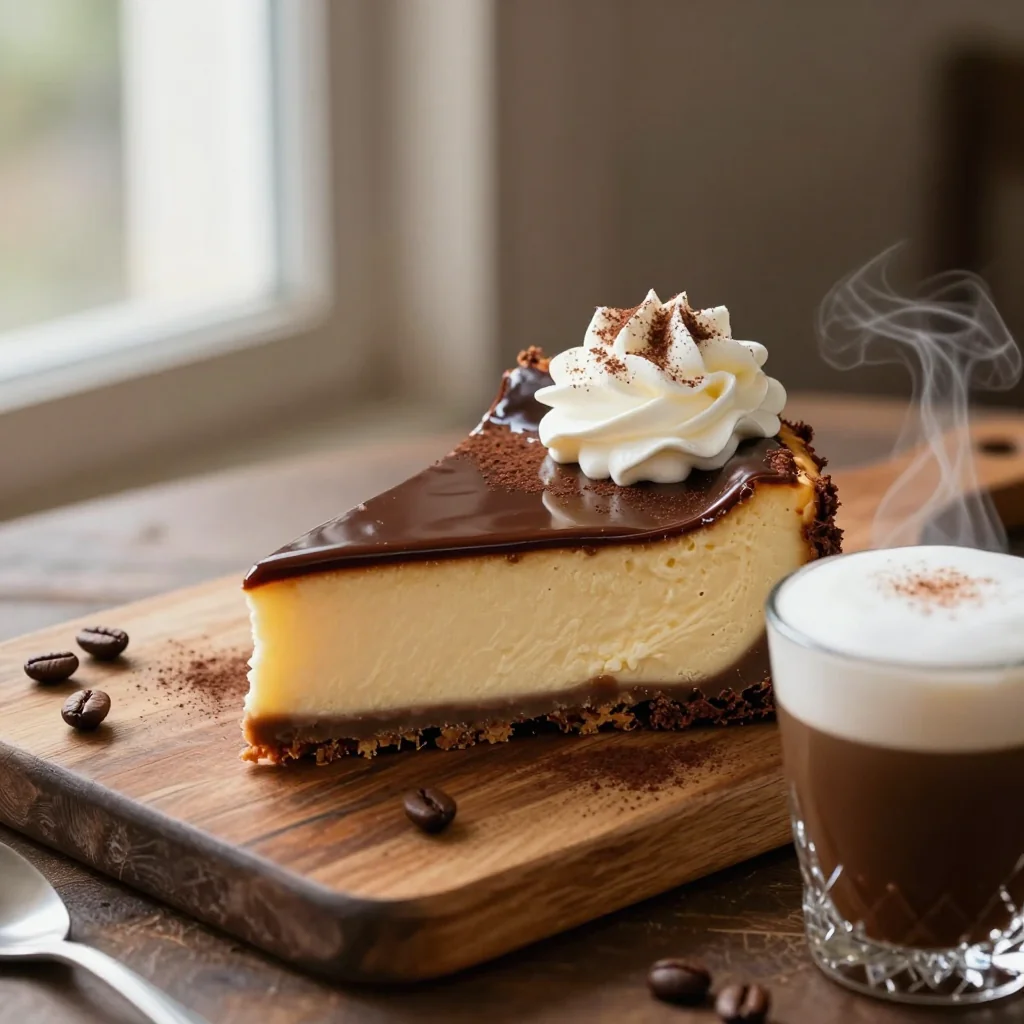
When I first tasted a slice of Irish coffee cheesecake at a tiny café in Dublin, the experience was nothing short of revelation. The silky cream cheese base, kissed by the smoky warmth of whiskey and coffee, lingered on my palate long after the last bite, while the chocolate crust added a satisfying crunch that anchored the whole dessert.
This dessert hails from the tradition of Irish coffee—a simple yet iconic cocktail that marries strong coffee, Irish whiskey, sugar, and cream. Over time, adventurous bakers have reimagined it as a cheesecake, marrying the classic flavors with the luxurious texture of a New York‑style cake.
In this article, I’ll walk you through every nuance of creating this masterpiece, from selecting the perfect chocolate for the crust to mastering the delicate balance of coffee and whiskey in the filling. You’ll learn why each step matters and how a few pro tips can elevate the final result from good to unforgettable.
So roll up your sleeves, preheat your oven, and let’s embark on a journey that will fill your kitchen with the irresistible aroma of coffee, chocolate, and a hint of Irish spirit.
🌟 Why This Recipe Will Captivate You
This cheesecake isn’t just a dessert; it’s an experience that blends comfort, elegance, and a dash of daring.
- ✨ Unforgettable Flavor Fusion: The marriage of rich dark chocolate, bold Irish whiskey, and robust coffee creates layers of taste that evolve with each bite.
- ✨ Creamy Yet Stable Texture: Using both cream cheese and mascarpone ensures a silky mouthfeel while maintaining structural integrity during baking.
- ✨ Versatile Presentation: Whether you serve it in elegant glass jars or classic cheesecake pans, the visual appeal is always striking.
- ✨ Crowd‑Pleasing Elegance: Its sophisticated profile makes it perfect for dinner parties, holiday gatherings, or a luxurious after‑dinner treat.
- ✨ Simple Ingredient Swaps: You can easily adapt the recipe for gluten‑free, dairy‑free, or lower‑calorie versions without sacrificing flavor.
- ✨ Fun Portion Control: The built‑in portion adjuster lets you scale the recipe up or down, ensuring you always have the right amount for any occasion.
🥗 The Ingredients
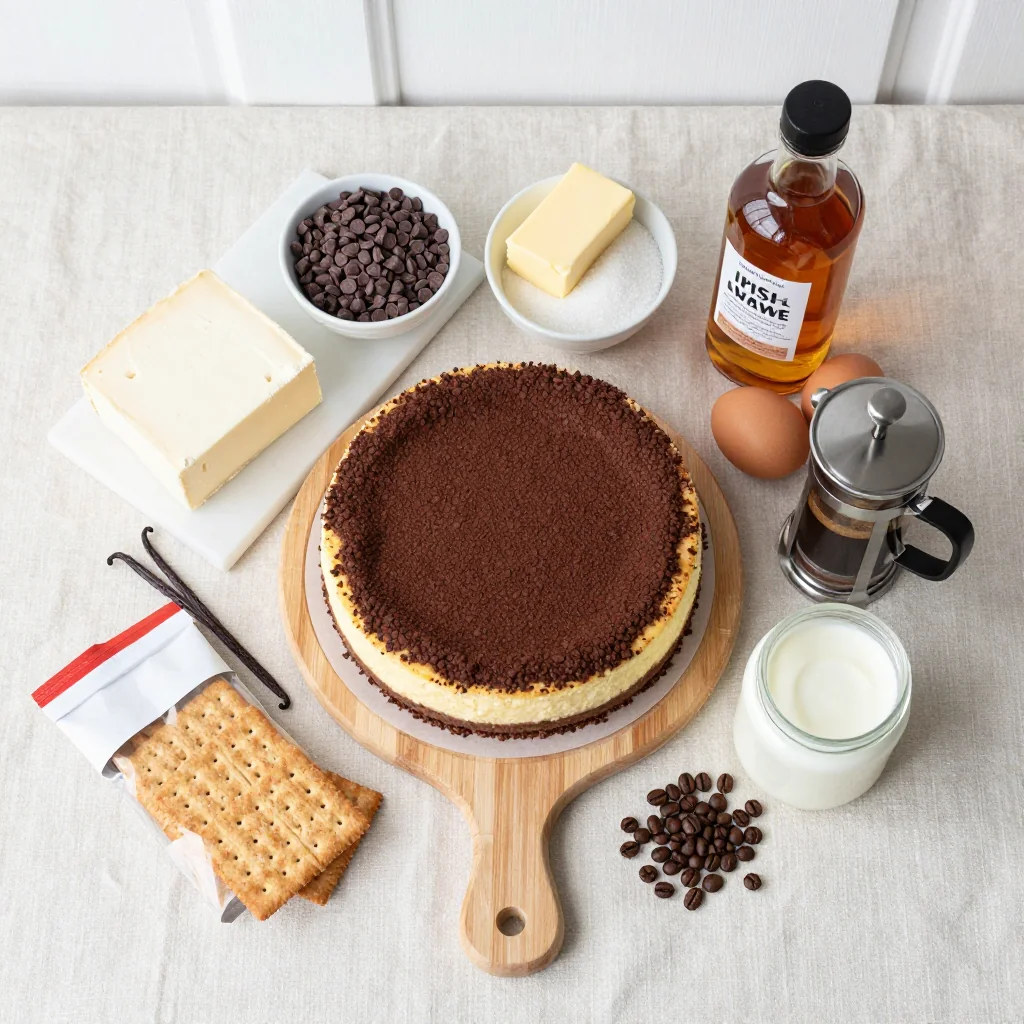
📝 Complete Ingredient List
For the Chocolate Crust:
- 200 g dark chocolate (70% cacao)
- 100 g unsalted butter, melted
- 150 g digestive biscuits, crushed
- 30 g granulated sugar
For the Cheesecake Filling:
- 500 g cream cheese, softened
- 200 g mascarpone
- 150 g granulated sugar
- 4 large eggs
- 60 ml Irish whiskey (Jameson or similar)
- 120 ml strong brewed coffee, cooled
- 10 ml vanilla extract
- 5 g cocoa powder (for flavor depth)
For the Topping:
- 200 ml heavy whipping cream
- 20 g powdered sugar
- 1 tsp Irish whiskey (optional, for drizzle)
- a pinch salt
- to taste freshly ground coffee beans (for garnish)
🔍 Focus on Key Ingredients
Dark Chocolate (70% cacao)
The chocolate forms the backbone of the crust, delivering a deep, slightly bitter note that balances the sweet cream cheese filling. Choose a chocolate with at least 70% cacao for a robust flavor and a firm texture once set. If you prefer a milder crust, a 60% bar works, but the contrast with the coffee‑whiskey filling will be less pronounced.
Irish Whiskey
Irish whiskey brings a subtle, honey‑sweet warmth that complements both the coffee and the creamy base. Its lower peat level compared to Scotch ensures the flavor stays smooth rather than smoky. A quality mid‑range brand like Jameson or Bushmills adds depth without overwhelming the palate.
Mascarpone
Mascarpone enriches the filling, lending a buttery silkiness that pure cream cheese alone cannot achieve. It also stabilizes the batter, preventing cracks during baking. If mascarpone is unavailable, substitute with an equal amount of ricotta blended until smooth.
🔄 Quick Substitutions
| If you don’t have... | Use instead... |
|---|---|
| Digestive biscuits | Graham crackers (same quantity) |
| Irish whiskey | Whiskey bourbon (slightly stronger) |
| Mascarpone | Ricotta cheese blended smooth |
👨🍳 Step‑by‑Step Instructions
Follow these detailed steps to create a cheesecake that looks as impressive as it tastes.
📋 Phase 1: Preparation & Mise en Place
Gather your tools and pre‑heat the oven so everything runs smoothly.
Prepare the crust
Combine the crushed digestive biscuits, melted butter, and sugar in a bowl. Stir until the mixture resembles wet sand. Press the mixture evenly into the base of a 23‑cm springform pan, using the back of a spoon to compact it. Chill the crust in the freezer for 10 minutes while you work on the filling.
Pre‑heat the oven
Set your oven to 160 °C (320 °F) and place a shallow pan of hot water on the lower rack to create a gentle steam bath. This prevents the cheesecake from cracking by maintaining a moist environment.
🔥 Phase 2: Baking & Assembly
Create the creamy filling, combine with the crust, and bake gently.
Blend the cream cheese and mascarpone
In a large mixing bowl, beat the softened cream cheese and mascarpone together on medium speed until completely smooth and free of lumps—about 2 minutes. Scrape down the sides to ensure an even mixture.
Add sugar, eggs, and flavorings
Gradually add the granulated sugar, beating until just incorporated. Add the eggs one at a time, mixing on low speed after each addition. Then whisk in the Irish whiskey, cooled coffee, vanilla extract, and cocoa powder until the batter is silky.
Combine filling with crust
Pour the filling over the chilled chocolate crust, smoothing the top with a spatula. Tap the pan lightly on the counter to release any trapped air bubbles.
Bake the cheesecake
Place the springform pan inside the water bath and bake for 45‑50 minutes, or until the edges are set and the center still has a slight wobble. Turn off the oven, crack the door, and let the cheesecake cool inside for 1 hour to prevent sudden temperature changes.
✨ Phase 3: Finishing & Serving
Cool, chill, and garnish for a stunning final presentation.
Chill the cheesecake
After the cheesecake has reached room temperature, cover it loosely with plastic wrap and refrigerate for at least 4 hours, preferably overnight. This allows the flavors to meld and the texture to firm up.
Prepare the whipped topping
Whip the heavy cream with powdered sugar and a pinch of salt until soft peaks form. If you like an extra kick, fold in a teaspoon of Irish whiskey. Spread the whipped cream evenly over the chilled cheesecake.
Garnish and serve
Dust the surface with a light sprinkling of cocoa powder and arrange a few freshly ground coffee beans on top. For an elegant touch, drizzle a thin stream of Irish whiskey around the plate.
💡 Expert Tips & Tricks
🛒 Choosing the Right Ingredients
Always select high‑quality dark chocolate with at least 70% cacao; the higher cocoa content provides a richer, less sweet crust. For the cream cheese, opt for full‑fat varieties—low‑fat versions can lead to a watery texture. When picking Irish whiskey, a smooth, lightly sweet brand works best; avoid heavily peated options unless you love a smoky nuance.
🔪 Preparation Techniques
When crushing the biscuits, a food processor gives a uniform texture, but a zip‑top bag and rolling pin work just as well. Ensure the butter is fully melted and slightly cooled before mixing; hot butter can melt the chocolate prematurely, altering the crust’s firmness.
🌡️ Mastering the Bake
The water bath is essential. It creates a gentle, even heat that reduces the risk of cracks. Keep the pan wrapped in foil to prevent water from seeping into the cheesecake. If you notice the top browning too quickly, loosely cover it with foil for the remaining baking time.
🍽️ Presentation & Service
Run a thin knife around the edge of the springform pan before releasing it to keep the sides pristine. Serve each slice on a chilled plate to maintain firmness, and accompany with a small espresso shot to echo the coffee notes in the cake.
🏆 Pro Tips
Professional bakers know that precision and timing separate a good cheesecake from a show‑stopping one.
- 🎯 Control the Temperature Gradient: Start the bake at 160 °C, then lower to 150 °C for the last 15 minutes. This gradual reduction minimizes thermal shock, preserving the creamy interior.
- 🎯 Use a Scale for Accuracy: Weigh all ingredients rather than measuring by volume. Small variations in sugar or butter can affect the crust’s texture and the filling’s firmness.
- 🎯 Whisk the Coffee and Whiskey Separately: Combining them first ensures an even distribution of flavor and prevents pockets of bitterness.
- 🎯 Chill the Crust Longer: A 20‑minute chill before adding the filling creates a firmer base that won’t soften during baking.
- 🎯 Incorporate Air Gently: When adding eggs, beat just until blended. Over‑beating introduces excess air, leading to cracks and a dry mouthfeel.
- 🎯 Finish with a Cold Shock: After refrigeration, place the cheesecake in the freezer for 10 minutes before serving. This brief cold shock sharpens the flavors and gives the topping a slight firmness.
"A perfect cheesecake is a balance of science and soul; respect the process, but let your palate guide you." — Dominique Crenn, Chef & Restaurateur
🔄 Variations & Adaptations
The beauty of this recipe lies in its flexibility. Whether you need a vegan version or want to explore bold flavor twists, the core concept stays delicious.
🥬 Vegetarian/Vegan Version
Swap dairy components for plant‑based alternatives: use a vegan cream cheese (such as Miyoko’s) and coconut‑based mascarpone. Replace butter with coconut oil and use oat‑based biscuits for the crust. The whiskey and coffee remain unchanged, preserving the signature taste.
- Vegan cream cheese (200 g) – provides the same tang.
- Coconut oil (100 g) – creates a firm, buttery crust.
🌶️ Flavor Variations
Play with complementary spices or regional twists to keep the dessert exciting.
Spicy Version:
Add a pinch of cayenne pepper to the crust and a dash of espresso‑infused dark chocolate chips to the filling for a subtle heat that awakens the palate.
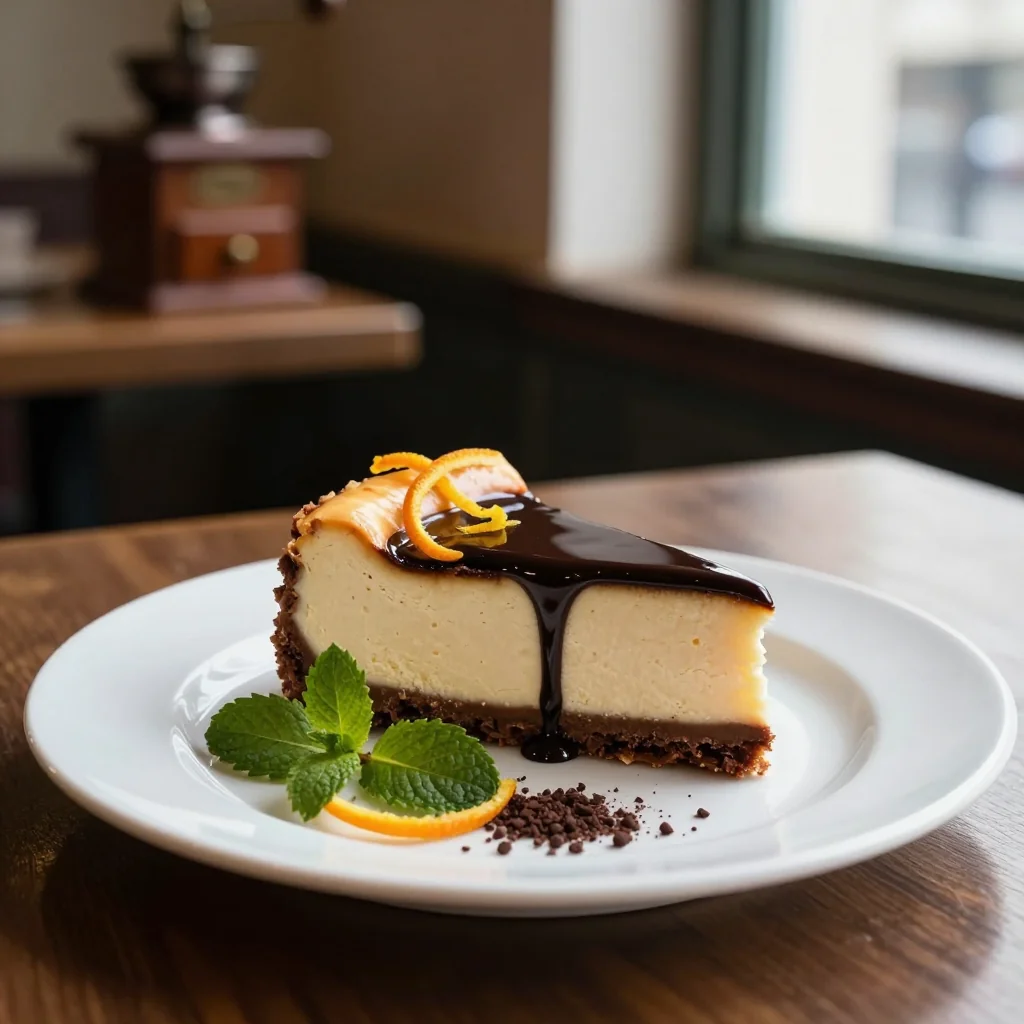
Mediterranean Version:
Incorporate a swirl of orange‑infused honey into the topping and garnish with candied orange zest. The citrus brightens the coffee‑whiskey depth.
Asian Fusion Version:
Replace the whiskey with a splash of Japanese sake, and add a teaspoon of matcha powder to the crust for a gentle green tea aroma.
⚠️ Dietary Adaptations
Gluten‑Free:
Use gluten‑free oat biscuits or almond flour mixed with melted butter for the crust. Ensure the chocolate is certified gluten‑free.
Lactose‑Free:
Swap cream cheese and mascarpone for lactose‑free alternatives made from almond or soy bases. Coconut cream can replace heavy cream in the topping.
Low‑Calorie:
Reduce sugar by half, use reduced‑fat cream cheese, and replace part of the butter in the crust with unsweetened applesauce. The flavor remains rich while cutting calories.
👶 Family/Kids Version
For younger palates, omit the whiskey and replace coffee with a mild cold brew. Add a swirl of chocolate ganache on top and serve with fresh berries for a playful, kid‑friendly presentation.
📦 Storage & Reheating
🧊 Conservation
Refrigerator:
- Duration: 5 days
- Container: Airtight cake dome or sealed plastic container
- Tip: Place a piece of parchment paper directly on the surface to prevent moisture absorption.
Freezer:
- Duration: 2 months
- Method: Wrap the entire cheesecake tightly in plastic wrap, then foil.
- Defrosting: Transfer to the refrigerator overnight before serving.
💡 For best texture, thaw slowly in the fridge; rapid thawing can cause the topping to separate.
♨️ Reheating
🔥 Oven (Recommended):
- Preheat to 150 °C (300 °F).
- Cover the cheesecake loosely with aluminum foil.
- Heat for 10‑12 minutes, until the center is just warmed through.
- Remove foil and heat an additional 2 minutes for a gentle surface glow.
⚡ Microwave (Quick):
- Place a slice on a microwave‑safe plate.
- Cover with a microwave‑safe lid.
- Heat on medium power for 30 seconds, then check; repeat in 15‑second bursts.
🍳 Stovetop:
Gently warm a slice in a non‑stick skillet over low heat, covered, for 2‑3 minutes. This method preserves the creamy interior without drying it out.
🍷 Perfect Pairings
🥗 Accompaniments
- Fresh Berries: A mix of raspberries and blackberries adds acidity that cuts through the richness.
- Candied Orange Slices: Their citrus sparkle brightens the deep coffee notes.
- Lightly Sweetened Whipped Mascarpone: A dollop offers an extra creamy layer without overwhelming the palate.
🍷 Wine & Beverage Pairings
- Irish Stout (e.g., Guinness): Its roasted malt complements the coffee and chocolate.
- Late Harvest Riesling: The subtle sweetness mirrors the whiskey’s honeyed undertones.
- Non‑Alcoholic Option: A chilled espresso martini mocktail with a splash of vanilla‑infused almond milk.
🍰 To Complete the Meal
Begin with a light citrus salad dressed in a honey‑yogurt vinaigrette, follow with the cheesecake, and finish with a petite dark chocolate truffle. This progression balances acidity, richness, and a final touch of indulgence.
❓ Frequently Asked Questions
Q: Can I use a different type of alcohol?
Absolutely. Bourbon adds a caramel‑vanilla nuance, while a dark rum introduces subtle molasses notes. Adjust the amount to taste—usually 45‑60 ml works well.
Q: How do I prevent cracks on the surface?
Cracks often result from rapid temperature changes. Baking in a water bath, cooling gradually in the oven, and chilling the cake slowly in the fridge all help maintain a smooth surface. Adding a thin layer of melted chocolate on top after cooling can also mask minor imperfections.
Q: What if I don’t have a springform pan?
You can use a 9‑inch (23 cm) regular cake pan lined with parchment paper, but you’ll need to carefully remove the cheesecake after cooling. A springform pan makes removal effortless and preserves the crust.
Q: Is it possible to make this cheesecake ahead of time?
Yes, the cheesecake improves after a night in the refrigerator, allowing flavors to meld. Prepare it up to 24 hours in advance, keep it covered, and add the whipped topping just before serving.
Q: Can I substitute the coffee with espresso powder?
Espresso powder works well; use about 2 teaspoons dissolved in the same amount of hot water as the brewed coffee. This provides a concentrated flavor without extra liquid.
Q: How do I adjust the sweetness level?
Reduce the granulated sugar in the filling by up to 30 % if you prefer a less sweet dessert. Keep the sugar in the crust to maintain its structure, but you can also lower it slightly.
🎉 To Your Oven!
Crafting an Irish Coffee Cheesecake with Chocolate Crust is a rewarding adventure that brings together the comforting warmth of coffee, the spirited kick of Irish whiskey, and the indulgent snap of a chocolate base. By following the detailed steps, respecting the gentle baking environment, and using high‑quality ingredients, you’ll create a dessert that dazzles both the eyes and the palate. Whether you’re serving it at a festive gathering or enjoying a quiet evening treat, this cheesecake promises to be the star of the table.
Don’t hesitate to experiment with the variations presented—each one offers a new twist while honoring the original concept. Share your successes, ask questions, and let the community celebrate your culinary triumphs together.
Have you tried this recipe?
Leave a comment and rating below! Share your photos on Instagram with #IrishCoffeeCheesecake for a chance to be featured.
Irish Coffee Cheesecake with Chocolate Crust
A velvety cheesecake infused with coffee and whiskey, anchored by a buttery chocolate crust.
📝 Ingredients
Chocolate Crust
Cheesecake Filling
Topping
👨🍳 Instructions
- Press the chocolate crust mixture into a 23 cm springform pan and chill for 10 minutes.
- Preheat oven to 160 °C and set a water bath on the lower rack.
- Beat cream cheese and mascarpone until smooth, then add sugar and eggs.
- Stir in whiskey, coffee, vanilla, and cocoa powder until fully incorporated.
- Pour filling over chilled crust, tap to release bubbles.
- Bake in water bath for 45‑50 minutes, then cool in oven with door ajar.
- Refrigerate for at least 4 hours, preferably overnight.
- Whip cream with powdered sugar and a pinch of salt; fold in optional whiskey.
- Spread whipped topping, dust with cocoa, garnish with coffee beans.
- Slice, serve, and enjoy with your chosen beverage.
🥗 Nutrition (per serving)
*Values are approximate and based on standard ingredient brands.
📚 You Might Also Like
Salted Caramel Espresso Cheesecake
Chocolate Stout Brownies
Vanilla Bean Tiramisu


💬 Comments & Reviews
Leave a Comment
Comments will appear here once readers share their thoughts.