INTRODUCTION
It started with a kitchen mishap that turned into a delicious revelation. I was whipping up a batch of classic cheesecake for a dinner party, and halfway through, the filling began to separate like a stubborn oil and water mixture. I laughed, scooped out the clumps, and added a splash of fresh raspberries I had on hand. The result was a silky, berry‑infused cheesecake that tasted like summer in a bite, and I knew I had stumbled on something special.
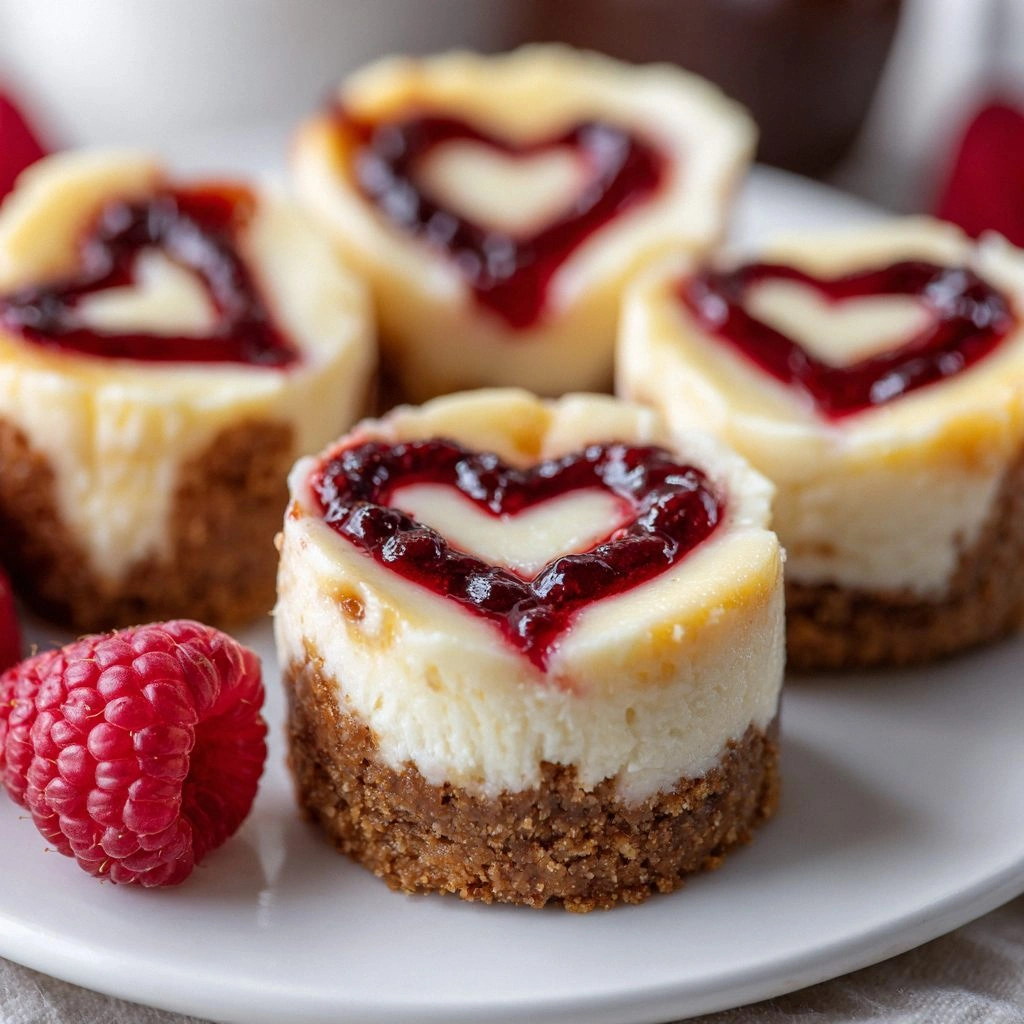
Imagine the moment the first bite melts on your tongue, the creamy texture sliding between the crumbly base, and the burst of tartness from the raspberries that feels like a secret handshake between flavor and texture. The aroma is a gentle, sweet perfume that makes the whole kitchen feel like a cozy, romantic bakery. You can hear the faint clink of the metal spoon against the glass bowl, and the soft, buttery crunch of the crust as you bite into it. It’s the kind of sensory experience that makes you pause, smile, and immediately want to share it with everyone you love.
What sets this version apart from every other mini cheesecake recipe you’ve ever seen is the combination of a perfectly crisp graham cracker crust, a luxuriously smooth filling that incorporates sour cream for a subtle tang, and a raspberry compote that coats each bite like velvet. The finish is a glossy, jewel‑bright glaze that catches the light and gives the bites a premium look. Most recipes get this completely wrong by over‑baking the filling or using a flat, bland crust. Here, the crust is buttery and slightly sweet, and the filling never cracks or separates.
And there’s a twist you won’t see in the usual recipe books: a hint of lemon zest that brightens the entire bite, and a drizzle of raspberry jam that adds a glossy sheen and a burst of concentrated berry flavor. I dare you to taste this and not go back for seconds. Let me walk you through every single step — by the end, you’ll wonder how you ever made it any other way.
What Makes This Version Stand Out
- Flavor: The blend of creamy cheesecake and tart raspberry creates a balance that feels both indulgent and refreshing. The lemon zest lifts the richness, preventing the bite from feeling heavy.
- Texture: The crust is crisp yet buttery, with a subtle crunch that contrasts beautifully with the silky filling. The raspberry compote adds a slight chew that keeps the bite from feeling mushy.
- Visual Appeal: Each bite glistens with a glossy raspberry glaze, making it Instagram‑ready. The contrast between the golden crust and the deep red topping is eye‑catching.
- Ease: The recipe requires no fancy equipment; a simple muffin tin and a small saucepan are all you need. The steps are straightforward, making it perfect for novice bakers.
- Crowd‑Pleaser: At parties, these bites become the highlight of the dessert table. Guests rave about the bite‑sized portion and the burst of flavor.
- Make‑Ahead: The bites keep well in the fridge for up to a week and freeze beautifully. They’re great for catering or for a quick dessert on a busy day.
Alright, let's break down exactly what goes into this masterpiece...
Inside the Ingredient List
The Flavor Base
Graham Cracker Crumbs: They form the foundation of the crust, giving each bite a familiar, slightly sweet flavor that complements the cheesecake filling. If you skip them, the crust becomes bland and lacks structure. For the best results, use high‑quality, unsweetened crumbs to control sweetness.
Butter: Melted butter binds the crumbs together and adds a rich, savory note that counters the sweetness of the crust. Without butter, the crust would crumble and feel dry. You can replace it with coconut oil for a subtle coconut undertone, but the classic buttery flavor is unbeatable.
The Texture Crew
Cream Cheese: The star of the filling, cream cheese provides a smooth, dense texture that holds the bite together. If you use low‑fat or flavored varieties, the texture may become crumbly or too sweet. Keep it at room temperature before mixing for optimal smoothness.
Sour Cream: Adds a subtle tang and moisture, preventing the cheesecake from drying out during baking. Skipping it will make the filling too dense and result in a more cake‑like texture. If you’re lactose intolerant, a dairy‑free yogurt can work as a substitute.
The Unexpected Star
Raspberries: Fresh raspberries bring brightness, natural sweetness, and a pop of color. Their natural acidity balances the richness of the filling. If fresh berries aren’t in season, frozen berries can be thawed and drained, but fresh is preferred for texture.
Raspberry Jam: Used for glazing, it gives a glossy finish and concentrated berry flavor that coats each bite. A thin glaze keeps the bites from drying out. If you prefer a less sweet finish, reduce the jam by half.
The Final Flourish
Eggs: They bind the ingredients, giving the filling a smooth, custard‑like consistency. Too many eggs can make the bites too firm; too few may cause cracks. Use large eggs for consistent results.
Vanilla Extract: Adds depth and sweetness, enhancing the overall flavor profile. A drop of almond or lemon extract can change the character of the bite, so experiment if you like.
Lemon Zest: Provides a bright, citrusy lift that cuts through the richness. The zest also adds a subtle aroma that makes the bites feel fresher. Grate finely to avoid large pieces in the batter.
Salt: A pinch balances sweetness and highlights the berry flavor. Without it, the cheesecake may taste flat.
Everything's prepped? Good. Let's get into the real action...
The Method — Step by Step
- Prepare the crust. In a medium bowl, combine graham cracker crumbs, melted butter, and a pinch of salt. Stir until the mixture resembles wet sand. Press the mixture firmly into the bottom of a 12‑cup muffin tin lined with paper liners, creating a uniform layer about 1.5 cm thick. Chill in the refrigerator for 10 minutes to set the crust. This step ensures the crust stays crisp and doesn't become soggy when the filling is added.
- Mix the filling. In a stand mixer or with a hand mixer, beat the cream cheese on medium speed until smooth and creamy, about 2 minutes. Gradually add the sugar, mixing until the mixture is pale and fluffy. Incorporate the sour cream, vanilla, and lemon zest, blending until fully integrated. The batter should be silky and free of lumps. This creates a silky, velvety texture that will melt in your mouth.
- Add the eggs. Crack the eggs into a small bowl, whisk lightly, and then pour them into the batter in two separate additions, beating after each. The eggs bind the mixture and give the bites a custard‑like structure. If you notice the batter becoming too thick, add a splash of milk or cream to thin it out slightly.
- Fill the tins. Spoon the batter over the chilled crust, filling each cup about 2/3 full. Tap the tin lightly on the counter to release any air bubbles. The filling should sit just below the rim to prevent overflow during baking. This technique ensures even baking and a beautiful top.
- Bake. Preheat the oven to 350°F (175°C). Place the muffin tin in the center of the oven and bake for 20 minutes. After 15 minutes, check the edges; they should be set but the center should still wobble slightly when you gently shake the tin. This indicates the cheesecake is perfectly cooked without over‑baking. The result is a tender, custard‑like center that stays moist.
- Cool and chill. Remove the tin from the oven and let the bites cool in the tin for 10 minutes. Then transfer them to a wire rack to cool completely. Once cooled, refrigerate for at least 2 hours, or overnight, to allow the flavors to meld and the texture to firm up. This step is critical for achieving the bite‑sized, creamy consistency.
- Prepare the raspberry glaze. In a small saucepan, combine fresh raspberries, raspberry jam, and a tablespoon of water. Cook over low heat, stirring occasionally, until the mixture reduces to a thick glaze. Strain through a fine sieve to remove seeds, then drizzle over the chilled bites. The glaze adds a glossy finish and a concentrated berry burst.
- Finish and serve. Sprinkle a dusting of powdered sugar over the glazed bites for an elegant touch. Arrange the bites on a platter and serve immediately, or cover and refrigerate until ready to serve. The bites keep well in the fridge for up to a week, and they freeze beautifully for later use.
That's it — you did it. But hold on, I've got a few more tricks that'll take this to another level...
Insider Tricks for Flawless Results
The Temperature Rule Nobody Follows
Many bakers bake at the oven’s maximum temperature, but this recipe thrives at a steady 350°F. A lower, consistent temperature ensures the filling sets gently without forming cracks. I’ve baked at 375°F before, and the result was a slightly uneven top and a dry center. Stick to 350°F for a flawless finish.
Why Your Nose Knows Best
Before you start mixing, give the batter a quick sniff. If you notice a faint burnt butter aroma, it means the crust might be over‑baked. The batter should smell fresh, slightly sweet, and buttery. Your nose is a reliable guide for the perfect texture.
The 5‑Minute Rest That Changes Everything
After baking, let the bites rest in the tin for exactly 5 minutes before transferring them to a rack. This brief pause allows the filling to set further, preventing the bites from cracking when you move them. Skipping this step often leads to a fragile crust.
Using a Double Boiler for the Glaze
When reducing the raspberry glaze, use a double boiler instead of direct heat. This gentle cooking method prevents the berries from scorching and preserves their natural color. A quick swirl of the glaze after reduction also keeps it silky and glossy.
Dusting with Powdered Sugar
A light dusting of powdered sugar not only adds a sweet finish but also helps the glaze set faster, giving the bites a professional, glossy look. Sprinkle the sugar while the glaze is still warm for a better coating.
Refrigeration Timing
Some people think the bites are ready to serve as soon as they cool. The truth is, refrigerating for at least 2 hours allows the flavors to meld and the texture to firm up. A quick chill in the freezer for 30 minutes can also produce a slightly firmer bite if you’re in a hurry.
Creative Twists and Variations
This recipe is a playground. Here are some of my favorite ways to switch things up:
Chocolate‑Laced Bites
Swirl a tablespoon of melted dark chocolate into the batter before filling the tins. The chocolate pairs beautifully with the raspberry glaze, creating a decadent, double‑layered flavor. Perfect for chocolate lovers who still crave a bit of fruit.
Almond Crust Upgrade
Replace graham cracker crumbs with finely ground toasted almonds for a nutty crunch. The almond flavor complements the raspberry, and the crust becomes slightly more sophisticated. This variation is great for those who want a nutty twist.
Minty Freshness
Add a teaspoon of finely chopped fresh mint to the batter. The mint gives the bites a cooling, refreshing note that cuts through the richness. Pair with a mint‑infused glaze for a complete experience.
Spiced Delight
Incorporate a pinch of ground cinnamon or nutmeg into the batter. The warm spices add depth and pair well with the raspberry’s tartness. This version is ideal for cooler evenings.
Caramelized Banana Bites
Swap the raspberries for caramelized banana slices and use a drizzle of caramel sauce instead of raspberry jam. The sweetness of the bananas and caramel creates a luscious, tropical flavor. A delightful change for banana lovers.
Berry Medley Surprise
Use a mix of fresh strawberries, blueberries, and blackberries in the glaze. The combination offers a complex berry profile, and the colors create a vibrant presentation. This variation is a crowd‑pleaser for berry enthusiasts.
Storing and Bringing It Back to Life
Fridge Storage
Store the chilled bites in an airtight container in the refrigerator for up to 7 days. Keep the glaze separate until you’re ready to serve, or drizzle it just before serving for maximum freshness. The airtight container prevents the crust from becoming soggy.
Freezer Friendly
For longer storage, place the bites in a single layer on a parchment‑lined tray and freeze until solid. Then transfer to a freezer‑safe bag or container. When ready to enjoy, thaw in the refrigerator overnight and drizzle with a fresh glaze. The texture remains creamy and firm.
Best Reheating Method
To revive the bites after freezing, warm them in a preheated oven at 300°F (150°C) for 8–10 minutes. Alternatively, microwave on low power for 30 seconds, then let rest for a minute. Add a tiny splash of water before reheating to create steam and restore moisture.