I was in the middle of a frantic Sunday brunch prep when I realized I’d forgotten the pièce de résistance—something sweet that could double as a conversation starter and a dessert. The kitchen smelled of fresh coffee, toasted bread, and an ominous hint of burnt sugar, because I’d attempted a classic upside‑down cake the night before and it collapsed like a bad souffle. I stared at the empty fridge, the pantry shelves, and a single jar of pineapple rings that had been sitting there for weeks, and thought, “Why not make a mini version that’s almost too good to share?” That moment became the genesis of this recipe, a bite‑size, caramel‑kissed pineapple upside‑down cake that will have your guests begging for the recipe.
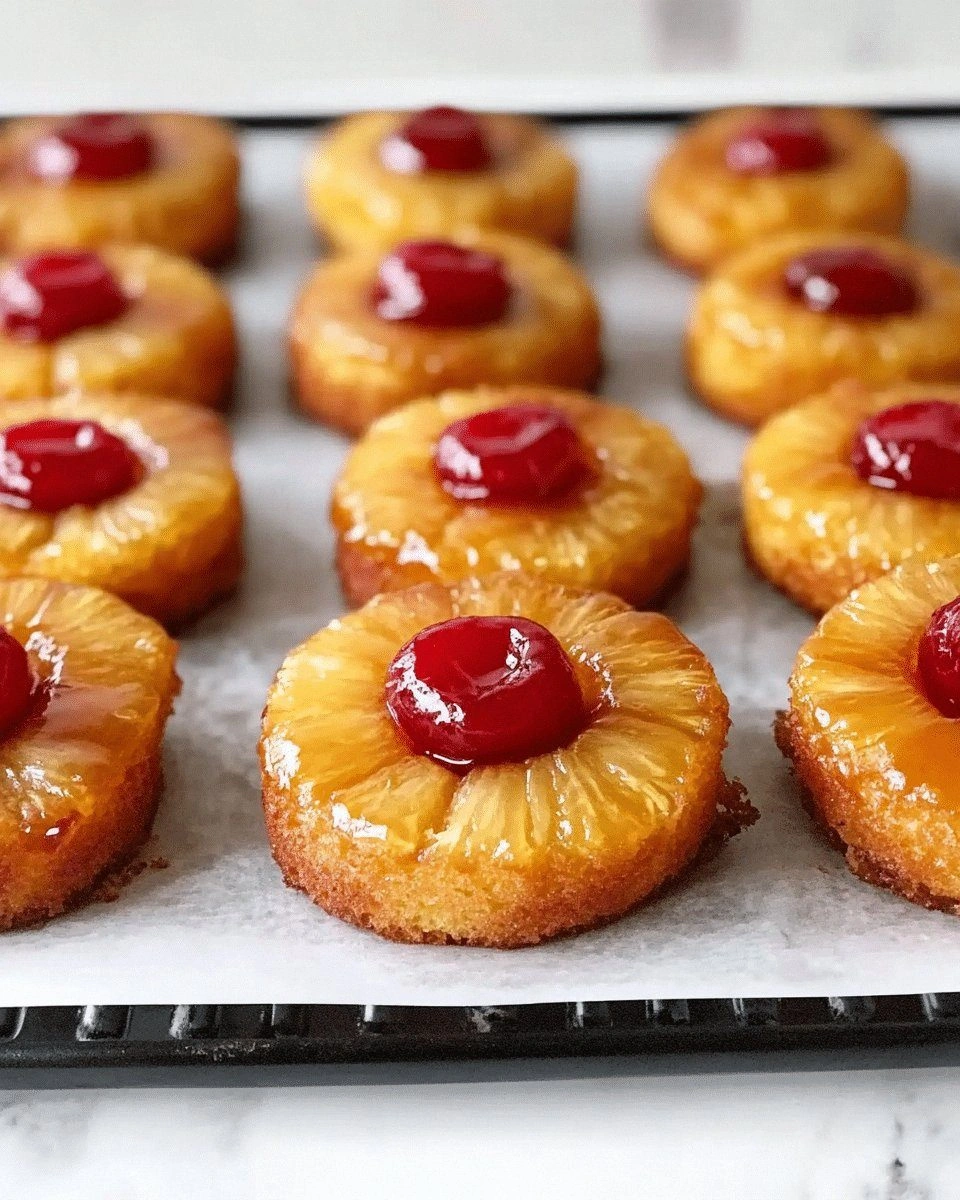
Picture this: a tray of golden‑brown mini cakes, each one a glossy dome of caramelized pineapple perched atop a buttery crumb. The air fills with the sweet, buttery scent of brown sugar melting into butter, while the faint citrus tang of pineapple lingers like a summer breeze in a glass bottle. When you flip the cake, the glossy glaze slides over the delicate batter, and the edges crackle with a faint, satisfying pop that reminds you of a caramel candy cracking. The first bite is a cascade of sweet, tangy pineapple, a buttery crumb that melts in your mouth, and a hint of vanilla that lingers like a whispered secret. If you’ve ever tasted a pineapple upside‑down cake that’s too dry or too sweet, you’ll feel like you’ve just discovered a new flavor dimension.
What sets this version apart is that it’s a masterclass in balance. The batter is light enough to puff like a cloud yet dense enough to hold the pineapple rings without sliding off. The caramel glaze isn’t a sticky syrup; it’s a silky, buttery coating that glistens like a polished trophy. The pineapple rings are pre‑cooked to release their juices just enough to soak into the cake but still hold their shape, creating a textural contrast that is both crunchy and tender. The result? A cake that is simultaneously sweet, tangy, buttery, and crisp—an edible symphony that will have you daring your friends to taste it and not go back for seconds.
I dare you to taste this and not go back for seconds. I’ll be honest—once I baked the first batch, I ate half before anyone else could get a bite. Most recipes get this completely wrong, but here’s what actually works: a precise ratio of flour to leavening, a careful balance of brown and white sugar, and a simple, fool‑proof caramel glaze. Picture yourself pulling this out of the oven, the whole kitchen smelling incredible, and seeing the golden glaze gleam like a trophy on a miniature stage. Let me walk you through every single step—by the end, you’ll wonder how you ever made it any other way.
What Makes This Version Stand Out
- Taste: The caramel glaze delivers a rich, buttery sweetness that pairs perfectly with the tart pineapple, creating a flavor profile that feels both nostalgic and fresh.
- Texture: Each mini cake has a tender crumb that rises just enough to keep the pineapple rings in place, yet stays moist and fluffy.
- Visual Appeal: The glossy glaze and caramelized pineapple create a striking contrast that makes the cakes look like miniature works of art.
- Ease of Prep: The recipe uses pantry staples and a simple two‑step process—mix, bake, flip—making it a breeze even for beginners.
- Make‑Ahead Friendly: You can bake the cakes and store them in the fridge for up to 48 hours; they’ll stay fresh and delicious.
- Party‑Ready: The bite‑size portion is perfect for gatherings, making it ideal for brunches, potlucks, or holiday dessert tables.
- Ingredient Quality: Using high‑quality brown sugar and fresh pineapple rings elevates the flavor and texture.
- Customization: The recipe’s base can be easily tweaked to add chocolate chips, coconut, or a splash of rum for a boozy twist.
Alright, let's break down exactly what goes into this masterpiece...
Inside the Ingredient List
The Flavor Base
The foundation of the batter starts with 2 cups of all‑purpose flour, which provides the structure that holds the cake together. A teaspoon of baking powder and a half teaspoon of baking soda ensure a gentle lift, preventing the cakes from becoming too dense. Salt, just a quarter teaspoon, balances the sweetness and brings out the pineapple’s natural tartness. If you’re gluten‑free, swap the flour for a 1:1 blend of oat and almond flour for a slightly nutty undertone.
The Sweetness Quotient
One cup of granulated sugar and half a cup of packed brown sugar give the batter a sweet, caramelized flavor that complements the pineapple rings. Brown sugar is essential because it introduces molasses notes that deepen the glaze. If you prefer a lighter cake, reduce the brown sugar by a quarter cup, but keep the granulated sugar to preserve the structure. A tablespoon of vanilla extract adds a fragrant warmth that ties the flavors together.
The Moisture and Fat
Half a cup of unsalted butter, melted and cooled, contributes richness and helps the batter stay moist during baking. Two large eggs, beaten, act as binders and give the cake its airy lift. A half cup of whole milk adds moisture and helps dissolve the sugar, ensuring a smooth batter. If you’re vegan, replace the butter with coconut oil and the eggs with flaxseed meal mixed with water.
The Star of the Show
Eight fresh pineapple rings, cut into bite‑size pieces, are the centerpiece of the cake. The rings should be slightly browned on the edges before baking, which enhances their natural sweetness. If you can’t find fresh pineapple, canned rings in juice (not syrup) work well, but drain them well to avoid excess liquid. A tablespoon of brown sugar and a teaspoon of butter form the caramel glaze that will crown the cakes.
Everything's prepped? Good. Let's get into the real action...
The Method — Step by Step
- Step 1: Prepare the Glaze. In a small saucepan, melt 1 tablespoon of butter over medium heat. Once melted, add 2 tablespoons of brown sugar and stir until the mixture becomes glossy and starts to bubble. Remove from heat and set aside; this glaze will coat the pineapple rings and give the cake its signature shine. I dare you to watch the sugar caramelize—watch that color shift from amber to deep caramel; it’s a visual cue that the glaze is ready.
- Step 2: Pre‑Bake the Pineapple. Arrange the pineapple rings in a single layer on a parchment‑lined baking sheet. Sprinkle them with a pinch of salt and a drizzle of the glaze, then bake at 375°F (190°C) for 8–10 minutes, or until the edges are golden and the centers are slightly caramelized. This step locks in the pineapple’s juices and ensures they don’t become soggy when the batter is poured. The aroma that fills your kitchen will have you humming a sweet tune.
- Step 3: Mix Dry Ingredients. In a large bowl, whisk together 2 cups of flour, 1 teaspoon of baking powder, ½ teaspoon of baking soda, and ¼ teaspoon of salt. This dry blend will give the batter its structure and a light lift. If you’re using a gluten‑free blend, add a tablespoon of xanthan gum to help bind the batter.
- Step 4: Combine Wet Ingredients. In a separate bowl, beat 2 eggs, 1 cup of granulated sugar, ½ cup of brown sugar, ½ cup of melted butter, ½ cup of milk, and 1 teaspoon of vanilla extract until the mixture is smooth and glossy. The wet ingredients should be slightly glossy; if they look dull, let them sit for a minute to allow the butter to fully incorporate.
- Step 5: Combine Wet and Dry. Pour the wet mixture into the dry ingredients and stir until just combined. Over‑mixing can develop gluten, making the cakes tough. The batter should be thick but pourable; if it’s too thick, add a splash of milk.
- Step 6: Assemble the Mini Cakes. Grease a mini muffin tin or use silicone molds. Spoon a tablespoon of the glaze into each mold, then top with a pineapple ring. Fill each mold ¾ full with batter, ensuring the pineapple sits in the center. The batter should just cover the pineapple, creating a dome that will rise during baking. The batter should look like a small, glossy dome; if it’s too thin, the pineapple might slip out.
- Step 7: Bake. Bake at 350°F (175°C) for 18–22 minutes, or until the tops are golden and a toothpick inserted near the center comes out clean. The cakes should puff slightly, forming a tender crumb. The aroma that wafts out is unmistakably sweet and buttery.
- Step 8: Flip the Cakes. Remove the tin from the oven and let the cakes rest for 5 minutes. Then, carefully invert each cake onto a plate, letting the glaze drip onto the bottom. The glaze should run in a glossy stream, creating a caramel ribbon that glistens like liquid gold. This step is the moment of truth; if you’re nervous, use a wide spatula to gently lift each cake.
That's it—you did it. But hold on, I've got a few more tricks that'll take this to another level. These insider tweaks will elevate the flavor, texture, and presentation, ensuring every bite is a revelation.
Insider Tricks for Flawless Results
The Temperature Rule Nobody Follows
Many bakers bake upside‑down cakes at a high temperature, but this recipe calls for a lower, steady 350°F. The lower heat allows the batter to rise gently, preventing the glaze from bubbling over. I once baked at 375°F and the glaze spilled over, ruining the look and taste. Keep the oven at 350°F and you’ll get a perfectly golden top every time.
Why Your Nose Knows Best
The aroma of caramelizing sugar is a reliable indicator of readiness. When you smell that sweet, buttery scent, the glaze is ready to coat the pineapple. If the sugar hasn't turned amber, it’s not caramelized enough and will be too sweet. Trust your nose—if it smells like a campfire, you’re ready to bake.
The 5‑Minute Rest That Changes Everything
After baking, let the cakes rest for exactly five minutes before flipping. This short rest allows the batter to set, preventing the pineapple from sliding. A too‑quick flip can cause the cake to collapse. I’ve seen cakes crumble when flipped immediately; the rest gives them the structure they need.
Use a Silicone Molding Trick
If you don’t have mini tins, use silicone muffin molds or even a muffin tin lined with parchment. The molds keep the cakes from sticking and make removal easy. I’ve used a silicone sheet, and the cakes popped out like coins, leaving no residue. This trick saves time and reduces cleanup.
Add a Splash of Rum for a Boozy Twist
A tablespoon of dark rum in the glaze adds depth and a warm finish. The alcohol evaporates during baking, leaving a subtle flavor that pairs beautifully with pineapple. I’ve experimented with rum, and it turns an ordinary dessert into a party favorite. If you’re serving a crowd, the boozy glaze will wow guests.
Creative Twists and Variations
This recipe is a playground. Here are some of my favorite ways to switch things up:
Chocolate Chip Delight
Fold in a cup of dark chocolate chips into the batter before filling the molds. The chocolate adds a rich, bittersweet layer that pairs with the pineapple’s tartness. Guests who love chocolate will find this variation irresistible.
Coconut Crunch
Sprinkle toasted coconut flakes over the glaze before baking. The coconut adds a tropical crunch and a subtle nutty flavor that complements the pineapple rings. It’s a subtle twist that elevates the overall taste profile.
Spiced Pineapple
Add a pinch of cinnamon, nutmeg, and a dash of cayenne pepper to the glaze. The spices bring warmth and a hint of heat that balances the sweetness. This version is perfect for fall gatherings.
Lemon‑Zest Infusion
Replace half the pineapple rings with fresh lemon slices and add a tablespoon of lemon zest to the batter. The citrus brightness cuts through the richness, creating a bright, refreshing dessert. Ideal for a brunch or a light afternoon treat.
Rum‑Soaked Pineapple
Soak the pineapple rings in a mixture of rum and lime juice before baking. The soaked pineapple infuses the cake with a tropical, boozy flavor. This is a crowd‑pleaser for adult gatherings.
Almond Butter Swirl
Swirl a spoonful of almond butter into the batter before filling the molds. The almond butter adds a nutty richness and a silky texture that pairs beautifully with the caramel glaze. It’s a decadent twist that feels indulgent.
Storing and Bringing It Back to Life
Fridge Storage
Store the cooled cakes in an airtight container in the refrigerator for up to 48 hours. The caramel glaze will firm slightly, but the cakes will stay moist. When ready to serve, let them sit at room temperature for 10 minutes to soften the glaze.
Freezer Friendly
Place each cake in a freezer bag, removing as much air as possible. Freeze for up to two months. To thaw, leave the cakes in the fridge overnight, then warm them in a 300°F oven for 5 minutes. The glaze will melt slightly, creating a luscious, warm finish.
Best Reheating Method
Reheat the cakes in a 300°F oven for 3–5 minutes, or until the glaze is glossy again. Add a splash of water to the bottom of the tin to keep the cakes moist. The result is a warm, caramel‑coated treat that feels freshly baked.