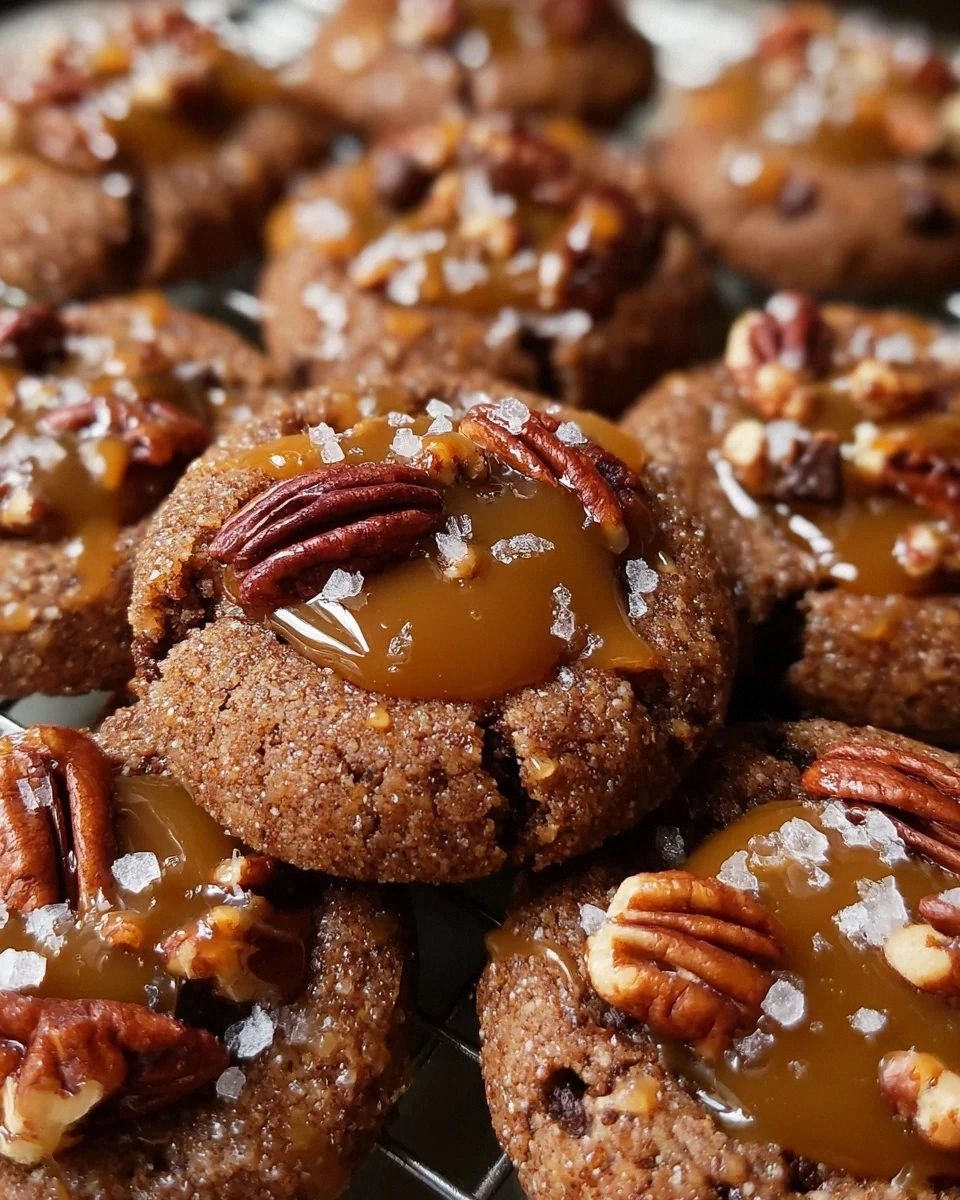
I once found myself in the middle of a frantic Saturday night, the pantry looking like a war zone after a cookie‑monster raid, and a sudden craving for something that could both soothe my sweet tooth and impress the whole family. I tossed together a half‑baked batch of chocolate cookies, but the result was… well, let’s just say it resembled a sad, flat pancake. That disaster sparked a dare from my roommate: “Make a cookie that actually looks like a work of art and tastes like a dream.” I accepted, and after countless trial‑and‑error sessions, I finally nailed the ultimate Pecan Caramel Thumbprint Cookies. This version is the culmination of those late‑night experiments, and trust me, it’s hands down the best version you’ll ever make at home.
Picture yourself standing in the kitchen, the butter melting in the bowl with a soft, buttery sigh, while the aroma of cocoa and toasted pecans swirls around you like a warm hug. The oven hums, and you can hear the faint crackle of caramel as it begins to turn a deep amber, promising a glossy, buttery center that will ooze out the moment you bite. When the cookies finally emerge, their edges are crisp, the tops are a glossy mahogany, and the centers are a molten caramel pool that glistens like liquid gold. The first bite delivers a symphony: a buttery, chocolate‑rich crust that shatters like thin ice, giving way to a silky caramel that coats the palate, finished with a crunch of toasted pecan and a whisper of sea salt.
Most recipes get this completely wrong. They either skip the cornstarch, resulting in a dry, crumbly cookie, or they over‑sweeten the caramel, turning it into a sticky mess that never sets. I’ve cracked the code by balancing the sweet and salty, adding a pinch of cinnamon and nutmeg to the caramel for depth, and using a small amount of coconut oil to make the chocolate drizzle set perfectly. The secret? A quick chill of the dough before baking, which creates that coveted “thumbprint” indentation that holds the caramel like a tiny treasure chest. I dare you to taste this and not go back for seconds.
I’ll be honest — I ate half the batch before anyone else got to try it, and the rest of the house still smells like a bakery on a cozy autumn afternoon. The reason this version stands out is simple: every ingredient has a purpose, every step is designed for texture and flavor, and the final product is a bite‑size masterpiece that feels both elegant and comfort‑food‑worthy. If you’ve ever struggled with thumbprint cookies that either fall apart or stay stubbornly flat, you’re not alone — and I’ve got the fix.
Okay, ready for the game‑changer? Let me walk you through every single step — by the end, you’ll wonder how you ever made it any other way.
What Makes This Version Stand Out
- Flavor Fusion: The marriage of rich chocolate, buttery caramel, and toasted pecans creates a layered taste that evolves with each bite, delivering sweet, salty, and nutty notes in perfect harmony.
- Texture Contrast: A crisp, buttery edge gives way to a soft, melt‑in‑your‑mouth center, while the caramel provides a gooey surprise that’s balanced by a satisfying crunch from the pecans.
- Simplicity Meets Sophistication: Despite the impressive flavor profile, the ingredient list is straightforward, and the technique is easy enough for a weekend baker yet impressive enough for a dinner party.
- Unique Thumbprint Design: The chilled dough holds a perfect indentation that captures the caramel without spilling, ensuring each cookie is a miniature caramel‑filled delight.
- Crowd‑Pleaser Factor: Guests invariably ask for the recipe, and the combination of chocolate, caramel, and nuts appeals to both kids and adults alike.
- Ingredient Quality: Using high‑quality unsalted butter and fresh, chopped pecans elevates the overall richness, while the pinch of sea salt on top adds a gourmet finish.
- Make‑Ahead Potential: The cookies can be baked ahead of time and stored, while the caramel can be reheated, making them perfect for holiday gatherings or last‑minute treats.
- Season‑Proof: Whether it’s a chilly winter night or a sunny summer afternoon, these cookies fit any occasion, thanks to their balanced flavor profile.
Inside the Ingredient List
The Flavor Base
All‑purpose flour is the backbone of any cookie, providing structure while allowing the butter and sugar to create that tender crumb. The cornstarch, though sneaky, cuts gluten formation, giving the cookie a melt‑in‑your‑mouth texture that’s impossible to achieve with flour alone. Unsalted butter brings richness; using a high‑fat, European‑style butter adds a buttery depth that feels luxurious on the tongue. Sugar not only sweetens but also contributes to the Maillard reaction, giving the cookies a caramelized, golden exterior.
The Texture Crew
A large egg acts as a binder, ensuring the dough holds together without becoming dense. Vanilla extract adds warmth and depth, turning a simple chocolate cookie into something aromatic and comforting. Kosher salt balances the sweetness and accentuates the chocolate’s bitterness, while baking cocoa infuses a deep, slightly bitter chocolate flavor that contrasts beautifully with the sweet caramel. Chopped pecans introduce a crunchy texture and a buttery, nutty flavor that pairs perfectly with the caramel’s silkiness.
The Unexpected Star
The caramel filling is a decadent blend of sugar, butter, heavy cream, and a pinch of sea salt. The sugar caramelizes to a deep amber, while butter adds a velvety mouthfeel. Heavy whipping cream introduces richness and prevents the caramel from becoming overly hard, ensuring it stays gooey when baked. Adding ground cinnamon and nutmeg brings a warm spice note that elevates the caramel from ordinary to unforgettable.
The Final Flourish
Semi‑sweet chocolate chips are drizzled on top, adding a glossy finish and an extra layer of chocolate intensity. Coconut oil helps the chocolate set quickly and gives it a subtle tropical hint that doesn’t overpower the other flavors. A final sprinkle of flaky sea salt (optional) creates a delightful contrast, turning each bite into a sweet‑salty masterpiece that sings on the palate.
Everything’s prepped? Good. Let’s get into the real action…
The Method — Step by Step
Preheat your oven to 350°F (175°C) and line two baking sheets with parchment paper. While the oven warms up, gather all your ingredients so you’re not scrambling mid‑process. This is the moment of truth: a properly preheated oven ensures the cookies rise evenly and develop that coveted golden edge.
In a large mixing bowl, whisk together the flour, cornstarch, cocoa powder, and kosher salt. The dry mix should look uniformly brown with no streaks of cocoa. This step is crucial because any lumps will become tiny pockets of bitterness in the final cookie.
In a separate bowl, cream 1 cup (2 sticks) of softened unsalted butter with 1 cup of granulated sugar until the mixture is pale, fluffy, and smells like a sweet, buttery cloud. Use a handheld mixer on medium speed for about 3‑4 minutes; this incorporates air, giving the cookies a light texture.
Kitchen Hack: Scrape the sides of the bowl with a silicone spatula every 30 seconds to ensure every butter grain gets fully incorporated.Add the large egg and 2 teaspoons of vanilla extract to the butter‑sugar mixture. Beat until just combined; over‑mixing can cause the dough to become tough. You’ll notice the batter turning glossy, a sign that the emulsification is spot on.
Gradually fold the dry ingredients into the wet mixture, using a spatula and a gentle hand. Stop mixing as soon as the flour disappears; you’re looking for a dough that’s slightly sticky but holds together. At this point, stir in the chopped pecans, ensuring they’re evenly distributed.
Divide the dough in half. Wrap each half in plastic wrap, shape into discs about 2 inches thick, and refrigerate for at least 20 minutes. This chilling step is pure magic — it firms the butter, prevents spreading, and creates a deep thumbprint later on.
While the dough chills, prepare the caramel. In a medium saucepan over medium heat, melt 4 tablespoons of unsalted butter, then whisk in ½ cup of sugar. Let the mixture bubble until it turns a deep amber, then carefully whisk in ¼ cup of heavy whipping cream (it will steam vigorously). Add ¼ teaspoon of salt, ½ teaspoon of ground cinnamon, and ¼ teaspoon of nutmeg. Stir until smooth, then remove from heat and let cool slightly.
Watch Out: Do not walk away while the sugar caramelizes; it can go from perfect amber to burnt in seconds.Scoop the chilled dough onto the prepared baking sheets using a tablespoon or a small ice‑cream scoop, spacing them about 2 inches apart. Using the back of a small spoon or the tip of a thumb, press a shallow indentation (about ¼ inch deep) into the center of each cookie. This is where the caramel will nestle, so make sure the well is deep enough to hold a generous dollop.
Bake the cookies for 10‑12 minutes, or until the edges are set and the tops have a matte, chocolatey sheen. The centers will still look slightly soft — that’s exactly what you want. While they’re baking, the caramel will continue to thicken, so resist the urge to open the oven too often.
Remove the cookies from the oven and, while they’re still warm, spoon about ½ teaspoon of caramel into each thumbprint. The warm cookie will melt the caramel just enough to create a glossy pool. Let the cookies cool on the sheet for 5 minutes, then transfer to a wire rack to finish cooling.
For the final flourish, melt the semi‑sweet chocolate chips with 2 tablespoons of coconut oil in a microwave‑safe bowl, stirring every 20 seconds until smooth. Drizzle the chocolate over each cookie in a zig‑zag pattern, then, if you like, sprinkle a pinch of flaky sea salt on top while the chocolate is still glossy.
Kitchen Hack: Use a piping bag or a resealable bag with a tiny corner cut off for a clean, even drizzle of chocolate.Allow the chocolate to set completely (about 15 minutes at room temperature or 5 minutes in the fridge). Once set, the cookies are ready to serve. That sizzle when the caramel hits the hot cookie? Absolute perfection.
That’s it — you did it. But hold on, I’ve got a few more tricks that’ll take this to another level…
Insider Tricks for Flawless Results
The Temperature Rule Nobody Follows
Always use room‑temperature butter and eggs. Cold butter will create pockets of dough that don’t blend, leading to uneven spreading. If your kitchen is warm, pop the butter in the fridge for 10 minutes before creaming; if it’s cold, let it sit out a bit longer. This temperature control ensures a uniform, buttery texture that’s neither greasy nor dry.
Why Your Nose Knows Best
When the caramel reaches that perfect amber hue, you’ll smell a nutty, toasty aroma that’s unmistakable. Trust your nose more than the clock; the visual cue can be deceptive. If the scent turns slightly burnt, pull the pan off the heat immediately and stir vigorously to stop the cooking process.
The 5‑Minute Rest That Changes Everything
After mixing the dough, let it rest for 5 minutes before chilling. This short rest allows the flour to hydrate fully, resulting in a softer crumb and a more cohesive dough that’s easier to shape. A friend once skipped this step and ended up with crumbly cookies that fell apart before they even hit the oven.
Chill, Then Chill Again
After forming the dough discs, give them a second chill (another 10 minutes) right before scooping. This double‑chill method locks in the butter’s firmness, ensuring the thumbprint stays deep and the cookies don’t spread too much. The result? Perfectly round cookies with a pronounced well for caramel.
The Drizzle Technique
When drizzling chocolate, let it cool just enough to thicken slightly (about 2 minutes). Too hot, and it will run off the cookie; too cool, and it will harden before you can drizzle. Using a small offset spatula to spread the drizzle can create a glossy, professional look.
Creative Twists and Variations
This recipe is a playground. Here are some of my favorite ways to switch things up:
Maple‑Pecan Delight
Swap the caramel’s sugar for pure maple syrup and add a splash of bourbon to the caramel base. The result is a warm, autumnal flavor that pairs beautifully with the toasted pecans. Perfect for a cozy fall gathering.
Espresso‑Infused Dream
Add 1 tablespoon of instant espresso powder to the dry mix and replace half of the chocolate chips with dark chocolate chunks. The coffee note deepens the chocolate flavor, giving the cookies a sophisticated, slightly bitter edge that coffee lovers adore.
White Chocolate‑Coconut Bliss
Use white chocolate chips instead of semi‑sweet, and fold in ¼ cup of toasted shredded coconut into the dough. The tropical twist balances the rich caramel, creating a bright, festive bite perfect for summer picnics.
Spicy Chili‑Chocolate
Incorporate a pinch of cayenne pepper into the cocoa‑flour blend and drizzle a thin line of chili‑infused chocolate on top. The subtle heat awakens the palate and makes the cookies a conversation starter at any party.
Nut‑Free Alternative
Replace the pecans with toasted sunflower seeds or pumpkin seeds for a nut‑free version that still offers crunch and a buttery flavor. This makes the cookies accessible to friends with nut allergies without sacrificing texture.
Storing and Bringing It Back to Life
Fridge Storage
Place the cooled cookies in an airtight container with a piece of parchment between layers. Store in the refrigerator for up to one week. The cool environment keeps the caramel from hardening too much while preserving the cookie’s crisp edges.
Freezer Friendly
Wrap each cookie individually in plastic wrap, then place them in a zip‑top freezer bag. They’ll stay fresh for up to three months. When you’re ready to enjoy them, let them thaw at room temperature for 15 minutes, then add a tiny splash of heavy cream to the caramel before reheating for that fresh‑out‑the‑oven gooeyness.
Best Reheating Method
Preheat the oven to 300°F (150°C), place the cookies on a parchment‑lined tray, and bake for 5‑7 minutes. The gentle heat revives the chocolate drizzle and warms the caramel without drying out the cookie. Add a drizzle of fresh caramel or a dusting of sea salt after reheating for an extra pop.