The kitchen had been a battlefield that night—flour everywhere, a rogue slice of cheesecake that collapsed in the oven, and my friend’s sarcastic grin that said, “You’re not going to make this again.” I was halfway through a recipe that promised a “cheesecake Danish” and halfway to a kitchen full of regret. The air was thick with the scent of melted butter, vanilla, and the faint but unmistakable aroma of fresh strawberries. The sound of the oven timer ticking like a metronome was a soundtrack to my culinary panic. I stared at the parchment paper, determined to turn this disaster into a triumph. Let me walk you through every single step — by the end, you'll wonder how you ever made it any other way.
Picture yourself pulling this out of the oven, the whole kitchen smelling incredible, and the first bite sending a wave of buttery, creamy delight across your palate. The pastry crackles like a crisp summer morning, the cheesecake filling glistens with a glossy sheen, and the strawberries burst with juicy sweetness that lingers like a sweet aftertaste. I dare you to taste this and not go back for seconds. This is hands down the best version you'll ever make at home, a sweet symphony that plays on your tongue. Most recipes get this completely wrong, but here’s what actually works. If you've ever struggled with this, you're not alone — and I've got the fix.
I’ll be honest — I ate half the batch before anyone else got to try it. That sizzle when it hits the pan? Absolute perfection. The texture is a flawless balance between flaky pastry and silky filling, with a hint of citrus that elevates the whole experience. The final result is a dessert that looks as good as it tastes, making it a showstopper for brunches, birthdays, or just a quiet afternoon indulgence. The secret? A simple dough, a luscious cheesecake base, and a splash of strawberry magic. And the best part? It’s surprisingly quick and easy to pull off. Okay, ready for the game-changer?
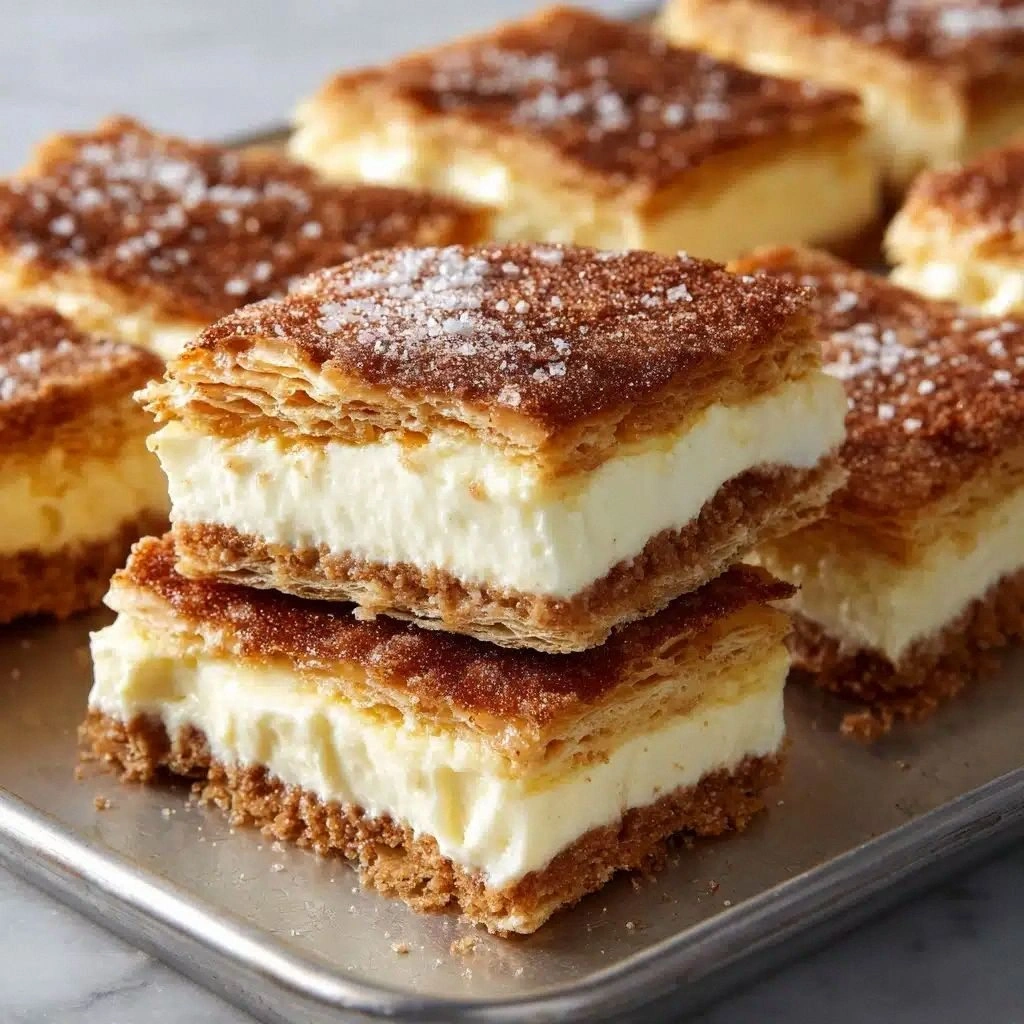
The first thing that sets this apart is the technique of layering flavors and textures. The pastry isn’t just a wrapper; it’s a buttery canvas that holds the creamy filling in place. The cheesecake base is light enough to let the strawberries shine, yet rich enough to satisfy a craving for dessert. The combination of fresh and jammed strawberries gives a depth of flavor that’s both bright and sweet. The final touch of lemon zest adds a subtle zing that cuts through the richness. This recipe is a playground where every bite tells a story, from the crisp edge to the soft center. Alright, let's break down exactly what goes into this masterpiece...
What Makes This Version Stand Out
- Texture: The pastry achieves a perfect balance of flaky and tender, with a slight crunch that gives way to a melt-in-your-mouth crumb.
- Flavor: The cheesecake filling is airy, with just the right amount of sweetness, while the strawberries provide a juicy counterpoint.
- Simplicity: No complicated doughs or multiple stages—just a single recipe that delivers a showstopper.
- Versatility: It can be served for breakfast, brunch, or dessert, and it adapts well to seasonal fruit variations.
- Make‑ahead: The Danish can be assembled and refrigerated, then baked fresh when you’re ready to serve.
- Visual Appeal: The golden crust, the glossy filling, and the bright strawberry topping make for Instagram-worthy plating.
- Ingredient Quality: Using high‑quality cream cheese and fresh strawberries elevates the entire dish.
- Audience Reaction: Friends and family rave about the harmony of flavors and the buttery finish.
Inside the Ingredient List
The Flavor Base
All-purpose flour and a pinch of salt create the structural backbone of the pastry. The powdered sugar sweetens the dough just enough to complement the cheesecake filling without overpowering it. If you omit the powdered sugar, the pastry will taste slightly flat and less fragrant. For a gluten-free version, swap in a 1:1 blend of gluten-free flour and a touch of xanthan gum.
The Texture Crew
Cold, cubed butter is the secret to flaky layers; it melts into pockets of buttery steam during baking. Ice water brings the dough together without overworking it, preserving that tender crumb. A pinch of cinnamon, while optional, adds a warm spice that rounds out the flavor profile. If you’re feeling adventurous, sprinkle a light dusting of cocoa powder over the dough before rolling for a chocolatey twist.
The Unexpected Star
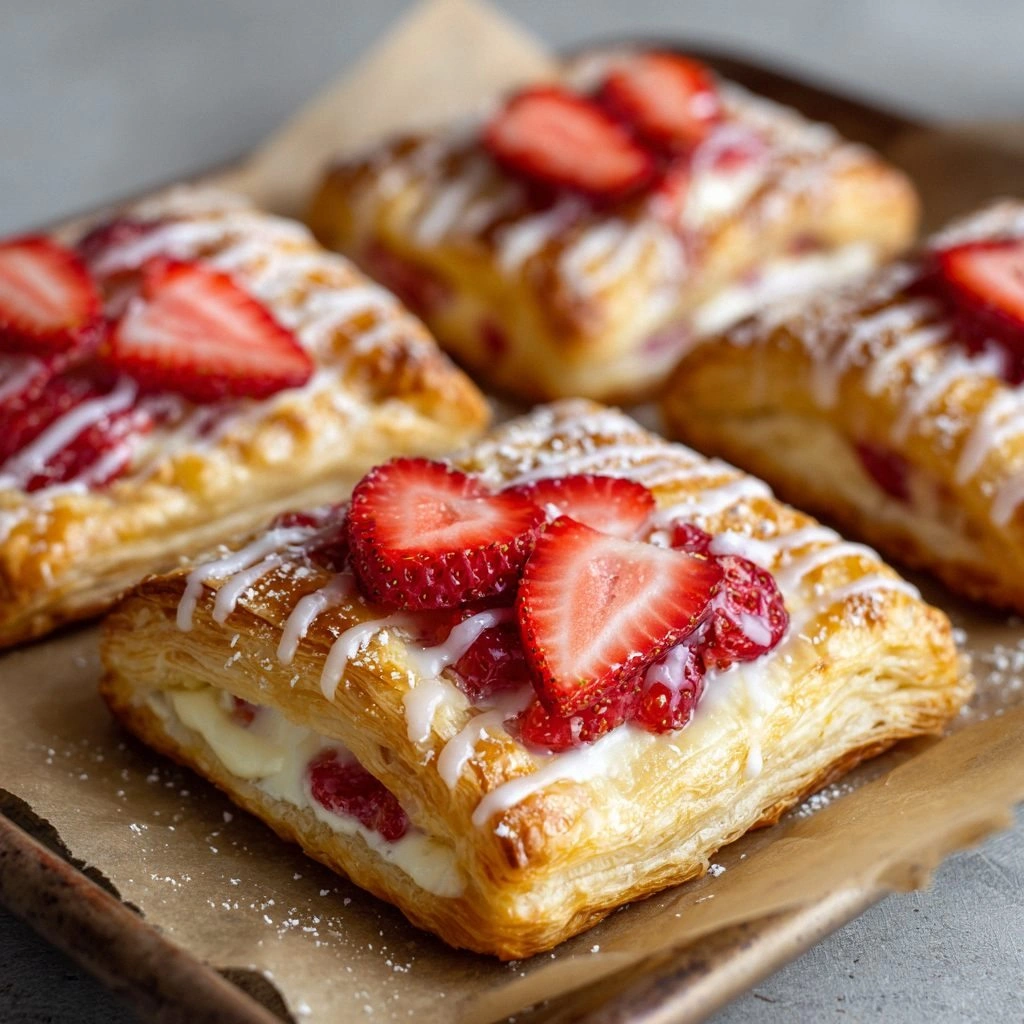
Fresh strawberries are the star that brightens the entire dish. Diced to the right size, they provide bursts of juice that mingle with the creamy filling. Strawberry jam, used sparingly, adds depth and a glossy sheen. If you’re in season, use a mix of sliced strawberries for a more rustic look. The jam’s syrupy texture also helps bind the filling together.
The Final Flourish
Cream cheese and granulated sugar combine to form a silky filling that is light enough to let the strawberries shine. Vanilla extract brings aromatic warmth, while lemon zest cuts through the richness with a bright citrus note. A beaten egg serves as an egg wash, giving the pastry a glossy finish and a golden crust. For extra freshness, sprinkle chopped mint leaves on top before serving.
Everything's prepped? Good. Let's get into the real action.
The Method — Step by Step
- Preheat the oven to 375°F (190°C). Line a baking sheet with parchment paper to prevent sticking. The oven should be fully preheated before you begin, ensuring an even bake. This step is crucial for achieving a golden crust. Keep an eye on the timer; the first few minutes are when the pastry expands.
- In a large mixing bowl, combine 2 cups of all-purpose flour, 1 teaspoon of salt, and ½ cup of powdered sugar. Stir until the dry ingredients are well blended. This mixture is the foundation of your pastry. A thorough blend ensures even distribution of salt and sugar. It also prevents lumps in the dough.
- Add 1 cup of cold, cubed butter to the flour mixture. Using a pastry cutter or your fingertips, cut the butter into the flour until the mixture resembles coarse crumbs. The cold butter should remain in small pieces to create flaky layers. If the butter starts to melt, refrigerate the dough briefly. This step is a game changer for texture.
- Pour in ¼ cup of ice water, a tablespoon at a time, and gently fold the mixture until the dough comes together. Do not overwork the dough; it should feel just slightly sticky. The ice water keeps the butter cold, preventing the dough from becoming tough. Once the dough is cohesive, shape it into a ball and flatten into a disc. Wrap tightly in plastic and chill for 30 minutes.
- While the dough chills, prepare the cheesecake filling. In a bowl, beat 2 cups of softened cream cheese until smooth. Add 1 cup of granulated sugar and 2 teaspoons of vanilla extract, and continue beating until the mixture is light and fluffy. The cream cheese should be at room temperature for optimal texture. This filling will be the heart of the Danish.
- Fold in 1 cup of diced fresh strawberries and 2 tablespoons of strawberry jam. The jam adds a glossy sheen and a hint of sweetness that balances the tartness of the strawberries. Mix gently to distribute the fruit without crushing it. Let the mixture sit for 5 minutes to allow the flavors to meld. This step is where the magic begins.
- Remove the dough from the refrigerator and roll it out on a lightly floured surface to a thickness of about ¼ inch. Cut the dough into 12 equal squares. Place a tablespoon of the cheesecake filling in the center of each square. Fold the dough over the filling to form a triangle or rectangle, sealing the edges by pinching them together. This shape creates a classic Danish appearance.
- Place the filled pastries on the prepared baking sheet, leaving a little space between each. Brush the tops with a beaten egg to give them a shiny, golden finish. Bake for 25–30 minutes, or until the pastry is puffed and golden brown. The edges should pull away slightly from the parchment. When done, let them cool on a wire rack.
- Once cooled, garnish with fresh strawberries and a sprinkle of chopped mint leaves. A light drizzle of honey or a dusting of powdered sugar can add a final touch of elegance. Serve immediately or chill for a few hours to let the flavors deepen. The result is a dessert that looks as good as it tastes. Enjoy the applause from your guests.
That's it — you did it. But hold on, I've got a few more tricks that'll take this to another level. The next section will dive into insider secrets that will make your Danish shine even brighter.
Insider Tricks for Flawless Results
The Temperature Rule Nobody Follows
Baking at the exact temperature is essential. A 10°F variance can mean the difference between a golden crust and a soggy pastry. Use an oven thermometer to ensure accuracy. Preheat for at least 10 minutes before placing your Danish in. This trick saves countless batches.
Why Your Nose Knows Best
Trust your sense of smell. When the pastry starts to develop a golden hue and a buttery aroma, it's ready to go. If it smells like raw dough, it needs more time. This sensory cue is often overlooked but incredibly reliable.
The 5-Minute Rest That Changes Everything
After baking, let the Danish rest on a rack for exactly five minutes. This short rest allows steam to escape, preventing sogginess. It also lets the filling set slightly, making slicing cleaner. Skip this step and you'll end up with a mess.
The Perfect Egg Wash
Beat the egg with a tablespoon of water to create a lighter glaze. Brush the pastry lightly; too much will make it greasy. A thin coat gives a beautiful shine without altering the flavor.
The Secret to a Fluffy Crumb
Use cold butter and chill the dough properly. The cold fat creates steam pockets that puff up during baking. Keep the dough in the fridge for at least 30 minutes before rolling.
The Final Touch of Freshness
Add a handful of fresh mint leaves just before serving. The mint adds a bright, herbal note that cuts through the richness. It also creates a pleasing visual contrast with the strawberries.
Creative Twists and Variations
Blueberry Cheesecake Danish
Swap the strawberries for fresh blueberries and add a splash of lemon juice to brighten the flavor. The blueberries give a pop of color and a slightly tart contrast. This version is perfect for a late summer brunch.
Chocolate Raspberry Danish
Replace the strawberry jam with a swirl of melted dark chocolate and fold in fresh raspberries. The chocolate adds depth, while the raspberries keep the fruity element. This indulgent twist works great for dessert parties.
Caramel Apple Danish
Use thinly sliced apples sautéed in butter and brown sugar, then layer them with the cheesecake filling. Drizzle caramel sauce over the top before baking for a sweet, sticky finish. This variation is a cozy fall favorite.
Pistachio Nutella Danish
Spread a thin layer of Nutella over the pastry before adding the filling, and sprinkle chopped pistachios on top. The nutty crunch pairs wonderfully with the creamy base. This is a decadent option for chocolate lovers.
Lemon Blueberry Danish
Add a teaspoon of lemon zest to the cheesecake mixture and top with fresh blueberries. The citrus zing brightens the overall taste, making it lighter and more refreshing. Great for a brunch that needs a pop of brightness.
Mango Coconut Danish
Incorporate diced mango and a splash of coconut milk into the filling. The tropical flavors create a vacation vibe, even in your kitchen. This is an excellent choice for a summer gathering.
Storing and Bringing It Back to Life
Fridge Storage
Store the Danish in an airtight container for up to three days. Keep them on a rack to maintain crispness. When ready to serve, let them sit at room temperature for 15 minutes to soften the pastry. Avoid microwaving, as it will make the crust soggy.
Freezer Friendly
Wrap each pastry individually in plastic wrap and place them in a freezer bag. They stay fresh for up to two months. To reheat, bake at 350°F (175°C) for 10–12 minutes, or until warmed through. The pastry regains its flaky texture.
Best Reheating Method
Preheat your oven to 350°F (175°C). Place the Danish on a baking sheet and bake for 8–10 minutes. For an extra crisp crust, brush lightly with melted butter before baking. A tiny splash of water in the pan creates steam, keeping the pastry moist.