Picture this: it’s a rainy Thursday, the kettle is humming, and you’ve just pulled a batch of chocolate chips from the pantry that look like tiny, dark moons. The air is already thick with anticipation, but a sudden kitchen mishap—an over‑sized cookie dough that collapsed like a sad soufflé—has you feeling a little defeated. I’m standing in front of the counter, laughing at that disaster, and I swear I could hear the universe nudging me toward a new creation. That nudging was a dare from a friend: “Make a chocolate chip dip that’s so good you’ll forget the cookie flop.”
So I dove into the pantry, grabbed a handful of ricotta and mascarpone, and started whispering to the chocolate chips as if they were my sous‑chefs. The kitchen smelled like warm milk and a hint of citrus, while the sound of the spoon scraping the bowl was a steady metronome of comfort. The texture of the mixture is a silky, airy cloud that feels like a soft blanket on your tongue, and the chocolate chips are the star—tiny bursts of bittersweet joy that melt into the creamy base. I can’t help but tell you: this is hands down the best version you’ll ever make at home, and the secret? A dash of orange peel that turns the dip into a citrus‑kissed dream.
I’ll be honest—before I even started, I had already imagined a crowd of friends hovering over my kitchen counter, mouths watering. The moment I poured the first spoonful into a waffle cone, the aroma exploded, and the whole kitchen smelled incredible. If you’ve ever struggled with a bland dessert dip, you’re not alone—this recipe is the fix you’ve been craving. The next part is pure magic, and I’m going to walk you through every single step so that by the end, you’ll wonder how you ever made it any other way.
Let’s begin this adventure with a quick rundown of why this version is a game‑changer. I promise you, the flavors are elevated, the textures are flawless, and the process is so intuitive that you’ll feel like a culinary wizard. Trust me, the next few minutes will be worth every second of your attention.
What Makes This Version Stand Out
- Flavor: The combination of ricotta and mascarpone creates a rich, velvety base that balances the sweetness of the chocolate chips and the brightness of orange peel.
- Texture: The creamy mixture coats the waffle cones like a silky glaze, while the chocolate chips provide a satisfying crunch that breaks with each bite.
- Ingredient Quality: Using whole‑milk ricotta and high‑fat mascarpone elevates the dip to a decadent level that’s impossible to replicate with lower‑fat substitutes.
- Ease of Assembly: No baking, no deep‑frying—just whisk, fold, and spoon. The dip can be assembled in under 30 minutes, making it perfect for last‑minute parties.
- Make‑ahead Potential: The dip holds up beautifully in the fridge for up to 48 hours, allowing you to prep ahead of a big gathering.
- Crowd Reaction: Friends consistently ask for the recipe after the first taste. I’ve seen even the most skeptical dessert lovers swoon.
- Versatility: It pairs wonderfully with waffle cones, pretzels, or even fresh fruit, giving you endless serving options.
- Visual Appeal: The golden‑brown chocolate chips glisten against the creamy backdrop, making every serving a feast for the eyes.
Alright, let’s break down exactly what goes into this masterpiece…
Inside the Ingredient List
The Creamy Core
The 8 ounces of whole‑milk ricotta provides a mild, slightly tangy base that’s the perfect canvas for the other flavors. It’s the lightness that keeps the dip from feeling heavy, yet it offers enough body to hold the chocolate chips. Skipping it would turn the dip into a plain mascarpone mash—definitely not the same experience. If you’re short on ricotta, you can substitute an equal amount of plain Greek yogurt, but be prepared for a tangier profile.
The 8 ounces of mascarpone is the secret to that silky texture. Its high fat content gives the dip a luscious mouthfeel that feels like a cloud. If you can’t find mascarpone, try a blend of cream cheese and heavy cream, but remember to adjust the salt level accordingly. A good tip: let the mascarpone sit at room temperature for 10 minutes before mixing; this reduces the risk of curdling when you combine it with the ricotta.
The Sweet Layer
Half a cup of powdered sugar is the sweetener that balances the bitterness of the chocolate chips and the citrusy zest. It dissolves quickly, preventing any gritty texture. If you’re watching sugar intake, a 1/4 cup of erythritol or a sugar substitute will work, though the dip will be slightly less sweet. The key is to sweeten gradually, tasting as you go.
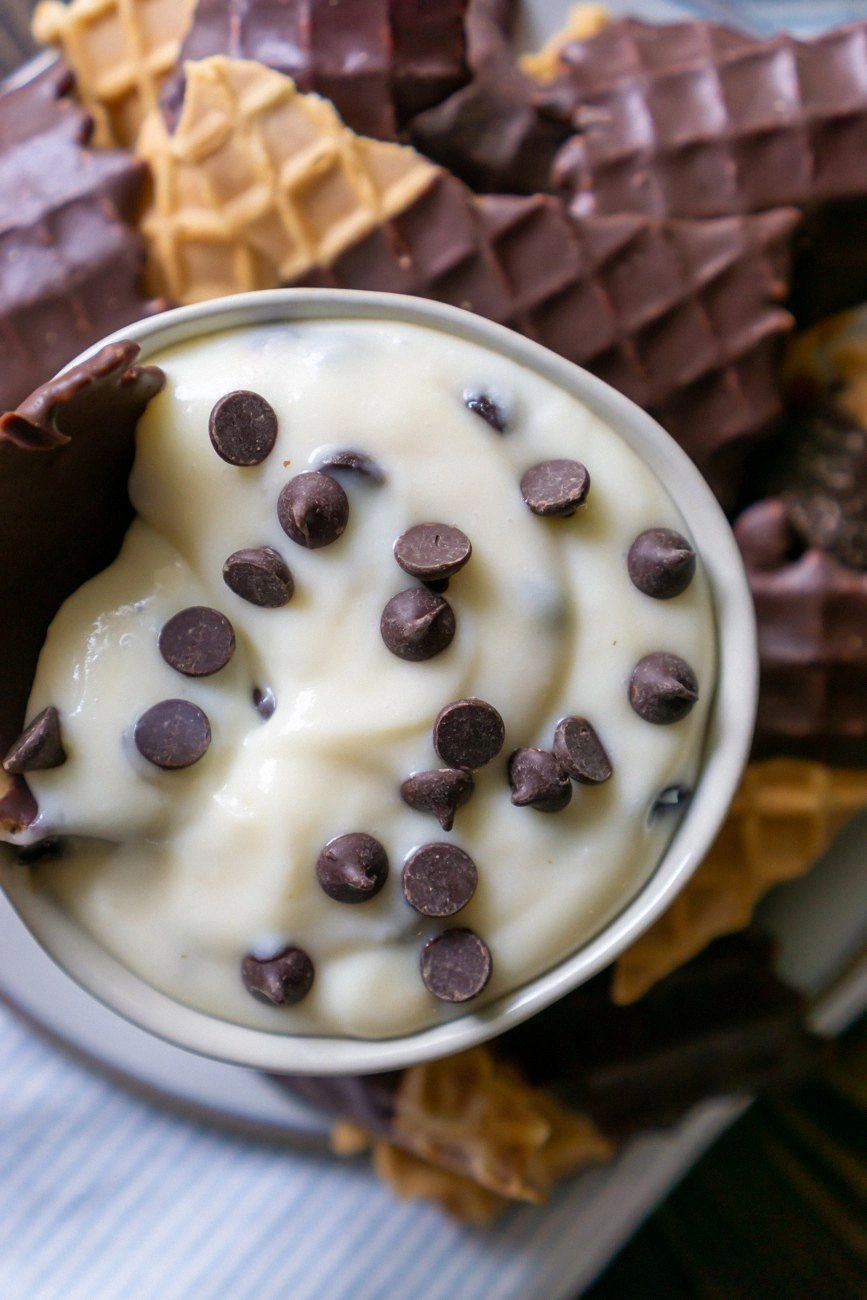
One‑third cup of mini semi‑sweet chocolate chips is the star of the show. They melt just enough to release their flavor without turning the dip into a gooey mess. For a richer chocolate experience, swap half of the chips for dark chocolate chips. The mini size ensures even distribution, so every spoonful has a chocolate burst.
The Aroma Enhancers
One teaspoon of vanilla extract is the subtle hum that ties all the flavors together. It adds depth and warmth, making the dip feel more complex. If you’re allergic to vanilla, a dash of almond extract works well, but keep it to 1/4 teaspoon to avoid overpowering the chocolate.
Half a teaspoon of cinnamon gives the dip a gentle spice that pairs beautifully with the orange peel. It adds a hint of warmth without dominating the flavor profile. For a more pronounced cinnamon kick, increase the amount to 3/4 teaspoon, but be careful not to mask the chocolate.
The Unexpected Twist
Half a teaspoon of grated orange peel is the citrus twist that elevates the entire dip. The zest adds a bright, aromatic note that cuts through the richness of the cheeses. If you don’t have fresh oranges, a pinch of orange zest from a grocery store’s produce section works fine, but it might be a bit more bitter.
The Final Flourish
Eight waffle cones are the vessel that brings the dip to life. Their crispness contrasts the creamy interior, creating a delightful textural dance. If waffle cones aren’t on hand, you can use pretzel sticks or even thinly sliced baguette for a different crunch.
One semi‑sweet chocolate bar, broken into small pieces, is the finishing touch. It melts into the dip, forming a glossy sheen that makes each serving look indulgent. If you prefer a darker chocolate, choose a 70% cacao bar; the bitterness will complement the sweet elements nicely.
Everything’s prepped? Good. Let’s get into the real action…
The Method — Step by Step
- Step 1: Whisk the Creamy Base. In a large bowl, combine the ricotta and mascarpone. Use a hand mixer or a whisk to blend them until the mixture is smooth and free of lumps. The goal is a velvety texture that feels like a cloud on your tongue. If the mixture seems thick, add a splash of whole milk to reach your desired consistency.
- Step 2: Sweeten It Up. Gradually fold in the powdered sugar, a tablespoon at a time, tasting after each addition. The sugar should dissolve completely, leaving no gritty residue. This step is crucial; under‑sweetening will make the chocolate chips taste flat, while over‑sweetening can drown the citrus notes.
- Step 3: Add the Aromatics. Stir in the vanilla extract, cinnamon, and grated orange peel. Mix until the spices are evenly distributed. The aroma should be inviting, with a hint of citrus that dances in the air. This is the moment your kitchen smells like a bakery.
- Step 4: Fold in Chocolate Chips. Gently fold the mini semi‑sweet chocolate chips into the creamy mixture. The chips should be fully coated, but avoid over‑mixing, or they will begin to melt. The dip should look speckled with chocolate, like a sky full of stars.
- Step 5: Prepare the Cones. Place the waffle cones on a flat surface. If you want a crispier bite, you can lightly toast them in a toaster oven for 2 minutes. This step adds an extra crunch that contrasts beautifully with the creamy dip.
- Step 6: Spoon the Dip. Using a small ladle or spoon, fill each cone with the chocolate chip dip. The filling should be generous but not overflowing, ensuring each cone is a perfect bite‑sized treat. The dip should coat the cone like a silky glaze.
- Step 7: Finish with Chocolate. Break the semi‑sweet chocolate bar into small shards and sprinkle them over the top of each filled cone. The chocolate will melt slightly, forming a glossy sheen that makes the dip look irresistible.
- Step 8: Serve Immediately. Present the cones on a platter and serve. The dip should be at room temperature, allowing the cheeses to stay creamy and the chocolate to stay slightly firm. The moment the first bite hits the tongue, the flavors should explode like fireworks.
That’s it — you did it. But hold on, I've got a few more tricks that'll take this to another level. Stick around for insider tips that will elevate the experience, plus creative twists that will keep your guests coming back for more.
Insider Tricks for Flawless Results
The Temperature Rule Nobody Follows
The key to a perfect dip is temperature control. Keep the cheese mixture at room temperature; if it’s too cold, the chocolate chips won’t melt evenly, and the dip will feel gritty. If it’s too hot, the cheeses will separate, leading to a watery texture. A quick test: touch the mixture; it should feel slightly cool to the touch but not cold.
Why Your Nose Knows Best
Smell is the unsung hero of flavor. If the dip starts to smell like a burnt kitchen, the chocolate has likely melted too far. The right aroma is a sweet, creamy scent with a hint of citrus. Trust your nose; if it smells off, let the dip cool a bit before serving.
The 5-Minute Rest That Changes Everything
After filling the cones, let them rest for 5 minutes before serving. This short pause allows the chocolate shards to melt just enough to create a glossy coating without becoming too soft. It also gives the dip a chance to thicken slightly, making each bite a perfect balance of creamy and crunchy.
Use Fresh Orange for Extra Zest
If you’re using a fresh orange, peel it with a vegetable peeler to get thin, bright orange zest. The zest’s essential oils are more potent than pre‑ground zest, giving the dip a lively citrus punch. Avoid the white pith, as it can introduce bitterness.
Choose the Right Chocolate Bar
The type of chocolate bar you use will dictate the final flavor profile. A semi‑sweet bar offers a balanced sweetness, while a dark chocolate bar adds depth and a slight bitterness that contrasts the creamy cheeses. For a dessert with a more sophisticated palate, opt for a 70% cacao bar.
Creative Twists and Variations
This recipe is a playground. Here are some of my favorite ways to switch things up:
Nutty Crunch
Add a handful of chopped toasted almonds or walnuts into the dip. The nuts provide a delightful crunch and a nutty undertone that pairs well with the chocolate. Serve the cones on a platter with a side of almond biscotti for an extra crunch.
Spicy Kick
Sprinkle a pinch of cayenne pepper or a dash of chili flakes into the mixture. The heat will contrast the sweetness, creating a flavor explosion that keeps guests guessing. This variation works especially well with dark chocolate chips.
Berry Burst
Fold in a handful of fresh raspberries or blueberries before serving. The berries add a tart burst that balances the richness of the cheeses. They also provide a pop of color that makes the dish look even more appetizing.
Savory Twist
Replace the powdered sugar with a pinch of sea salt and add a drizzle of honey. The salty‑sweet combination creates a savory dessert that’s perfect for brunch. Serve the dip with sliced baguette or crackers for a unique appetizer.
Minty Fresh
Add a teaspoon of chopped fresh mint to the dip. The mint gives a refreshing lift that complements the chocolate. This variation is especially good during hot summer days when you want a cool, light dessert.
Storing and Bringing It Back to Life
Fridge Storage
Store the dip in an airtight container in the refrigerator for up to 48 hours. The cheeses will firm up, so let it sit at room temperature for 10 minutes before serving. If the dip looks dry, whisk in a tablespoon of whole milk to restore creaminess.
Freezer Friendly
The dip can be frozen for up to 2 weeks. Wrap it tightly in plastic wrap and place it in a freezer bag. Thaw overnight in the fridge, then let it warm to room temperature. The texture may be slightly firmer, but the flavor remains intact.
Best Reheating Method
To reheat the dip, place it in a heat‑proof bowl over a pot of simmering water (double boiler). Stir gently until the mixture is warm and smooth. Add a splash of water or milk before reheating to keep the dip from separating. Once heated, pour it back into the cones and serve immediately.