I remember the night my kitchen turned into a disaster zone: the sweet potato mash I was whipping up for a quick snack had turned into a sticky, overcooked mess that clung to every surface. The heat was too high, the pot had a crack, and the aroma of burnt sugar floated through the air. I stared at the ruined mash, feeling a mix of frustration and a strange craving for something sweet, comforting, and utterly irresistible. That moment sparked a daring idea: what if we could turn a single ingredient—sweet potato—into a pancake that would melt in your mouth and leave you craving more? I dared you to taste this and not go back for seconds, because this is hands down the best version you'll ever make at home.
Picture the scene: a humble sweet potato, steamed to a velvety softness, mashed until it feels like a silky soup. The kitchen hums with the gentle hiss of the stove, the sweet scent of caramelized sugars drifting through the air. Your fingers, sticky with the mash, feel the heat of the pot as you scoop it into a bowl. As you stir, the mixture glistens like a warm amber lake, inviting you to taste it. The first spoonful is a burst of natural sweetness, a subtle earthiness that balances the subtle hint of orange, and a texture that feels like a cloud on your tongue. That sizzle when it hits the pan? Absolute perfection.
The beauty of this recipe lies in its simplicity: just two ingredients that work together like a duet. The sweet potato provides natural sweetness, moisture, and a subtle earthy flavor that lifts the batter. The flour gives structure, allowing the pancakes to rise and develop that golden crust we all crave. No leavening agents, no eggs, no dairy—just pure, honest flavor that respects the ingredient. I dare you to try this and watch the world of pancakes fall away, replaced by a single, glorious flavor that feels like a hug in a bowl.
But here's the twist that sets this version apart: the sweet potato is turned into a puree that becomes the very batter itself, eliminating the need for separate wet ingredients. The result is a pancake that is both fluffy and dense, with a caramelized edge that cracks like thin ice when you bite into it. The technique involves a delicate balance of temperature and timing—too hot, and you’ll scorch the edges; too low, and the pancakes will be gummy. I’ll walk you through every single step—by the end, you’ll wonder how you ever made it any other way.
So, grab your sweet potato, your trusty flour, and let’s embark on a culinary adventure that will redefine what a pancake can be. If you’ve ever struggled with pancake batter that turns out too dense or too runny, you’re not alone—this is the fix you’ve been waiting for. The next step? Let’s dive into what makes this version stand out from the rest.
What Makes This Version Stand Out
- Flavor: The natural sweetness of the potato infuses each bite with a subtle, comforting sweetness that feels like a warm hug.
- Texture: The batter’s density creates a pancake that is tender inside and caramelized outside, delivering that satisfying crunch.
- Simplicity: Only two ingredients—no eggs, no milk, no leavening—makes this recipe a breeze for even the most time‑constrained cooks.
- Uniqueness: Turning the sweet potato into the batter itself is a game‑changer that eliminates the need for separate wet ingredients.
- Crowd Reaction: The first bite triggers an “aha” moment—people can’t believe it’s just sweet potato and flour.
- Ingredient Quality: Using a high‑quality flour ensures a fine crumb and the right amount of structure.
- Cooking Method: The method relies on precise heat control, giving you a pancake that rises beautifully without over‑cooking.
- Make‑Ahead Potential:
Alright, let’s break down exactly what goes into this masterpiece. Each ingredient plays a crucial role, and the synergy between them creates a pancake that’s both comforting and extraordinary.
Inside the Ingredient List
The Flour Foundation
Flour is the backbone of any batter. In this recipe, it gives the pancakes their structure, allowing them to rise slightly while maintaining a tender crumb. The type of flour matters; a medium‑protein bread flour will yield a slightly chewier texture, whereas a cake flour will produce a lighter, softer pancake. If you don’t have the exact type on hand, all‑purpose flour will do just fine, but experiment with the ratio if you prefer a denser or lighter outcome. Skipping flour entirely would leave you with a mushy, unstructured mash that won’t hold its shape.
The Salt Symmetry
Salt is more than just a seasoning; it’s a flavor enhancer that balances the natural sweetness of the sweet potato. A pinch of salt brings out the depth of the potato’s earthy undertones and prevents the pancakes from tasting flat. Too much salt, however, will overpower the delicate sweetness and make the pancakes taste briny. If you’re watching sodium, a dash of sea salt works just as well, but be sure to measure carefully. Skipping salt entirely will leave the pancakes sweet but lacking that complex flavor profile.
The Unexpected Star
While the recipe lists only flour and salt, the real star is the sweet potato itself. The potato’s natural sugars caramelize during cooking, creating a golden crust that’s slightly crisp yet moist inside. Its inherent moisture eliminates the need for eggs or dairy, making this an excellent option for vegans and those with dietary restrictions. Choosing a sweet potato with a higher sugar content—like a Japanese variety—will intensify the caramelization and produce a richer flavor. If you’re in a pinch, a sweet potato mash from canned pumpkin can serve as a substitute, though the texture will differ slightly.
The Final Flourish
The final flourish is the method of combining the ingredients. Mixing the flour into the sweet potato mash until a smooth batter forms is critical; overmixing can develop gluten and make the pancakes tough. The batter should be thick enough to hold its shape but still pourable. A quick test is to drop a spoonful onto a hot pan; if it spreads slightly but stays together, the consistency is perfect. The batter’s final texture will determine how fluffy the pancakes become during cooking.
Everything’s prepped? Good. Let’s get into the real action and watch those pancakes rise.
The Method — Step by Step
- Step 1: Prepare the Sweet Potato. Start by steaming a medium sweet potato until it’s fork‑tender, which usually takes about 15 minutes. Once it’s done, let it cool enough to handle, then peel and mash it until it’s a smooth, lump‑free puree. The key is to achieve a velvety consistency; any lumps will create uneven texture in the pancakes. Keep the puree in a bowl; it will serve as the base for the batter.
- Step 2: Combine Flour and Salt. In a separate mixing bowl, whisk together 2 cups of flour and 1 teaspoon of salt. This ensures an even distribution of salt throughout the batter, preventing pockets of seasoning that could burn. Use a whisk or fork to avoid clumps. The flour will absorb moisture from the sweet potato, creating a thicker batter.
- Step 3: Merge the Mixtures. Gently fold the flour mixture into the sweet potato puree. Stir slowly and patiently, ensuring that the batter remains smooth. Overmixing can cause gluten development, leading to a tougher pancake. The batter should be thick enough to hold its shape but still pourable; if it’s too thick, add a splash of water or vegetable broth to thin it slightly.
- Step 4: Preheat the Pan. Heat a non‑stick skillet over medium heat. Add a small pat of butter or a drizzle of oil, allowing it to melt and coat the surface. The pan should be hot enough that a drop of water sizzles and evaporates almost immediately, but not so hot that the butter burns. This temperature is crucial for achieving a golden crust.
- Step 5: Pour the Batter. Using a 1/4 cup measure, pour batter onto the skillet. The batter should spread slightly but remain in a round shape. Don’t crowd the pan; cooking pancakes in batches ensures even cooking. As the batter cooks, you’ll notice a light steam rising—this is a good sign.
- Step 6: Flip at the Right Time. When bubbles form on the surface and the edges lift, it’s time to flip. Use a spatula to carefully turn the pancake. The flip should be smooth; if the pancake sticks, the pan isn’t hot enough. Cook the second side until it’s golden brown and the pancake feels firm to the touch.
- Step 7: Repeat Until Done. Continue the process with the remaining batter, making sure to adjust the heat if the pan starts to smoke. Keep the pancakes warm in a low oven if you’re making a large batch. The key to perfect pancakes is consistent heat and patience.
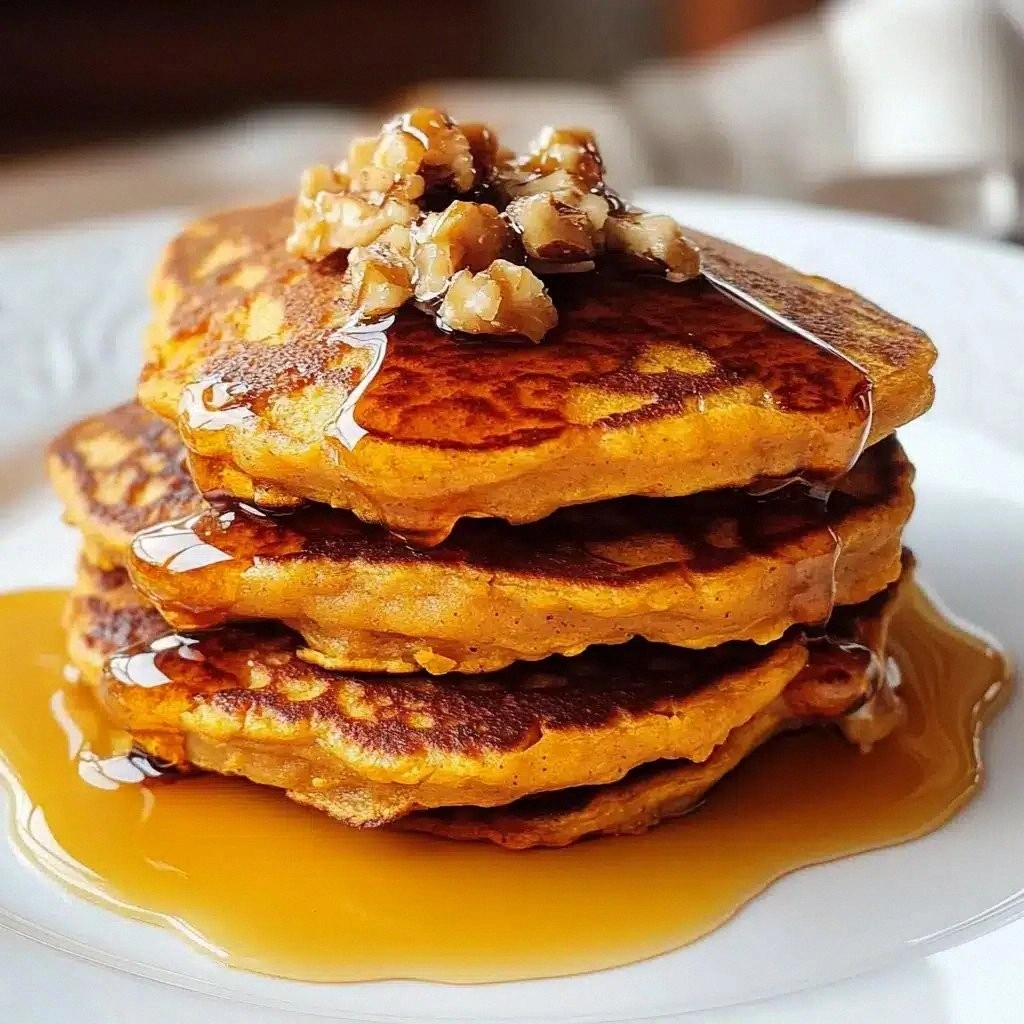
- Step 8: Serve Immediately. Serve the pancakes hot from the pan, topped with your favorite drizzle—perhaps a dollop of yogurt, a swirl of maple syrup, or a sprinkle of powdered sugar. The pancakes are best enjoyed fresh, but leftovers can be reheated gently in a toaster or oven.
That’s it— you did it. But hold on, I’ve got a few more tricks that will take this to another level. These insider tips will help you perfect the texture, flavor, and overall experience of your sweet potato pancakes.
Insider Tricks for Flawless Results
The Temperature Rule Nobody Follows
Many cooks underestimate the importance of pan temperature. The trick is to test the heat by flicking a small amount of batter onto the skillet; it should sizzle immediately and spread slightly. If it takes too long to heat, lower the flame; if it burns quickly, increase the heat slightly. I once tried to cook a batch on high, and the pancakes came out charred on the edges while the inside remained raw. The lesson? Keep the heat steady and moderate, and you’ll get that perfect golden crust every time.
Why Your Nose Knows Best
Your nose is a powerful tool for judging doneness. As the pancakes cook, they’ll emit a warm, sweet aroma that’s almost intoxicating. When you smell caramelizing sugars, you know the edges are crisping and the interior is setting. If the scent is faint, the pancakes need more time; if it’s overpowering, you’re overcooking. Trust that olfactory cue—it’s a reliable indicator of the perfect pancake.
The 5-Minute Rest That Changes Everything
After cooking, let the pancakes rest on a wire rack for five minutes. This rest period allows the steam to redistribute, preventing sogginess on the surface. It also gives the batter a chance to firm up, making the pancakes easier to slice or stack. I’ve seen people skip this step, resulting in a pancake that feels mushy right out of the pan. Trust me, a short rest is a game‑changer.
Add a Touch of Citrus for Brightness
A squeeze of fresh lemon or orange juice on the batter before cooking can brighten the flavor profile. The acidity cuts through the sweetness, creating a more balanced taste. This is especially effective if you’re serving the pancakes with a sweet topping; the citrus will cut through the richness. Try it once and see how it transforms the whole dish.
Keep the Batter Cold for a Fluffy Texture
If you’re making a large batch, keep the batter in the refrigerator until you’re ready to cook. Cold batter yields a fluffier texture because the fat in the batter doesn’t melt as quickly, allowing the starches to expand more fully. I’ve cooked pancakes from cold batter, and the difference in fluffiness is noticeable. Give it a try next time you’re in a rush.
Creative Twists and Variations
This recipe is a playground. Here are some of my favorite ways to switch things up:
Spiced Sweet Potato Pancakes
Add a pinch of cinnamon or nutmeg to the batter for a warm, aromatic twist. These spices pair beautifully with the natural sweetness of the potato. Serve with a drizzle of honey or a dollop of whipped cream for an indulgent breakfast.
Savory Sweet Potato Pancakes
Omit the salt and add chopped herbs like rosemary or thyme. A splash of soy sauce or tamari can give it a umami kick. Top with sautéed onions and a fried egg for a hearty brunch.
Gluten‑Free Version
Swap the all‑purpose flour for a gluten‑free blend that contains xanthan gum. This keeps the pancakes tender and prevents them from falling apart. The texture is slightly different but still delicious.
Vegan Sweet Potato Pancakes
These are already vegan, but you can enhance the flavor by adding a splash of almond milk to the batter. The milk adds a subtle nutty taste and improves the batter’s consistency.
Sweet Potato Pancakes with a Sweet Twist
Fold in a handful of dried cranberries or raisins before cooking. The dried fruit will burst with moisture and add a chewy texture that contrasts nicely with the softness of the pancake.
Sweet Potato Pancakes with a Sweet Twist
Fold in a handful of dried cranberries or raisins before cooking. The dried fruit will burst with moisture and add a chewy texture that contrasts nicely with the softness of the pancake.
Storing and Bringing It Back to Life
Fridge Storage
Cool the pancakes completely, then stack them with parchment paper between layers. Store in an airtight container in the refrigerator for up to 3 days. The pancakes will retain their softness, but a quick reheat will restore the crispness.
Freezer Friendly
Place cooled pancakes in a single layer on a baking sheet, freeze for 2 hours, then transfer to a freezer bag. They’ll stay fresh for up to 2 weeks. When ready to eat, pop a pancake into a toaster or oven to revive the texture.
Best Reheating Method
Add a tiny splash of water to the pan before reheating; the steam will help the pancakes rehydrate and stay moist. Alternatively, wrap in foil and heat in a low oven for 5 minutes. This trick ensures the pancakes aren’t dry or rubbery.