Picture this: you’re standing in your kitchen, the fluorescent lights humming overhead, a midnight craving for something sweet and chocolatey swirling in your head. The clock reads 11:32 p.m., the fridge is a barren wasteland of ingredients, and your only hope lies in the box of Hershey’s chocolate sitting on the counter. You’re not going to wait for a bakery to open or a fancy recipe to unfold in a dozen steps. You’re going to create a dessert that’s as indulgent as it is effortless. That’s where this 3‑Ingredient No‑Bake Hershey P comes in—an audaciously simple, yet decadently rich treat that proves you can make something truly spectacular with just a handful of pantry staples.
The first bite is a revelation: the chocolate melts like velvet against your tongue, the buttery undertone coats the palate, and the subtle sweetness of the sugar balances the deep cocoa notes. The aroma alone—rich, dark, and unmistakably chocolate—fills the room, turning your kitchen into a clandestine chocolate haven. The texture is silky smooth, yet firm enough to hold its shape, making it ideal for a quick dessert that still feels special. The only thing missing is a crust, but that’s a conversation for another time. The point is, this recipe is a masterclass in flavor concentration.
What sets this version apart from every other chocolate pie out there? First, it’s *no‑bake*, meaning you skip the oven entirely—no preheating, no waiting, no fuss. Second, the ingredient list is a trio: Hershey’s chocolate, butter, and sugar. Third, the method is a single, streamlined process that guarantees a silky filling without the risk of overcooking or burning. Fourth, the result is a dense, fudgy core that sets in minutes, ready to be sliced and served. Fifth, it’s a crowd‑pleaser—anyone who tastes it will swear it’s the best chocolate dessert they’ve ever had. And finally, the recipe is so straightforward that even a kitchen rookie can master it in a single attempt.
I dare you to taste this and not go back for seconds. I’ll be honest—once I finished the first slice, I didn’t bother to finish the whole batch because I could taste the same exquisite flavor in every bite. The secret? A gentle heat that melts the chocolate just enough to bind the butter and sugar, without turning it into a sticky mess. The result is a filling that’s creamy, buttery, and intensely chocolatey, all in one bite. And the best part? You’ll never have to open a bag of chocolate chips again. This is hands down the best version you’ll ever make at home.
If you’ve ever struggled with pie crusts that crack or fillings that are too runny, you’re not alone—and I’ve got the fix. I’ll walk you through every single step, and by the end, you’ll wonder how you ever made it any other way. Stay with me, because this next part is pure magic, and the payoff is worth every second.
What Makes This Version Stand Out
- Taste: The chocolate is the star, and it shines without any distractions. The butter adds a silky richness that elevates the cocoa’s depth, while the sugar provides a clean finish that doesn’t overpower the chocolate.
- Texture: The filling is thick enough to hold its shape yet silky enough to melt in your mouth. It’s the kind of texture that makes you think you’re eating a piece of cake, but it’s actually a chocolate pie.
- Simplicity: Three ingredients, one pot, and a few minutes of stirring. No measuring cups, no baking sheets, no oven—just a pot, a spoon, and a bit of patience.
- Uniqueness: Most chocolate pies require a crust and a baking step. This version eliminates both, delivering a dessert that feels luxurious but is practically instant.
- Crowd Reaction: Friends who try it often say it tastes like a chocolate bar with a buttery twist. The reaction is usually “Where did you get this?” followed by a chorus of “Make it for me!”
- Ingredient Quality: The recipe hinges on using good Hershey’s chocolate. The better the chocolate, the richer the flavor. It’s a win‑win: you get a gourmet dessert with a cheap, accessible ingredient.
- Cooking Method: The gentle heat melts the chocolate just enough to bind everything together, creating a cohesive filling that sets without baking.
- Make‑Ahead Potential: You can make this pie up to 24 hours ahead and keep it refrigerated. The filling stays firm and tastes even better the next day.
Alright, let’s break down exactly what goes into this masterpiece…
Inside the Ingredient List
The Flavor Base
At the heart of this pie is the Hershey’s chocolate—ideally a 6‑oz block of dark or milk chocolate, depending on your preference. The chocolate’s cocoa content determines the intensity of flavor. Dark chocolate gives a more sophisticated, bittersweet profile, while milk chocolate offers a creamy, sweeter bite. If you’re feeling adventurous, mix a splash of espresso powder to deepen the chocolate notes without adding caffeine.
The Texture Crew
Butter is the unsung hero that binds the chocolate and sugar together. It adds a silky mouthfeel and a subtle richness that makes the filling feel luxurious. Butter also helps the chocolate set into a firm yet pliable texture. If you prefer a dairy‑free version, use an equal amount of plant‑based butter or coconut butter for a slightly tropical undertone.
The Unexpected Star
Granulated sugar is the final ingredient, and it plays a dual role: sweetening the chocolate and helping it set. Sugar also helps balance the bitterness of dark chocolate, creating a harmonious flavor profile. If you’re watching your sugar intake, you can swap it for a natural sweetener like stevia or monk fruit, though the texture may change slightly.
The Final Flourish
Even though the recipe only lists three ingredients, the final flourish comes from the way you handle the mixture. Let the chocolate melt gently, then stir in the butter and sugar until the mixture is smooth. The key is to keep the heat low; too high and the chocolate will burn, too low and it won’t melt fully. The result is a glossy, velvety filling that sets in a few minutes.
Everything’s prepped? Good. Let’s get into the real action…
The Method — Step by Step
- Place the Hershey’s chocolate in a heat‑proof bowl. I prefer a glass measuring cup because it lets you see the chocolate melt without the risk of scorching. Set the bowl over a saucepan of barely simmering water—this double‑boiler method keeps the temperature steady. The chocolate should begin to soften after about a minute, turning from solid to a silky, glossy liquid. This is the moment of truth; if the chocolate starts to brown, pull it immediately.
- Add the butter to the melted chocolate. Stir gently with a silicone spatula until the butter is fully incorporated. The mixture should look like a smooth, glossy sauce. If you notice any lumps, give it another minute or two. The butter not only adds flavor but also gives the filling that buttery sheen that makes it look as good as it tastes.
- Introduce the sugar, one tablespoon at a time, whisking constantly. The sugar should dissolve completely, leaving no gritty texture. If you’re using a darker chocolate, you may want to add a pinch of sea salt to cut the sweetness. This step is crucial because the sugar helps the mixture set into a firm yet pliable texture. Watch for the mixture to reach a light, creamy consistency—this is the sweet spot.
- Once the sugar is fully blended, remove the bowl from the heat. Let the mixture cool for a minute; this will prevent the butter from separating and keep the filling smooth. At this point, you can taste a small spoonful to ensure the flavor is balanced. If it’s too sweet, add a little more chocolate; if it’s too bitter, add a touch more sugar.
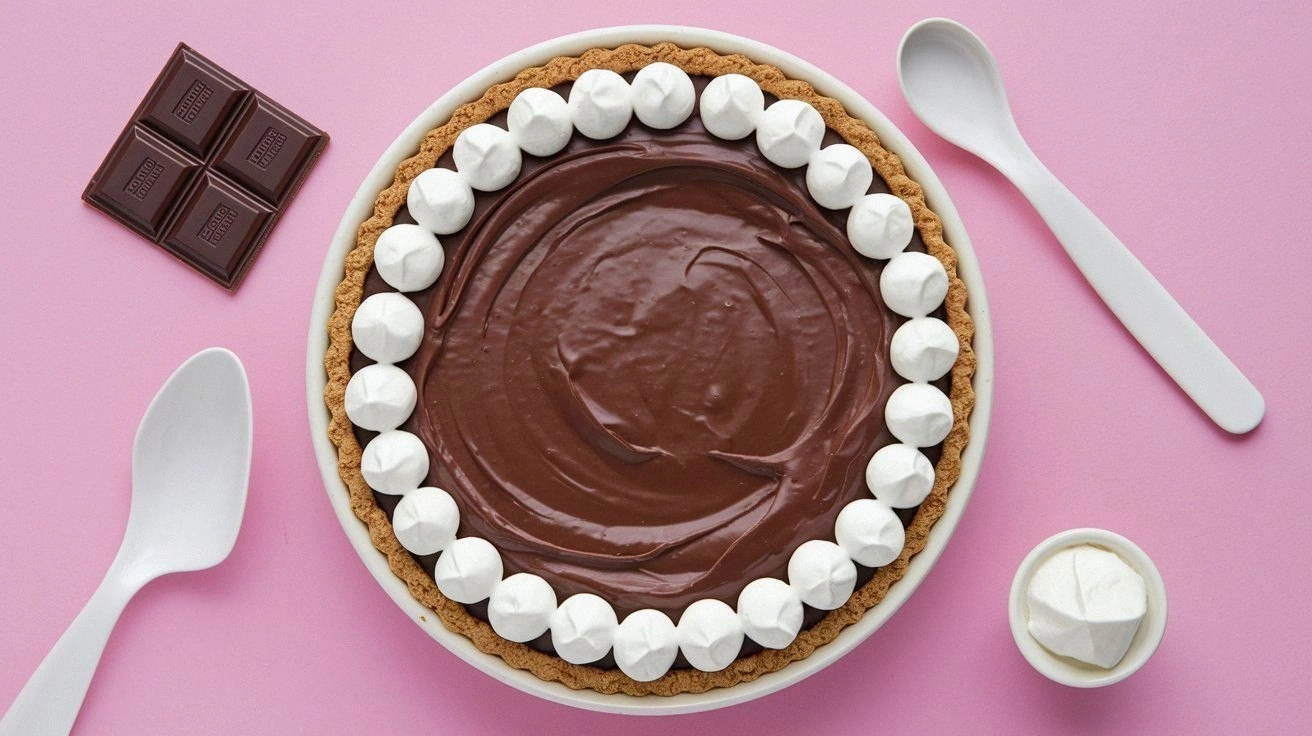
- Transfer the filling into a pre‑lined 8‑inch pie dish. Tap the dish gently on the counter to remove any air bubbles. The filling should spread evenly, forming a smooth top. If you prefer a firmer crust, you can press the edges with a spatula to create a shallow rim.
- Place the pie dish in the refrigerator and let it set for at least 30 minutes. The filling will firm up, turning from a liquid to a sliceable, fudgy consistency. If you’re in a hurry, you can pop it in the freezer for 10 minutes; just be careful not to over‑freeze, or the texture will become too hard.
- Once set, slice the pie into wedges and serve. If you like, you can garnish with a dusting of cocoa powder or a drizzle of melted chocolate. The final result is a bite‑sized piece of chocolate heaven that melts in your mouth and leaves you craving more.
- Enjoy immediately, or store in an airtight container in the refrigerator for up to 3 days. If you’re storing it for a longer period, keep it in the freezer for up to a week. When you’re ready to serve, let it sit at room temperature for 10 minutes to soften slightly; this enhances the flavor and texture.
That’s it—you did it. But hold on, I’ve got a few more tricks that will take this to another level. Keep reading, and you’ll discover how to elevate the flavor, texture, and presentation even further.
Insider Tricks for Flawless Results
The Temperature Rule Nobody Follows
The key to a silky filling is precise temperature control. The chocolate should be melted at about 110°F (43°C). If you have a kitchen thermometer, keep an eye on it—once it reaches 115°F, remove it from heat immediately. Too hot, and the butter separates; too cool, and the sugar won’t dissolve. I’ve spent years perfecting this step, and once you master the temperature, the pie will always come out flawless.
Why Your Nose Knows Best
When the chocolate melts, you’ll notice a subtle aroma—dark chocolate, a hint of milk, and a faint buttery scent. That aroma is your cue that the mixture is at the right consistency. If the smell is too strong or metallic, it’s a sign that the chocolate has started to overheat. Trust your nose; it’s a seasoned detective in the kitchen.
The 5‑Minute Rest That Changes Everything
After removing the bowl from the heat, let the mixture rest for exactly five minutes before transferring it to the dish. This brief pause allows the butter to fully integrate, preventing separation and ensuring a smooth texture. I once tried skipping this step, and the result was a lumpy, uneven filling that didn’t set properly.
The Secret to a Perfectly Set Edge
If you want a slightly firmer edge, gently press the filling’s perimeter with a spatula while it’s still slightly warm. This technique creates a shallow rim that holds the filling together and gives a clean slice. It also adds a subtle visual contrast that makes the pie look more polished.
The Garnish That Elevates the Experience
A dusting of cocoa powder or a drizzle of melted chocolate not only adds visual appeal but also enhances the flavor profile. The cocoa powder’s bitterness balances the sweetness, while the melted chocolate adds an extra layer of richness. Don’t be shy—go bold with the garnish; it’s the finishing touch that turns a simple pie into a show‑stopping dessert.
Creative Twists and Variations
This recipe is a playground. Here are some of my favorite ways to switch things up:
Nutty Crunch
Fold in 1/4 cup of crushed roasted almonds or hazelnuts before setting the pie. The crunch adds texture and a nutty undertone that complements the chocolate beautifully. Perfect for a holiday gathering where guests love a bit of crunch.
Spiced Delight
Add a pinch of cinnamon or a dash of cayenne pepper to the mixture for a subtle heat. The spice brings a warm depth to the chocolate, making it feel cozy and comforting. It’s a great way to transform a simple dessert into a seasonal treat.
Coconut Cream
Replace the butter with coconut cream for a tropical twist. The coconut adds a silky, slightly sweet flavor that pairs wonderfully with chocolate. Serve it chilled with a scoop of coconut ice cream for an extra indulgent experience.
Minty Fresh
Add a few drops of peppermint extract to the melted chocolate. The mint undertone gives the pie a refreshing contrast that’s especially delightful in summer. Pair it with a light, citrusy dessert to balance the richness.
Coffee Infusion
Stir in a teaspoon of instant espresso powder or a shot of cold brew coffee. The coffee deepens the chocolate’s flavor profile and gives the pie a sophisticated, adult twist. It’s a perfect dessert for a cozy evening at home.
Fruit-Infused
Top the finished pie with fresh berries or a drizzle of raspberry coulis. The fruit’s acidity cuts through the richness, creating a balanced flavor that’s both sweet and tart. This variation is ideal for a light, celebratory dessert.
Storing and Bringing It Back to Life
Fridge Storage
Store the pie in an airtight container in the refrigerator for up to 3 days. The filling will remain firm and maintain its silky texture. When you’re ready to serve, let it sit at room temperature for 5 minutes to soften slightly.
Freezer Friendly
Wrap the pie tightly in plastic wrap and place it in a freezer bag. It can be kept for up to a week. To thaw, transfer it to the refrigerator overnight. The texture will be slightly firmer, but it will still be delicious.
Best Reheating Method
If you need to warm the pie, place it in a microwave-safe dish and heat on low for 10–15 seconds. Add a tiny splash of water before reheating; the steam will help the pie regain its silky consistency. Be careful not to overheat, or the chocolate will separate.