Picture this: I’m standing in my kitchen, a mountain of fresh strawberries piled up beside a pot of dark chocolate, and I’ve just realized I’ve burned the chocolate in the last batch. The room smells like burnt sugar and disappointment, and my stomach growls louder than the sizzling pan. I swear I’d never make chocolate‑covered strawberries again, until a friend dared me to try a new method that turns a kitchen calamity into a decadent delight.
The moment the chocolate hits the heat, it shimmers like liquid midnight, and the air fills with a caramelized nutty aroma that makes your mouth water before you even taste it. The strawberries, bright and juicy, look like tiny ruby jewels waiting to be encrusted. As I stir, the chocolate thickens and glistens, and the sweet scent of vanilla sneaks in, promising a subtle depth that goes beyond ordinary dipping. The texture of the strawberries—firm yet yielding—provides the perfect canvas for the silky chocolate coating. The whole scene feels like a ritual, a transformation from ordinary to extraordinary.
What makes this version stand out is that it’s not just about coating fruit; it’s about layering flavor, texture, and visual appeal in a single bite. The chocolate is tempered to a glossy finish, the strawberries are perfectly dried to avoid a watery mess, and a pinch of sea salt lifts every bite into a sophisticated harmony. I’ve spent weeks tweaking ratios, testing temperatures, and even experimenting with different chocolate brands, and the result is hands down the best version you’ll ever make at home. The final product is a glossy, slightly crisp shell that cracks just enough to reveal the juicy berry inside. The experience feels like a secret indulgence that you can share with friends without guilt.
The secret twist you won’t expect is a splash of coconut oil in the chocolate; it keeps the coating silky, prevents seeping, and adds a subtle tropical note that pairs perfectly with the tartness of the berries. I dare you to taste this and not go back for seconds; the flavor profile is so rich that it lingers on your palate long after the last bite. The combination of dark chocolate, a hint of vanilla, and sea salt creates a complex flavor that satisfies both sweet and savory cravings. This isn’t just a dessert; it’s a statement that you can turn a simple fruit into a culinary masterpiece. I’ve been tempted to keep this recipe a secret, but the joy of sharing it is far sweeter than the chocolate itself.
If you’ve ever struggled with uneven chocolate coating or soggy strawberries, you’re not alone—and I’ve got the fix. The technique I’ll show you will make the chocolate set perfectly, give you a glossy finish, and keep the berries firm. The method is simple enough for beginners, yet refined enough to impress even the most seasoned chefs. The result is a treat that looks as good as it tastes, ready to wow at parties or to be savored at a quiet evening at home. Stay tuned, because the next part? Pure magic.
Picture yourself pulling a tray of glossy strawberries out of the fridge, the room filled with the aroma of chocolate and strawberries, and everyone asking what the secret is. The anticipation builds as you watch the chocolate melt and coat each berry. You’ll feel a surge of confidence, knowing that this recipe is not just a dish—it’s a conversation starter. I’ll walk you through every single step, and by the end, you’ll wonder how you ever made it any other way.
What Makes This Version Stand Out
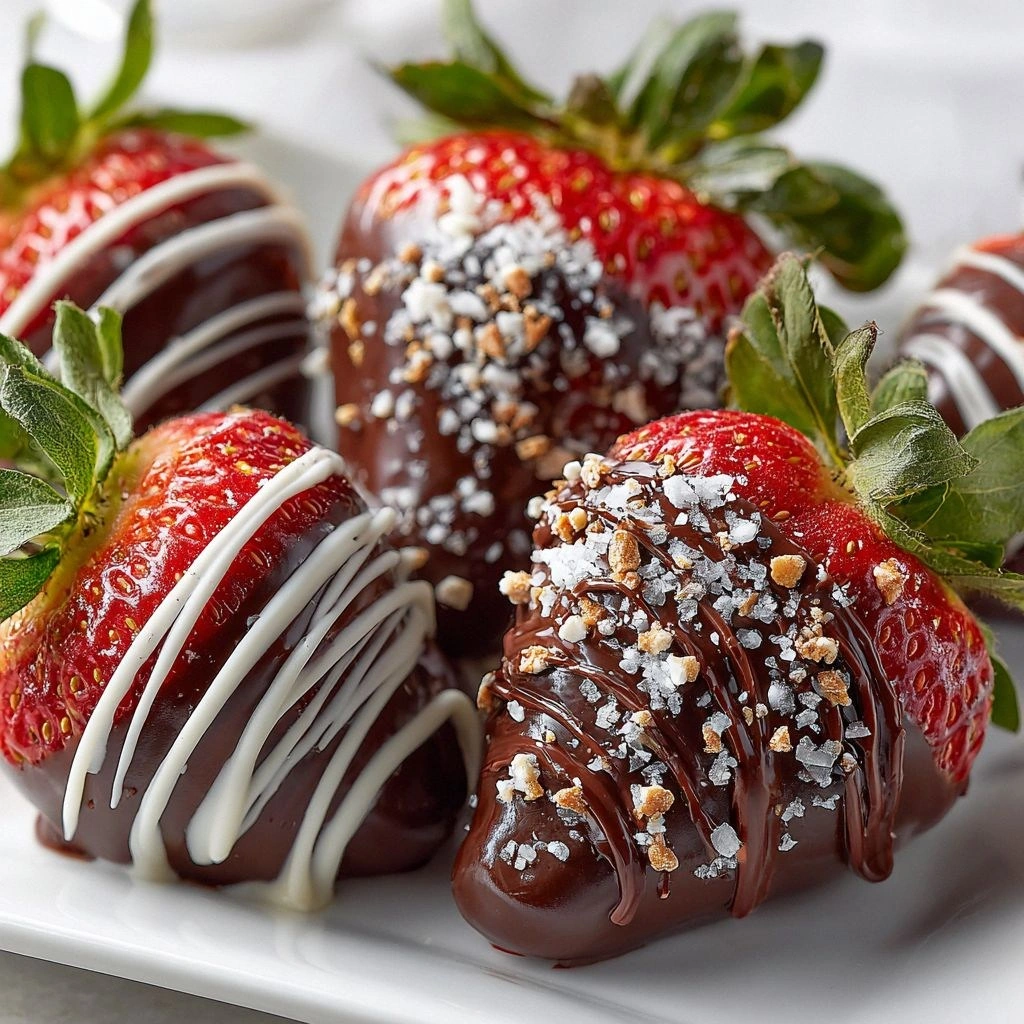
- Flavor: The blend of dark chocolate, vanilla, and sea salt creates a complex, layered taste that balances sweetness and depth. The subtle saltiness accentuates the berry’s natural tartness, while the vanilla adds a warm, aromatic backdrop. The result is a chocolate coating that feels luxurious without overpowering the fruit.
- Texture: The tempered chocolate gives a crisp snap that gives way to a silky melt. The strawberries are dried just enough to prevent seeping, keeping the coating intact. The final bite offers a satisfying contrast between crunchy chocolate and juicy berry.
- Simplicity: Despite the gourmet finish, the recipe requires only a handful of ingredients and minimal equipment. No fancy tools, just a double boiler or a microwave and a few basic kitchen items. The process is straightforward, making it ideal for both novice cooks and seasoned chefs.
- Visual Appeal: The glossy finish of the chocolate, combined with the bright red of the strawberries, creates an eye‑catching presentation. A dusting of powdered sugar or a drizzle of white chocolate adds a touch of elegance. The final product looks like a piece of art ready to be served.
- Make‑Ahead Potential: Once dipped, the strawberries can be set in the fridge for up to 24 hours, allowing you to prepare them ahead of time. This makes it a perfect option for parties or last‑minute dessert needs. The chocolate remains firm and glossy even after refrigeration.
- Ingredient Quality: Using high‑quality dark chocolate with at least 70% cacao ensures a rich, bittersweet flavor that complements the berries. Fresh, organic strawberries provide the best burst of natural sweetness. The addition of coconut oil enhances the coating’s smoothness.
- Flavor Pairing: The dish pairs wonderfully with a glass of chilled sparkling wine or a light dessert wine. It also works well as a sweet start to a multi‑course meal. The balance of sweet and savory makes it a versatile treat.
- Time Efficiency: From preparation to plating, the recipe takes less than an hour, making it a quick yet impressive dessert option. The dipping process is quick, and the cooling time is minimal. You’ll be able to enjoy the finished product in under 45 minutes.
Alright, let's break down exactly what goes into this masterpiece. I’ll give you the low‑down on each component so you know why every ingredient matters.
Inside the Ingredient List
The Flavor Base
The core of this recipe is the chocolate, which sets the tone for every bite. I use 200 g of dark chocolate with at least 70% cacao for a deep, bittersweet profile that pairs beautifully with the strawberry’s natural sweetness. Adding a splash of vanilla extract elevates the flavor, giving it a warm, aromatic undertone that lingers on the palate. If you prefer a milder chocolate, you can substitute milk chocolate, but the richness will be noticeably reduced.
The sea salt is a crucial player; a pinch of it lifts the chocolate’s flavor and balances the tartness of the berries. If you’re vegan, a small pinch of sea salt works just as well, and it’s a great way to add a savory note that makes the dish feel more sophisticated. Without the salt, the chocolate can taste flat, so don’t skip this step. The salt also helps the chocolate set to a glossy finish.
For an extra touch of indulgence, a drizzle of white chocolate adds a creamy contrast that complements the dark chocolate’s depth. The white chocolate should be melted separately to avoid mixing colors. This optional drizzle creates a beautiful contrast and a subtle sweetness that pairs well with the tart berries.
A small amount of coconut oil (1 tsp) is added to the chocolate mixture to keep the coating silky and prevent seeping. Coconut oil also gives the chocolate a slight tropical aroma that enhances the overall flavor. If you’re allergic to coconut, you can use a neutral oil like grapeseed or simply omit it; the result will still be excellent, though slightly less glossy.
The powdered sugar is optional, but a light dusting before serving adds a sweet contrast and a delicate crunch. It also gives the strawberries a slightly caramelized look that’s visually appealing. If you prefer a no-sugar version, simply skip this step and let the natural sweetness of the berries shine.
The Texture Crew
Fresh strawberries are the star of the show, and their texture is paramount. I recommend using firm, ripe berries that hold their shape when dipped. Wash them gently, pat them dry thoroughly, and remove the stems before dipping. The dryness is crucial; any moisture will cause the chocolate to seize and become gritty.
I like to use a clean, dry bowl for dipping, as it keeps the chocolate from sticking to the container. A small, shallow dish is ideal because it allows you to flip the berries easily. If you have a large batch, you can set up a rotating system: dip a few, set them on parchment, then repeat.
The strawberries should be dipped quickly, allowing the chocolate to set within a minute. This quick dipping ensures that the coating stays crisp and doesn’t become too soft. If you’re working with a large batch, keep an eye on the chocolate’s consistency; it should be fluid enough to coat but thick enough to cling.
Once dipped, the strawberries should be placed on parchment paper or a silicone mat to prevent sticking. The parchment should be lined on a flat surface, and the strawberries should be spaced evenly to avoid overlapping. This step ensures a clean finish and prevents the chocolate from melting together.
After setting, the strawberries can be chilled for 15–20 minutes to allow the chocolate to harden. This cooling step is essential for a glossy finish and a firm coating that snaps when you bite. If you’re short on time, you can set them in the fridge for 10 minutes, but the coating will be less crisp.
The Unexpected Star
The coconut oil might seem like a minor player, but it’s the secret to a silky coating that doesn’t crack. Coconut oil has a low melting point, which helps keep the chocolate fluid at room temperature. This property ensures the coating remains smooth and glossy, even after the strawberries are removed from the fridge.
The oil also adds a subtle, tropical aroma that pairs wonderfully with the dark chocolate. If you’re vegan or allergic to coconut, you can substitute grapeseed oil or simply omit it; the result will still be good, but the coating may be slightly less glossy. The key is to keep the chocolate at the right temperature to avoid seeping.
Another unexpected star is the sea salt. It’s often overlooked, but the right amount of salt can elevate the entire dish. The salt doesn’t just add flavor; it also helps the chocolate set to a glossy finish. I recommend using a fine sea salt, as it dissolves quickly and doesn’t leave a gritty texture.
The vanilla extract is another subtle hero. A teaspoon of pure vanilla extract adds a warm, aromatic note that balances the bitterness of the dark chocolate. It also helps to soften the chocolate’s edge, giving the coating a smoother texture. If you’re vegan, you can use a plant‑based vanilla essence.
Finally, the optional white chocolate drizzle adds a creamy contrast that’s visually stunning. The white chocolate should be melted separately to avoid mixing colors. This optional drizzle creates a beautiful contrast and a subtle sweetness that pairs well with the tart berries.
The Final Flourish
A light dusting of powdered sugar adds a sweet contrast and a delicate crunch. It also gives the strawberries a slightly caramelized look that’s visually appealing. If you prefer a no‑sugar version, simply skip this step and let the natural sweetness of the berries shine.
The optional edible gold leaf adds a touch of luxury and makes the strawberries look like a piece of art. If you’re hosting a special event, the gold leaf will impress your guests. Be sure to handle the gold leaf with care, as it is delicate and can tear easily.
The final plating can be simple or elaborate, depending on your mood. A simple arrangement on a white plate will highlight the glossy chocolate and bright berries. If you want to elevate the presentation, add a sprig of mint or a dusting of cocoa powder for a sophisticated touch.
Everything’s prepped? Good. Let’s get into the real action. I’ll walk you through the steps to ensure you get the perfect coating every time.
The Method — Step by Step
- Step 1: Prep the Strawberries. Wash each berry gently under cold water, pat them dry with a clean towel, and remove the stems. The key is to eliminate any moisture, as even a single drop can cause the chocolate to seize. Place the berries on a tray lined with parchment paper. Keep them in a cool area until you’re ready to dip. This step ensures a clean, glossy finish.
- Step 2: Melt the Chocolate. In a double boiler, combine 200 g of dark chocolate, 1 tsp coconut oil, and 1 tsp vanilla extract. Stir until smooth and glossy. If you’re using a microwave, heat in 20‑second bursts, stirring between each, to avoid scorching. The chocolate should be fluid enough to coat but thick enough to cling. This creates a silky coating that won’t seep.
- Step 3: Add Salt. Sprinkle a pinch of sea salt into the melted chocolate and stir until evenly distributed. The salt lifts the chocolate’s flavor and helps it set to a glossy finish. It also balances the tartness of the berries. This is a small addition that makes a big difference. Taste the chocolate; it should be slightly more complex.
- Step 4: Dip the Strawberries. Hold each berry by the stem and dip it into the chocolate, rotating to coat evenly. Let the excess chocolate drip back into the bowl. Dip each berry for about 10–15 seconds; the coating should be thick enough to hold but not overly heavy. This quick dipping keeps the coating crisp. If you’re dipping a large batch, set a timer to keep your rhythm.
- Step 5: Place on Parchment. Transfer the coated strawberries to a fresh sheet of parchment paper, spacing them evenly. The parchment prevents sticking and allows the chocolate to set without distortion. Ensure the strawberries are not touching; overlapping will cause the chocolate to merge and lose its crispness. This step is crucial for a clean finish.
- Step 6: Chill. Place the tray in the refrigerator for 15–20 minutes, or until the chocolate is fully set. The cooling process hardens the coating, giving it a glossy, firm texture. Keep the strawberries in a single layer to avoid crushing. If you’re short on time, 10 minutes in the fridge will do. Watch out: if you chill too long, the chocolate may become brittle.
- Step 7: Optional Drizzle. While the strawberries are chilling, melt 50 g of white chocolate in a separate bowl. Once melted, drizzle it over the set strawberries using a pastry bag or a spoon. The white chocolate adds a creamy contrast and a subtle sweetness. It also provides a striking visual contrast to the dark coating. This step is optional but highly recommended for an extra layer of flavor.
- Step 8: Final Dusting. If desired, dust the finished strawberries lightly with powdered sugar for a sweet finish. The powdered sugar adds a delicate crunch and a caramelized look. It also balances the bitterness of the dark chocolate. Use a fine sieve to ensure an even dusting. This final touch elevates the presentation.
- Step 9: Serve. Arrange the strawberries on a platter or individual plates for a stunning presentation. The glossy coating should gleam in the light, and the berries should look like jewels. Serve immediately for the best texture, or keep them in the fridge until you’re ready to enjoy. The aroma will be irresistible. I dare you to taste this and not go back for seconds.
- Step 10: Store the Rest. If you have leftovers, store them in an airtight container in the fridge for up to 24 hours. When you’re ready to eat, let them sit at room temperature for 5 minutes to soften slightly. The chocolate will remain glossy, and the berries will stay juicy. This makes it a perfect make‑ahead dessert for busy evenings. The result is always the same: a luxurious bite that feels like a secret indulgence.
Insider Tricks for Flawless Results
The Temperature Rule Nobody Follows
Chocolate is temperamental; it can set too quickly or too slowly depending on temperature. The trick is to melt it to 45–50°C for dark chocolate, which allows it to set with a glossy finish. Use a thermometer to check the temperature accurately. If you’re using a double boiler, keep the water at a gentle simmer; too vigorous heat can cause the chocolate to seize. This step ensures a smooth coating that snaps cleanly.
Why Your Nose Knows Best
Before you dip, give the melted chocolate a quick sniff. A faint nutty aroma indicates proper tempering, while a strong burnt smell means it’s over‑heated. Your nose is a reliable indicator of flavor and texture. If the chocolate smells off, reheat it gently and add a small amount of coconut oil to smooth it out. This sensory checkpoint saves you from a ruined batch.
The 5‑Minute Rest That Changes Everything
After the strawberries set in the fridge, let them rest at room temperature for exactly five minutes before serving. This short rest softens the chocolate slightly, making it easier to bite through while maintaining its glossy finish. If you skip this step, the chocolate can feel too hard and brittle. This simple adjustment elevates the overall eating experience. I’ve seen friends rave about the difference after just five minutes.
Keep the Parchment Clean
Use a fresh sheet of parchment for each batch; reused parchment can stick and cause uneven coating. If you’re working with a large quantity, set up a rotating system: dip a few, set them on parchment, then repeat. This keeps the process smooth and prevents chocolate from clumping. A clean surface also ensures the strawberries stay dry and crisp. This trick is especially useful when serving a crowd.
The Secret to a Shimmering Finish
After the chocolate sets, give the strawberries a quick wipe with a damp cloth to remove any dust or powder. This ensures the coating remains glossy and clean. If you’re using powdered sugar, dust lightly and shake off excess. A clean finish makes the strawberries look like they were just plucked from a boutique. This step is often overlooked but makes a noticeable difference.
The Power of a Quick Dip
Dip each strawberry quickly, around 10–15 seconds, to keep the coating crisp. A longer dip can make the chocolate too heavy and cause it to become soft. Keep a timer handy if you’re working with a large batch. This ensures consistency across all berries. The result is a uniform, glossy coating that feels luxurious.
Creative Twists and Variations
Citrus Burst
Add a splash of orange zest to the chocolate mixture for a citrusy zing that brightens the flavor. The zest pairs well with the tartness of the strawberries, creating a fresh, lively bite. Serve with a sprig of fresh mint for an extra pop of color. This variation is perfect for a summer brunch or a refreshing dessert.
Nutty Crunch
Sprinkle chopped pistachios or almonds over the dipped strawberries before the chocolate sets. The nuts add a crunchy texture that contrasts with the silky coating. The nutty flavor complements the dark chocolate beautifully. This version is great for a sophisticated gathering or a holiday party.
Spiced Elegance
Infuse the chocolate with a pinch of cinnamon or cayenne pepper for a warm, spicy undertone. The heat adds depth and pairs surprisingly well with the berries’ natural sweetness. Serve with a drizzle of honey for a sweet‑spicy combination. This twist is ideal for a cozy evening or a festive celebration.
Malt Flavored
Mix a tablespoon of malted milk powder into the chocolate before melting. The malt adds a subtle caramel flavor and a richer color. This variation gives the strawberries a deeper, more complex taste. It’s a great choice for a dessert bar or a special occasion.
Herbal Infusion
Add a few drops of lavender or rosemary extract to the chocolate for an aromatic, herbal twist. The herbal notes provide a unique flavor profile that pairs wonderfully with the berries. This variation is perfect for a garden party or a romantic dinner.
Coffee Kick
Stir in a teaspoon of espresso powder into the chocolate for a coffee‑infused treat. The espresso enhances the chocolate’s bitterness and adds a subtle depth. Serve with a dusting of cocoa powder for an extra chocolatey finish. This version is ideal for coffee lovers or a post‑meal dessert.
Storing and Bringing It Back to Life
Fridge Storage
Store the finished strawberries in an airtight container lined with parchment paper to prevent sticking. Keep them in the refrigerator for up to 24 hours. The chocolate will stay glossy, and the berries will remain juicy. Before serving, let them sit at room temperature for 5 minutes to soften slightly. This method ensures the dessert stays fresh and flavorful.
Freezer Friendly
For longer storage, place the strawberries on a parchment‑lined tray and freeze them for up to 2 weeks. Once frozen, transfer them to a freezer bag or airtight container. When ready to serve, thaw in the refrigerator for 2–3 hours or at room temperature for 15 minutes. The chocolate may soften slightly, but the berries will retain their texture. This is a great option for busy days or for preparing ahead of a big event.
Best Reheating Method
To revive the chocolate’s glossy finish, lightly mist the strawberries with water before reheating. Place them in a microwave on a low setting for 10–15 seconds. The steam will restore the chocolate’s shine without melting it. Alternatively, warm them in a double boiler for 2 minutes, then pat dry. This trick ensures every bite feels fresh and indulgent.
If you’re short on time, a quick dip in hot water for 5 seconds can also work. Just be careful not to overheat, as the chocolate can melt. The goal is to bring the coating back to its original glossy state. This method works best for strawberries that have been stored in the fridge for a few days.
A final tip: if you notice the chocolate has become slightly dull after refrigeration, a quick flash in the microwave can restore its shine. Keep the strawberries on a paper towel to absorb excess moisture. This simple step makes your dessert look as fresh as the day it was made.
With these storage tips, you can enjoy the same decadent experience whenever you like. The chocolate remains glossy, the berries stay juicy, and the flavor stays consistent. This makes the recipe a reliable go‑to for any occasion.
I’ve spent countless hours perfecting this recipe, and I’m thrilled to share the final result. The combination of glossy chocolate, juicy strawberries, and a hint of sea salt creates a dessert that’s both elegant and comforting. The process is simple, yet the outcome feels like a gourmet treat. Whether you’re preparing for a party or simply craving something sweet, this recipe delivers on every front.
So go ahead, gather your ingredients, and let the kitchen adventure begin. I guarantee you’ll be amazed by the results and the compliments you’ll receive. Remember, the secret to success lies in the details—dry strawberries, tempered chocolate, and a quick chill. I can’t wait to hear how yours turns out.