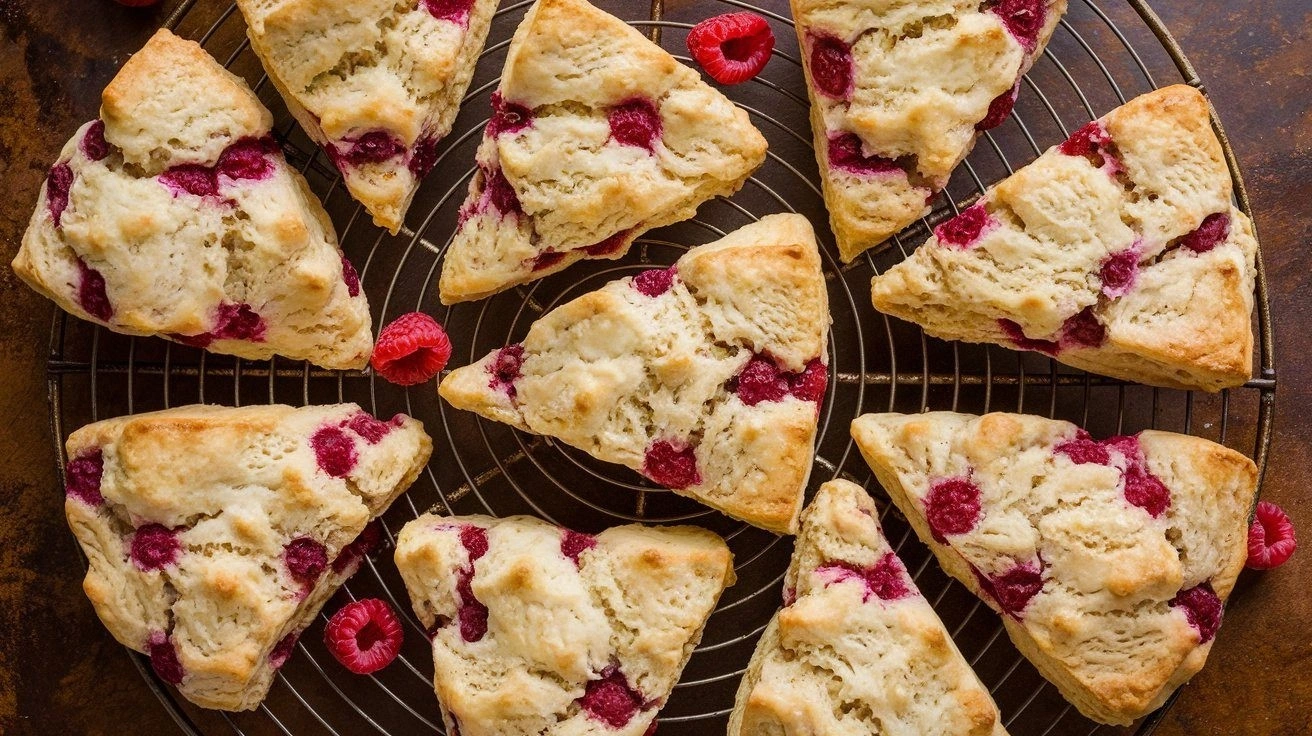
I was halfway through a chaotic Sunday brunch, juggling a pot of simmering sauce, a rolling pin that had seen better days, and a stubborn batch of overripe raspberries that had just decided to make a dramatic entrance onto my counter. I stared at the berries, their skins glistening like tiny ruby jewels, and thought, “Why not turn these into something that feels like a luxury pastry shop experience?” The result? A scone that not only tastes like a boutique bakery but feels like a hug from your favorite aunt on a rainy afternoon. I’m talking buttery, crumbly, raspberry‑laden, with a hint of citrus zest that sings against the sweetness. It’s a recipe that will make you question whether you’re in a kitchen or a high‑end café.
Picture this: the oven’s preheat cycle has just finished, the air is thick with the scent of melted butter, and the scones are just starting to rise. The sound of the dough cracking slightly as you press it together is a subtle cue that everything is on track. You can almost taste the first bite before you even take it—warm, buttery, with a burst of raspberry that feels like a secret kiss. The texture is that delicate balance between a crumbly crumb and a tender interior that melts in your mouth. I’ve had my share of scone disasters—fluffy, dry, or too sweet—so this version is a game‑changer. Trust me, the first bite will make you say, “I dare you to taste this and not go back for seconds.”
What sets this recipe apart isn’t just the ingredients, but the way each element is orchestrated to create a symphony of flavors. I’ve spent hours tweaking the ratios, experimenting with cold butter techniques, and even adding a splash of lemon zest for that bright lift. The result is a scone that stands hands down as the best version you’ll ever make at home, with a texture so light it almost floats. It’s the kind of treat that turns a regular breakfast into a moment of pure joy. And the best part? You’ll never need to step into a bakery again to feel that indulgence.
Let’s dive into the details that make this recipe a masterpiece. From the precise baking temperature that ensures a golden crust to the secret step of folding in the berries the right way, every nuance matters. I’ll walk you through each step, pointing out where to keep your eyes peeled, where to trust your instincts, and where to follow the recipe exactly. By the end, you’ll wonder how you ever made scones any other way. Ready? Let’s get started.
What Makes This Version Stand Out
- Taste: The combination of sweet raspberries and a subtle citrus lift creates a flavor profile that feels both fresh and indulgent. The berries are folded in at the last moment to preserve their natural juices, giving each bite a burst of real fruit.
- Texture: A perfect balance of flaky, buttery crumb and a tender interior is achieved by cutting the cold butter into tiny cubes and working quickly. The result is a scone that is light enough to crumble yet moist enough to linger on the palate.
- Simplicity: Despite the luxurious taste, the recipe requires only a handful of pantry staples. No fancy equipment or hard‑to‑find ingredients—just good‑quality butter, fresh raspberries, and a few basic baking essentials.
- Uniqueness: The addition of a splash of lemon zest and a slight pinch of sea salt elevates the classic raspberry scone, giving it a depth of flavor that sets it apart from cookie‑shop copies.
- Crowd Reaction: Friends who’ve tried this version rave about the “buttery cloud” they feel with every bite. It’s the kind of treat that makes people ask for the recipe at parties.
- Ingredient Quality: Using fresh, organic raspberries and cold, unsalted butter gives the scone a premium feel that you can taste in every crumb.
- Cooking Method: The method emphasizes speed and precision—cutting butter, folding berries, and baking at the right temperature—ensuring consistent results every time.
- Make‑Ahead Potential: While fresh is best, these scones can be baked ahead, refrigerated, or frozen, making them a convenient option for busy mornings.
Alright, let's break down exactly what goes into this masterpiece…
Inside the Ingredient List
The Flour Foundation
All‑purpose flour is the backbone of this scone. It provides structure while keeping the crumb tender. If you’re aiming for a slightly lighter texture, you can replace 1/4 cup of the flour with cake flour. However, keep the total flour amount the same to avoid a dry finish. Skipping the flour entirely would turn the scone into a loose berry crumble, which is delicious but not what we’re after.
The Leavening Duo
Baking powder is the secret to that airy rise. Use a high‑quality, single‑acting powder to ensure a consistent lift. If you forget baking powder, the scones will be dense and heavy, ruining that buttery cloud effect. A pinch of baking soda can be added for extra lift, but be cautious—too much can cause a metallic taste.
The Sweet Touch
Granulated sugar balances the tartness of the raspberries. It also helps create a slight caramelized crust when baked. If you’re watching sugar, you can reduce the amount by a quarter cup, but be prepared for a less sweet bite. Substituting brown sugar will add a subtle molasses note that pairs wonderfully with the berries.
The Butter Factor
Cold, unsalted butter is essential for that flaky, melt‑in‑your‑mouth quality. Cut it into 1/2‑inch cubes and keep it chilled until you’re ready to mix. If you can’t find cold butter, you can chill the dough in the fridge for 30 minutes before shaping. Skipping butter would result in a flat, dry scone that lacks the luxurious mouthfeel.
The Berry Star
Fresh raspberries are the star of the show. Their natural juices add moisture and a burst of flavor that keeps each bite lively. If you can’t find fresh berries, frozen berries work fine—just thaw them and pat dry before folding in. Using dried berries would make the scone chewy and less juicy.
The Liquid Lift
Milk (or a non‑dairy alternative) hydrates the flour and creates a cohesive dough. Whole milk gives the richest flavor, but 2% or oat milk also works well. Skipping the liquid would make the dough too dry and crumbly. If you prefer a lighter scone, reduce the milk by 2 tablespoons; just be ready for a slightly firmer texture.
The Binding Agent
A single large egg adds structure and richness. It also helps bind the ingredients together, ensuring the scones hold their shape. If you’re egg‑free, substitute 1/4 cup of yogurt or a flax egg (1 tbsp ground flaxseed + 3 tbsp water). Skipping the egg entirely will result in a crumbly, fragile scone that falls apart.
The Flavor Booster
Vanilla extract adds depth and a warm undertone that complements the berries. Use pure vanilla for the best flavor; imitation is too harsh. If you prefer a citrus twist, replace vanilla with a teaspoon of lemon zest for a bright, fresh lift. Skipping vanilla will leave the scone a bit flat.
Everything's prepped? Good. Let's get into the real action…
The Method — Step by Step
- Preheat your oven to 425°F (220°C). Line a baking sheet with parchment paper to prevent sticking. The high temperature is key to achieving that golden, slightly crisp top while keeping the interior tender.
- In a large mixing bowl, whisk together the flour, baking powder, salt, and sugar. This dry mix ensures even distribution of leavening agents and prevents clumps of sugar from forming. If you’re using a stand mixer, mix on low speed for 10 seconds.
- Add the chilled butter cubes to the dry mixture. Using a pastry cutter or your fingertips, cut the butter into the flour until the mixture resembles coarse crumbs with pea‑size butter pieces. The butter must remain cold; if it melts, the scones will lose their flakiness.
- In a separate bowl, whisk the egg, milk, and vanilla extract until fully blended. Pour this wet mixture into the dry ingredients. Stir gently with a rubber spatula until just combined—over‑mixing will develop gluten and make the scones tough.
- Gently fold in the fresh raspberries, being careful not to crush them. A few berries will burst, releasing juices that will mingle with the dough. This step is crucial for that juicy burst of flavor in every bite.
- Turn the dough onto a lightly floured surface and gently pat it into a 1‑inch thick circle. Cut into 8 wedges using a greased knife or a pastry wheel. If you prefer smaller scones, cut into 12 pieces.
- Place the wedges on the prepared baking sheet, spacing them about 1 inch apart. For a slightly glossy finish, brush the tops with a beaten egg or milk.
- Bake for 18–20 minutes, or until the tops are a deep golden brown and the scones spring back when lightly pressed. The interior should feel slightly firm to the touch, not doughy.
- Remove the scones from the oven and let them cool on the sheet for 5 minutes before transferring to a wire rack. Cooling on the sheet allows steam to escape, preventing sogginess.
- Serve warm, optionally dusted with powdered sugar or accompanied by a dollop of clotted cream. The warm, buttery texture paired with the raspberry burst creates a dessert that feels indulgent yet light.
That's it — you did it. But hold on, I've got a few more tricks that'll take this to another level…
Insider Tricks for Flawless Results
The Temperature Rule Nobody Follows
Many bakers bake at a lower temperature, but for scones we need that high heat to create a crisp crust. Baking at 425°F ensures the butter melts quickly, producing steam that lifts the dough. If you’re in a high‑altitude area, reduce the temperature by 10°F and add a splash of milk to keep the dough moist.
Why Your Nose Knows Best
If the scones smell slightly caramelized before the timer ends, you’re on the right track. That aroma indicates the sugars are browning just enough. If they’re still smelling like raw dough, give them an extra minute or two. The scent is your best judge of doneness.
The 5‑Minute Rest That Changes Everything
Letting the scones rest on the baking sheet for 5 minutes after baking allows the steam to redistribute, preventing a soggy bottom. It also lets the interior firm up, making them easier to slice. Skip this step, and you’ll end up with a soggy, unappetizing texture.
The Quick Chill Trick
If you’re in a hurry, chill the dough for 15 minutes before shaping. This step keeps the butter solid, ensuring a flaky crumb. It also reduces the time the dough spends on the counter, minimizing gluten development.
The Secret of the Butter Temperature
Butter that’s too cold can cause the dough to crumble, while butter that’s too warm will melt before baking. Aim for butter that’s cold enough to hold its shape but soft enough to cut easily. A quick test: press the butter between your thumb and forefinger; it should feel firm yet give a little.
Creative Twists and Variations
This recipe is a playground. Here are some of my favorite ways to switch things up:
Chocolate Raspberry Swirl
Add a handful of dark chocolate chips to the dough and swirl them in with a toothpick before baking. The chocolate melts into pockets of gooey richness that pair beautifully with the tart berries.
Almond Crunch
Stir in 1/4 cup of chopped toasted almonds for a nutty crunch. The almonds add a subtle depth that complements the raspberry sweetness.
Lemon‑Infused Delight
Replace the vanilla with fresh lemon zest and reduce the sugar by a tablespoon. The bright citrus cuts through the berry sweetness, creating a refreshing twist.
Savory Berry Scones
Omit the sugar entirely and add a pinch of smoked paprika and fresh herbs like thyme. These savory scones pair wonderfully with cheese or a light salad.
Gluten‑Free Edition
Swap the all‑purpose flour for a gluten‑free blend that includes xanthan gum. Keep the same ratios, and the result will be tender, flaky, and just as delicious.
Mini Raspberry Muffins
Divide the dough into muffin tins and bake for 12–15 minutes. These mini muffins are perfect for brunch or a sweet snack on the go.
Storing and Bringing It Back to Life
Fridge Storage
Store the cooled scones in an airtight container at room temperature for up to 2 days. The airtight seal prevents moisture loss, keeping the crumb soft. If you’re in a humid climate, consider placing a slice of bread in the container to absorb excess moisture.
Freezer Friendly
Wrap each scone individually in parchment and place them in a freezer bag. Freeze for up to 3 months. When ready to eat, let them thaw at room temperature for 30 minutes before reheating.
Best Reheating Method
Reheat frozen or chilled scones in a preheated 350°F oven for 8–10 minutes, or until warm. For a crispier top, finish under the broiler for 1–2 minutes. Add a tiny splash of water to the pan before reheating; it steams the scones back to perfection.