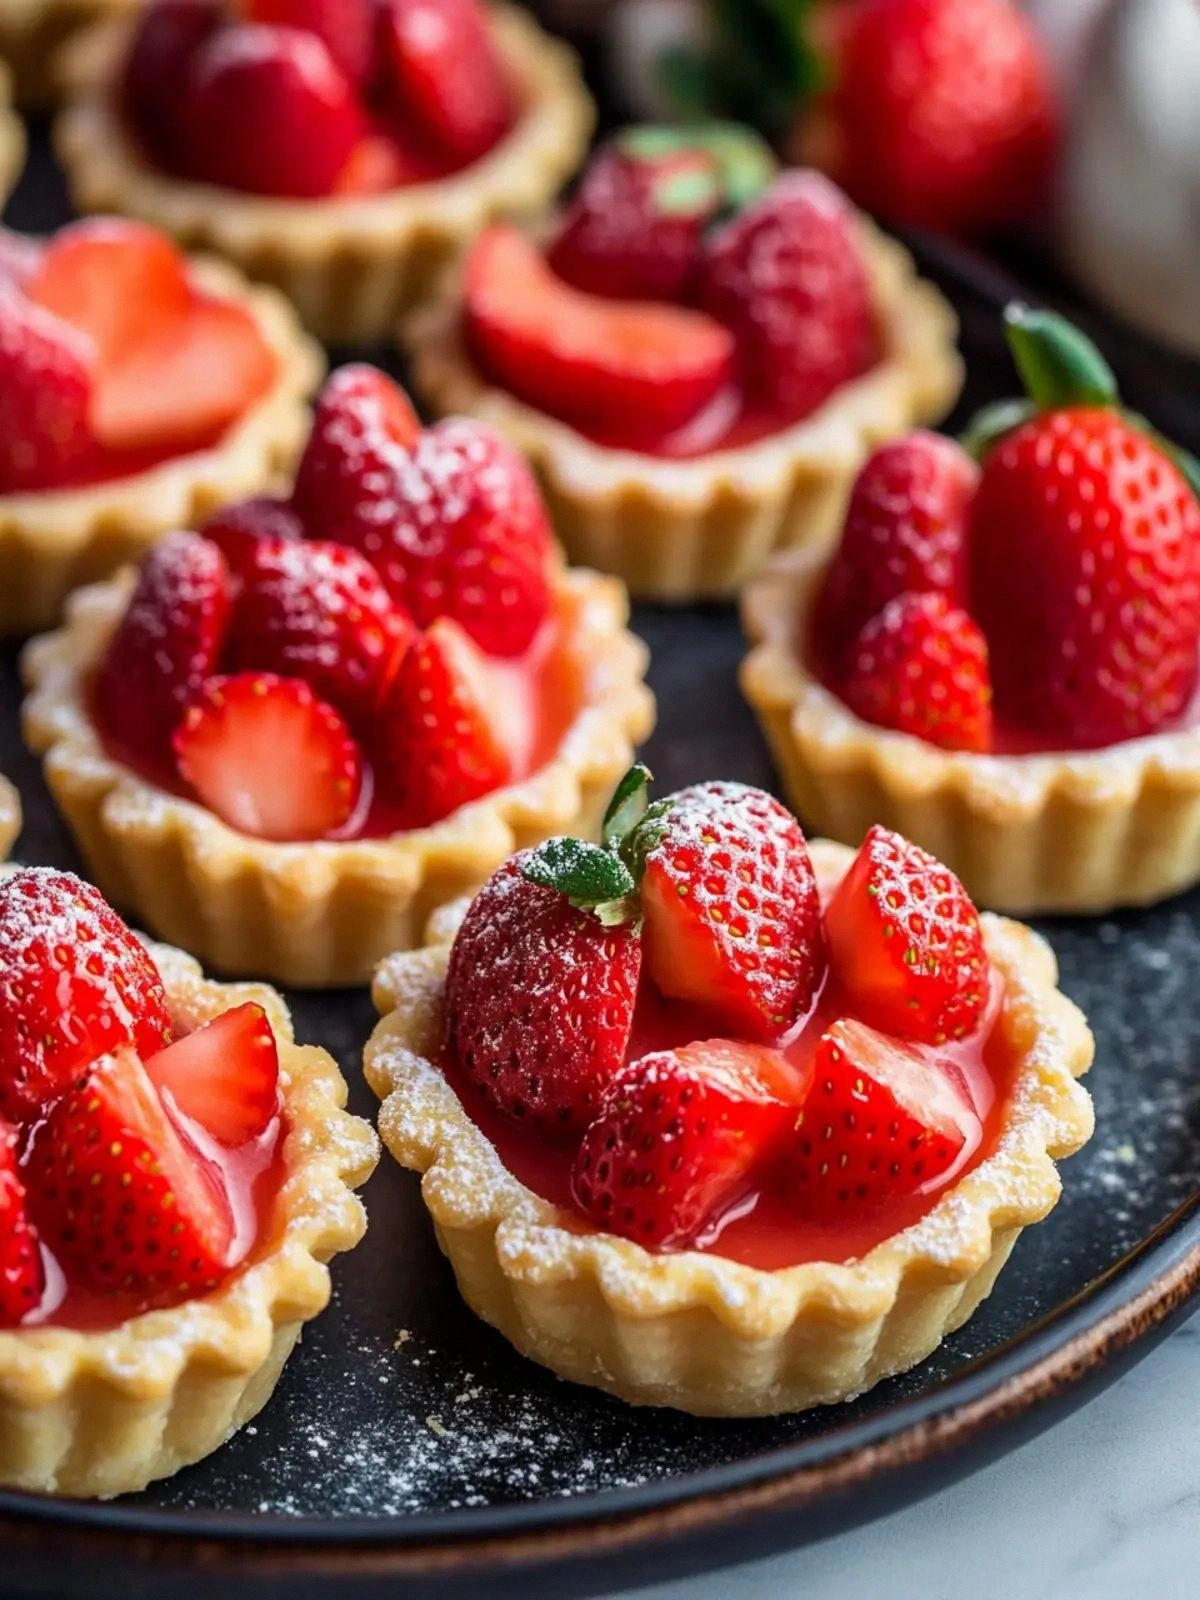
Picture this: you’re standing in a cramped kitchen, a bowl of fresh strawberries in one hand, a half‑filled pan of custard in the other, and a friend shouting, “You’re going to blow my mind with those mini tarts!” I’ve been chasing that moment for years—trying every recipe, tweaking the ratios, and finally hitting the sweet spot. The result? A silky strawberry custard that coats the delicate tart shells like a velvet kiss, topped with a swirl of apricot preserve that gives a subtle, unexpected pop of sweetness.
It was a Saturday afternoon that turned into a culinary experiment. I had a surplus of strawberries from the farmer’s market, a bag of fresh mini tart shells, and a daring spirit that said, “Let’s do something wild.” I whisked the egg yolks, added sugar, and let the mixture bubble in a saucepan, the scent of vanilla filling the air. The kitchen smelled like summer, the sound of the stove hissed like a contented cat, and the anticipation was thick enough to taste.
I confess: I was nervous. The first time I poured the custard into the shells, the filling seemed to slosh like a tiny wave, threatening to spill. But as the custard set, it became a smooth, glossy layer that held the shape of each shell, a tiny dome of flavor. The apricot preserves, spread thinly on top, added a glossy finish that glistened like a fresh coat of paint. I dared you to taste this and not go back for seconds—trust me, the first bite was a revelation.
What makes this version stand out from every other strawberry tart recipe is the meticulous balance of textures and flavors. The custard’s silky smoothness contrasts with the crisp, buttery shell, while the apricot preserves offer a subtle tartness that lifts the sweetness of the berries. I’ve spent weeks refining the ratio of cornstarch to sugar to achieve that perfect thickness without it becoming gummy. The result is a bite that melts in your mouth, leaving a lingering echo of fresh strawberries and a whisper of vanilla.
And there’s a twist that most recipes miss: the use of cold, unsalted butter that melts just enough to add richness without overpowering the delicate flavors. This tiny detail transforms the custard from ordinary to extraordinary, giving it a silky, almost buttery finish that feels like a luxury treat. I’ve even added a pinch of kosher salt to balance the sweetness, a subtle trick that elevates every bite.
Picture yourself pulling the finished tarts out of the oven, the kitchen smelling incredible, the steam curling like delicate wisps. The first bite is a burst of fresh strawberries, the custard’s silky texture, and that hint of apricot glaze. The mini tarts look like tiny works of art, ready to be plated on a fancy tray for a party or served at a brunch. If you’ve ever struggled with making mini tarts that stay together, you’re not alone, and I’ve got the fix.
Okay, ready for the game‑changer? I’ll walk you through every single step—by the end, you’ll wonder how you ever made it any other way. From selecting the freshest berries to mastering the custard’s consistency, this recipe will become your new kitchen staple. I’ll share kitchen hacks, watch‑out moments, and insider tricks that will make every batch flawless. Let’s dive in and create the ultimate strawberry custard tartlets.
What Makes This Version Stand Out
- Texture: The custard is silky smooth yet thick enough to stay inside the shell, preventing leaks. It’s a delicate balance achieved by precise cornstarch measurements and gentle cooking.
- Flavor: Fresh strawberries provide natural sweetness, while apricot preserves add a subtle tartness that lifts the overall profile. The vanilla bean paste offers depth without overpowering.
- Visual Appeal: The glossy apricot glaze gives the tarts a polished look, making them perfect for parties or brunches. The shells’ crisp edges contrast beautifully with the custard’s sheen.
- Time Efficiency: The entire process takes under an hour, making it a quick yet impressive dessert. No complex techniques required.
- Make‑ahead Potential: The tarts can be assembled and frozen, then baked fresh when needed. The custard holds up well in the fridge for up to two days.
- Ingredient Quality: Using cold unsalted butter and fresh strawberries ensures maximum flavor. The butter’s low moisture content prevents sogginess.
- Versatility: The recipe can be adapted with different fruits or glazes, making it a playground for creativity.
- Audience Reaction: Guests rave about the buttery crust and the burst of strawberry flavor, often asking for a second plate.
Alright, let’s break down exactly what goes into this masterpiece…
Inside the Ingredient List
The Flavor Base
The foundation of any great custard is the sugar and vanilla. The 100 grams of granulated sugar caramelizes just enough to add depth without turning the custard bitter. Vanilla bean paste or extract provides aromatic warmth; I prefer paste because it delivers a richer, more complex flavor. If you’re allergic to egg yolks, a small amount of lemon zest can provide a bright counterpoint, but the egg yolks are essential for that silky mouthfeel.
The Texture Crew
Cornstarch is the unsung hero that turns a watery mixture into a luscious custard. The 24 grams of cornstarch, when tempered with cold milk, create a smooth, glossy texture that coats the palate. The whole milk adds creaminess, but you can substitute half‑and‑half for a richer version—just remember to adjust the cornstarch slightly to compensate for the higher fat content. The pinch of kosher salt is a subtle balancing act; it amplifies the strawberries’ natural sweetness and tempers the butter’s richness.
The Unexpected Star
The 42 grams of cold unsalted butter, when melted gently, infuse the custard with a buttery depth that feels luxurious. The key is to keep it cold enough so it doesn’t separate, then allow it to melt slowly into the hot mixture. This subtle richness elevates the entire dish, giving it a velvety finish that feels indulgent yet light. If you’re vegan, a plant‑based butter works, but be sure it’s cold and unsalted to maintain the same flavor profile.
The Final Flourish
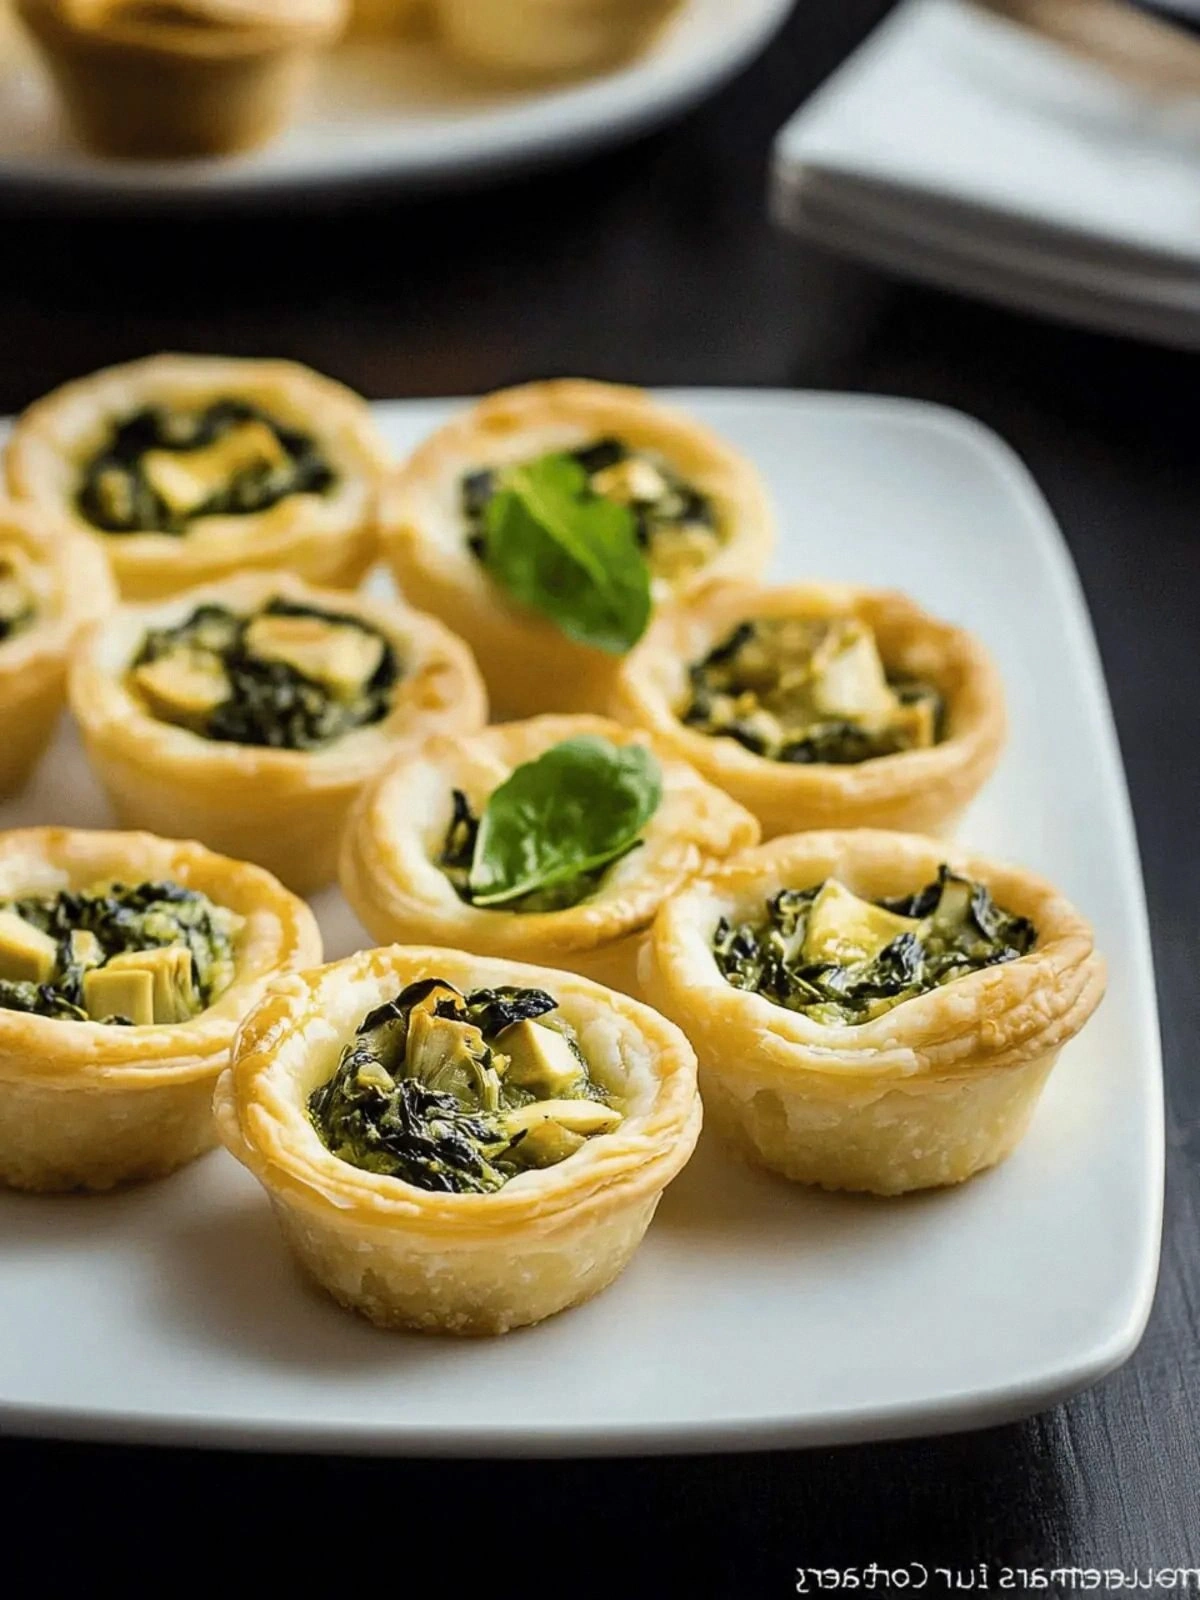
Fresh strawberries are the star of the show—454 grams of ripe fruit add a burst of natural sweetness and a bright, fresh aroma. Wash them gently, hull, and slice thinly to ensure even distribution across the custard. Apricot preserves, 80 grams, provide a glossy glaze and a tangy counterbalance to the strawberries’ sweetness. The 32 mini tart shells are the canvas; they need to be pre‑baked until lightly golden to avoid sogginess. Whipped cream, added just before serving, offers a light, airy contrast to the dense custard.
Everything’s prepped? Good. Let’s get into the real action…
The Method — Step by Step
- Preheat the Oven: Set your oven to 180°C (350°F) and line a baking sheet with parchment paper. The parchment ensures the shells stay crisp and don’t stick. I’ve found that a slightly higher temperature gives the shells a golden edge that looks stunning. Let the oven warm up while you prepare the custard.
- Prepare the Mini Tart Shells: Arrange the 32 mini tart shells on the parchment. Place them in the oven for 5 minutes to dry out the crust, which prevents the custard from soaking in. This quick step locks in a buttery crunch. Remove them and let them cool; they’re ready to receive the luscious filling.
- Whisk the Egg Yolks: In a medium bowl, whisk the 4 egg yolks with 100 grams of sugar until the mixture turns pale and thick. The color change indicates the sugar has dissolved, which is crucial for a smooth custard. Keep whisking until the mixture is glossy, then set aside.
- Temper the Cornstarch: In a small bowl, combine 24 grams of cornstarch with 120 ml of cold whole milk. Whisk until smooth, then set aside. This step prevents lumps when the mixture is heated.
- Cook the Custard: In a saucepan, gently heat the remaining 360 ml of milk over medium heat. Once hot, whisk in the cornstarch mixture to avoid clumps. Then add the whisked egg yolks and sugar mixture. Stir constantly, ensuring the mixture thickens to a glossy custard. The custard should coat the back of a spoon and leave a faint line when you lift it.
- Add Butter and Vanilla: Remove the saucepan from heat and stir in 42 grams of cold unsalted butter, one teaspoon of vanilla bean paste, and a pinch of kosher salt. The butter melts into the custard, giving it a silky finish. The vanilla infuses the custard with aromatic depth. Let the mixture cool slightly; it should still be warm enough to pour.
- Fill the Tart Shells: Spoon the custard into each pre‑baked shell, filling them about three‑quarters full. Use a small spoon or piping bag for precision. The custard should be thick enough to hold its shape but not so thick that it hardens before baking. Carefully place a slice of strawberry on top of each custard, pressing it gently into the surface.
- Apply Apricot Glaze: Using a pastry brush, lightly spread apricot preserves over the strawberries. The glaze should be thin, allowing the strawberry’s natural flavor to shine while adding a subtle tang. This step also creates a glossy finish that looks like polished jewels.
- Bake the Tarts: Return the filled shells to the oven for 20 minutes, or until the custard sets and the apricot glaze is slightly caramelized. Keep an eye on the shells; they should be golden but not burnt. The baking time is critical—overbaking will dry out the custard.
- Cool and Finish: Remove the tarts from the oven and let them cool on a wire rack for 10 minutes. While they’re still warm, top each with a dollop of whipped cream. The cream adds a light, airy contrast to the dense custard and makes the tarts feel indulgent. Serve immediately, or chill for a few hours before serving.
That’s it — you did it. But hold on, I’ve got a few more tricks that’ll take this to another level…
Insider Tricks for Flawless Results
The Temperature Rule Nobody Follows
Many bakers believe that a high oven temperature is key, but that can cause the shells to burn while the custard remains undercooked. I always set the oven to 180°C (350°F) and let it preheat fully. The shells bake evenly, and the custard sets just right. If you’re using a convection oven, reduce the temperature by 10°C to avoid over‑browning.
Why Your Nose Knows Best
When the custard is near completion, inhale deeply. The aroma of vanilla and caramelized sugar will tell you if it’s ready. A faint, sweet scent means the sugar has caramelized enough to give depth. If you smell a sharp, raw egg odor, the custard needs more time.
The 5‑Minute Rest That Changes Everything
After baking, let the tarts rest on a wire rack for exactly 5 minutes. This rest allows the custard to set fully, preventing it from sliding off the shells when you plate them. It also lets the apricot glaze slightly firm up, giving a more professional finish.
Use a Pastry Brush for a Polished Look
When applying the apricot preserves, use a clean pastry brush. Brush in a thin, even layer, then let it dry for a minute before adding whipped cream. A thick glaze can make the tarts look greasy; a thin glaze keeps them looking elegant.
Freeze for Make‑Ahead
Assemble the tarts without baking, then freeze them in a single layer. When you’re ready to serve, bake them straight from the freezer for 25 minutes. This method saves time on busy days and keeps the custard from melting.
Creative Twists and Variations
This recipe is a playground. Here are some of my favorite ways to switch things up:
Berry Medley
Swap strawberries for a mix of blueberries, raspberries, and blackberries. The varied colors create a vibrant presentation, and each berry brings its own sweet‑tart profile.
Chocolate Drizzle
After baking, drizzle melted dark chocolate over the tarts. The chocolate adds a rich, bittersweet contrast that balances the strawberry sweetness.
Almond Crunch
Sprinkle toasted sliced almonds on top of the whipped cream. The crunch adds texture, and the nutty flavor complements the fruit.
Mint Infusion
Add a few fresh mint leaves to the custard while it cooks. The mint gives a refreshing lift, perfect for hot summer days.
Nutella Swirl
Fold a spoonful of Nutella into the custard before filling. The chocolate hazelnut flavor transforms the tarts into a decadent treat.
Spiced Variation
Infuse the custard with a pinch of ground cardamom or cinnamon. The warm spices add depth and make the tarts feel cozy.
Storing and Bringing It Back to Life
Fridge Storage
Store the assembled, unbaked tarts in an airtight container in the refrigerator for up to 48 hours. When ready to serve, bake them at 180°C (350°F) for 20 minutes.
Freezer Friendly
Wrap each filled tart individually in plastic wrap, then place them in a freezer bag. They’ll keep for up to 3 months. Bake directly from the freezer, adding 5 minutes to the baking time.
Best Reheating Method
Reheat the baked tarts in a preheated oven at 150°C (300°F) for 5 minutes. Add a splash of water to the bottom of the pan to create steam, which keeps the custard moist and prevents it from drying out.