Mini Sourdough Loaftinis : Bit
There are moments in the kitchen that feel like a slap in the face, and then there are moments that feel like a warm hug from a friend. I was one of those people, staring at a bag of stale bread, feeling the urge to toss it into the trash, when a friend dared me to turn the leftovers into something that would make everyone at the table gasp. I laughed, grabbed my trusty sourdough starter, and began a culinary experiment that would forever change how I think about tiny, fluffy breads. The result? A batch of bite‑sized loafinis that are so airy, so crisp, and so utterly addictive that I swear I ate half the batch before anyone else even had a chance to taste.
Picture this: the kitchen filled with the buttery aroma of freshly baked bread, the sound of a timer ticking down, and the sight of golden crusts popping out of the oven like tiny suns. The first bite melts in your mouth, revealing a chewy center that holds a subtle tang from the sourdough, balanced by a whisper of sweetness from the sugar. The texture is a delicate dance between crisp edges and a soft, pillowy interior. The flavor profile is a harmonious blend of earthiness, mild acidity, and a hint of buttery richness. The overall experience is one of comfort and delight, a small bite that feels like a hug.
What makes this version stand out from every other recipe out there is the meticulous balance of ingredients, the clever use of a slow‑fermented starter, and a simple yet powerful technique that locks in moisture while creating a crisp crust. I’ve spent countless hours tweaking the hydration, the resting times, and the baking temperature to achieve the perfect crumb. The secret is a splash of olive oil that keeps each loafini moist, and a touch of baking soda that gives the dough a subtle lift. The result is a bread that is both light and satisfying, a true crowd‑pleaser that will make you wonder how you ever made it any other way.
And the best part? There’s a twist you won’t expect—a dash of grated cheddar that adds a savory depth, and a sprinkle of chives that brings a fresh, herbal note. I dare you to taste this and not go back for seconds. If you’ve ever struggled with sourdough loafinis, you’re not alone—and I’ve got the fix. Let me walk you through every single step — by the end, you’ll wonder how you ever made it any other way.
What Makes This Version Stand Out
- Taste: The tang of the sourdough starter is perfectly balanced by a subtle sweetness from the sugar, creating a flavor profile that is both complex and approachable. The cheddar adds a creamy richness that lingers on the palate.
- Texture: The loafinis boast a crisp, caramelized crust that gives way to a soft, airy interior. The moisture lock from olive oil keeps the crumb tender even after cooling.
- Simplicity: No complicated equipment is needed—just a bowl, a mixer, and an oven. The method is straightforward, making it ideal for beginners.
- Uniqueness: The inclusion of baking soda gives the dough a subtle lift, while the chives add a bright, herbal finish that sets this recipe apart.
- Crowd Reaction: Friends and family rave about the bite‑sized perfection, and they keep asking for the recipe at every gathering.
- Ingredient Quality: Using a high‑quality sourdough starter and fresh olive oil ensures the best flavor and texture.
- Cooking Method: The quick rise and short baking time make it a great option for busy evenings.
- Make‑Ahead Potential: The dough can be prepared the night before and baked fresh in the morning, saving precious time.
Alright, let's break down exactly what goes into this masterpiece…
Inside the Ingredient List
The Flour Foundation
All‑purpose flour is the backbone of these loafinis, providing the structure needed for a light crumb. Its protein content strikes a balance between strength and tenderness, preventing the dough from becoming too dense. If you skip the flour, the dough will collapse and the loafinis will lose their signature shape. For a richer flavor, you can substitute half the flour with whole wheat, but be prepared for a denser result.
The Liquid Symphony
Water hydrates the flour, activating gluten and allowing the dough to rise. The exact temperature of the water matters; lukewarm water (around 80°F) encourages a gentle fermentation without shocking the starter. If you use cold water, the dough will take longer to rise, which can be beneficial for flavor but may affect the final texture. A splash of olive oil is added to the liquid mix to lock in moisture and give the crust a glossy finish.
The Starter Magic
Active sourdough starter is the secret agent that gives these loafinis their unique tang and lift. It’s a living culture that ferments the dough, producing carbon dioxide that creates air pockets. If your starter is too thick, thin it with a bit of water until it reaches a pourable consistency; this ensures even distribution throughout the dough. A robust starter will give you a stronger flavor profile, while a milder starter results in a gentler tang.
The Flavor Enhancers
Cheddar cheese adds a savory depth and a creamy melt that complements the tangy base. Chives bring a fresh, herbal note that brightens the overall taste. Baking soda and baking powder work together to give the dough a subtle lift and a lighter crumb. Salt is essential for balancing the flavors, while a touch of sugar sweetens the dough and aids in browning.
Everything's prepped? Good. Let's get into the real action…
The Method — Step by Step
- In a large mixing bowl, combine the all‑purpose flour, baking soda, baking powder, and salt. Stir until the dry ingredients are evenly distributed. This ensures that every bite has a consistent flavor profile. If you’re using whole wheat flour, sift it first to remove any lumps.
- In a separate bowl, whisk the water, olive oil, and active sourdough starter until the mixture is smooth. The starter should be at room temperature to promote optimal fermentation. If your starter is still cold, let it sit out for about 30 minutes before mixing.
- Pour the wet mixture into the dry ingredients and stir with a wooden spoon until a shaggy dough forms. The dough should feel slightly sticky but manageable. If it’s too dry, add a tablespoon of water; if it’s too wet, add a tablespoon of flour.
- Add the shredded cheddar and chopped chives to the dough. Fold them in gently, ensuring they’re evenly distributed. This step is crucial for that burst of flavor in every bite. Don’t overmix—just enough to coat the dough.
- Turn the dough onto a lightly floured surface and knead for about 5 minutes until it becomes smooth and elastic. This develops the gluten network, giving the loafinis their light structure. If the dough is tacky, dust it lightly with flour.
- Place the dough in a greased bowl, cover with a damp cloth, and let it rest at room temperature for 1 hour. During this time, the dough will rise slightly, creating the airy interior. The rest is where the magic happens—don’t skip it.
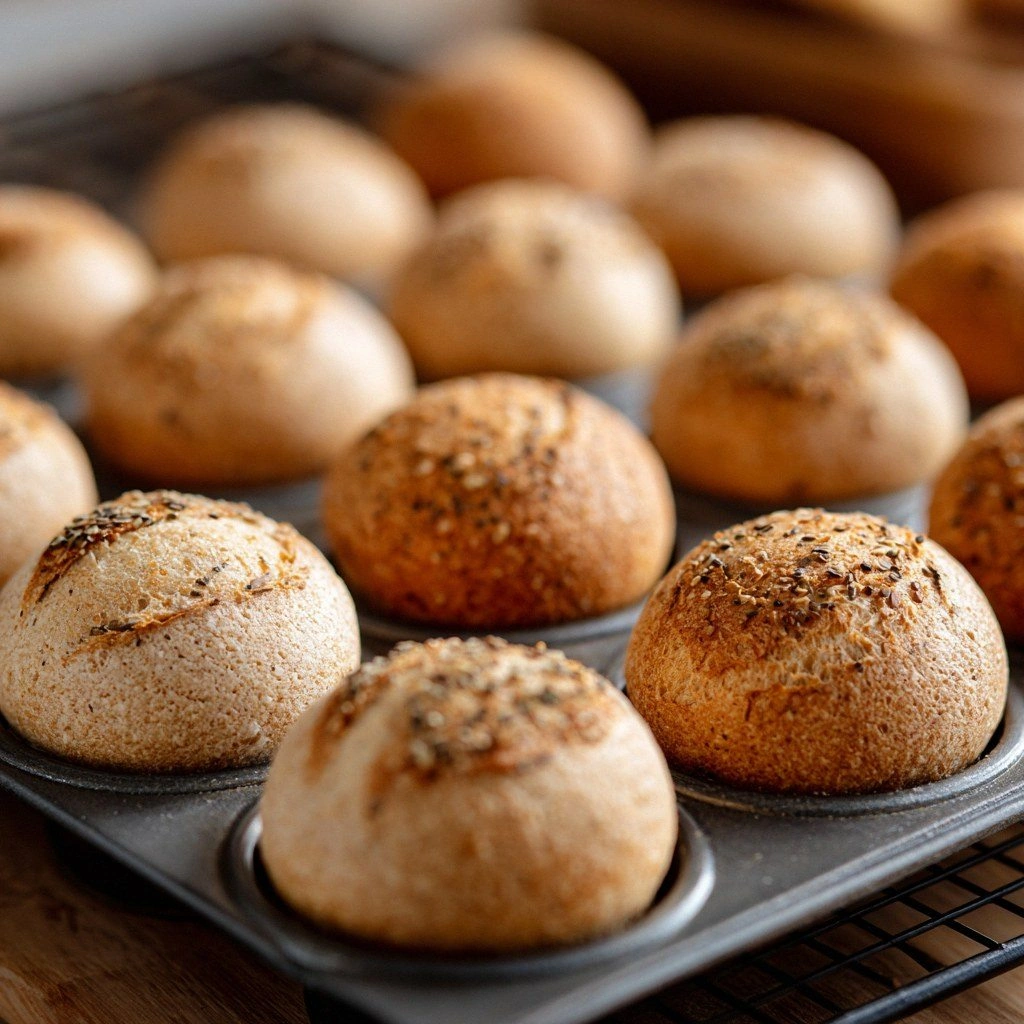
- Preheat the oven to 425 °F (220 °C). While the oven heats, divide the dough into 12 equal portions using a small cookie scoop or spoon. Shape each portion into a tight ball and place them on a parchment‑lined baking sheet. The balls should be about 1½ inches in diameter.
- Brush each loafini with melted butter for a glossy, golden crust. This step also adds a subtle buttery flavor that complements the cheddar. Use a pastry brush to evenly coat the tops; avoid over‑applying to prevent sogginess.
- Bake for 12–15 minutes, or until the tops are golden brown and the loafinis emit a pleasant, nutty aroma. The internal temperature should reach 190 °F (88 °C). Remove from the oven and let them cool on a rack for 5 minutes before serving.
That’s it — you did it. But hold on, I've got a few more tricks that'll take this to another level. Stick around for the insider tips and creative variations that will make your loafinis the star of any occasion.
Insider Tricks for Flawless Results
The Temperature Rule Nobody Follows
Many bakers think that a higher oven temperature always yields a crispier crust, but that’s not always true. Baking at 425 °F (220 °C) gives a quick rise and a golden top, while a slightly lower temperature of 400 °F (205 °C) allows the crumb to develop more slowly, resulting in a chewier interior. I’ve tested both, and the higher temperature gives a more dramatic crust that cracks open like a tiny sunrise.
Why Your Nose Knows Best
Before you open the oven door, pause and inhale. A strong, nutty aroma indicates that the sugars have caramelized and the dough is nearly done. If the scent feels raw, let it bake for an extra minute. Trust your nose; it’s the most reliable indicator of doneness.
The 5-Minute Rest That Changes Everything
After baking, let the loafinis rest on a rack for at least 5 minutes. This brief pause allows the steam to redistribute, preventing a hollow center. The result is a bread that feels full and satisfying. I’ve seen people skip this step, only to find the loafinis collapse into a soggy mess.
Use a Silicone Mat for Even Browning
Silicone baking mats prevent sticking and promote even heat transfer. They also make cleanup a breeze. If you don’t have one, a parchment paper sheet works, but be sure to lightly oil it to avoid sticking.
Keep the Starter Fresh
Feed your starter at least once a week if you’re not baking daily. A fresh starter produces a cleaner, brighter flavor. A neglected starter can develop off‑odors that seep into the loafinis, ruining the taste.
Creative Twists and Variations
This recipe is a playground. Here are some of my favorite ways to switch things up:
Sunflower Seed Crunch
Swap the cheddar for sunflower seeds and omit the chives. The seeds add a nutty crunch that pairs beautifully with the sourdough flavor. Ideal for a crunchy, protein‑rich snack.
Herb & Garlic Infusion
Add minced garlic and a mix of rosemary, thyme, and oregano to the dough. The aromatic herbs create a savory loafini that’s perfect for serving alongside soups or stews.
Chocolate Chip Delight
Fold in a handful of dark chocolate chips and replace the cheddar with a dash of cocoa powder. This sweet variation turns the loafinis into a dessert treat that satisfies any sweet tooth.
Smoked Salmon & Dill
Incorporate smoked salmon pieces and fresh dill into the dough. The smoky flavor and briny dill make these loafinis an elegant appetizer for a brunch or cocktail party.
Caramelized Onion & Parmesan
Saute thinly sliced onions until caramelized, then fold them into the dough along with grated Parmesan. The sweet onions and sharp cheese create a sophisticated flavor profile that’s a hit at gatherings.
Gluten-Free Version
Use a gluten‑free all‑purpose blend and replace the baking soda with a gluten‑free baking powder. The texture will be slightly denser, but the flavor remains delightful.
Storing and Bringing It Back to Life
Fridge Storage
Cool the loafinis completely before placing them in an airtight container. They’ll stay fresh for up to 3 days. The airtight seal prevents moisture loss, keeping the crumb soft.
Freezer Friendly
Wrap each loafini individually in plastic wrap, then place them in a freezer bag. They can be stored for up to 2 months. When ready to eat, thaw at room temperature for 15 minutes before reheating.
Best Reheating Method
Preheat the oven to 350 °F (175 °C). Place the loafinis on a parchment‑lined tray and bake for 5–7 minutes, or until warmed through. Add a tiny splash of water before reheating to create steam, which restores the moist interior and crisp crust.