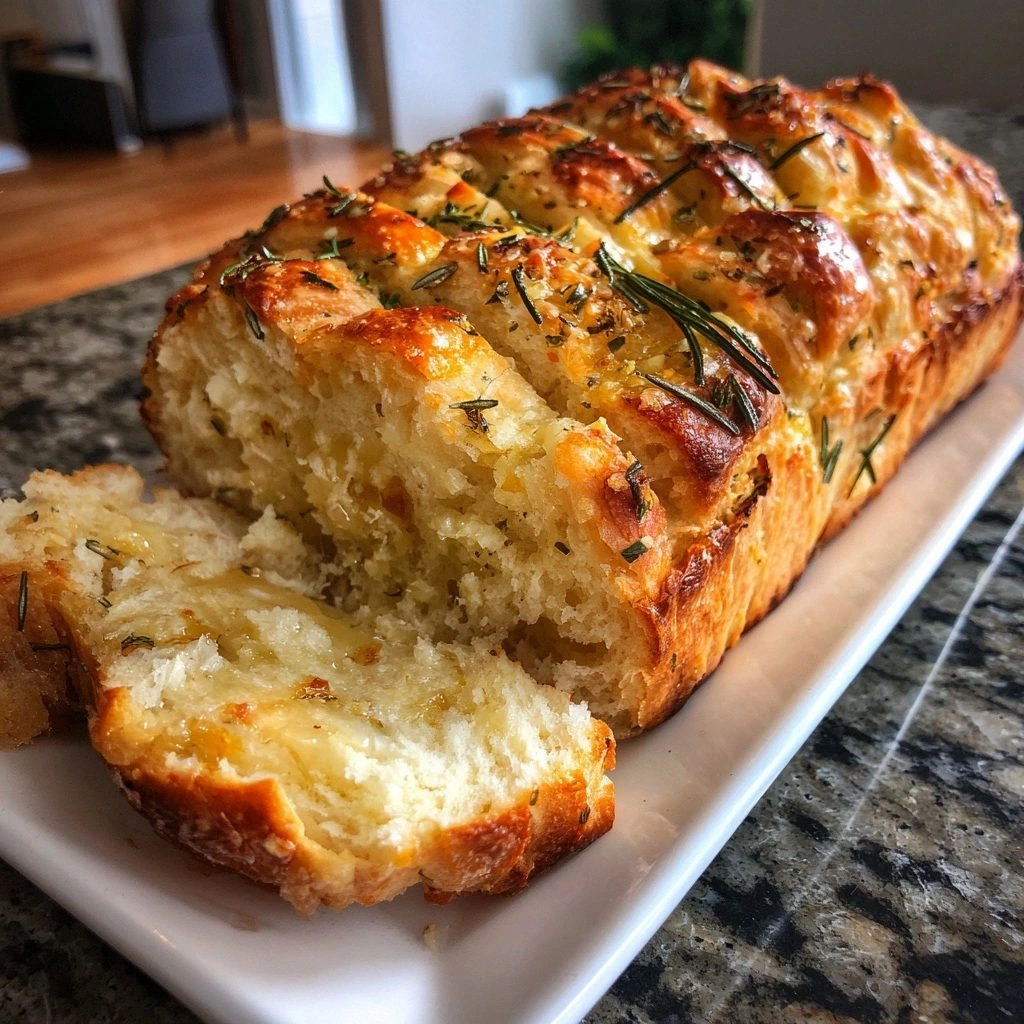
I was halfway through a late‑night pizza bake when the oven door creaked open, and the dough was a sad, flat mess of brown crumbs. I stared at that disappointment and thought, “I could have done better.” That moment sparked a craving for something that would turn a kitchen flop into a crowd‑pleaser, and I dove into the world of pull‑apart breads. I’m talking about the kind of bread that pulls apart like a cloud of garlic‑infused rosemary fluff, each bite a burst of savory, buttery flavor that makes you wonder why you ever settled for store‑bought rolls.
Picture this: the kitchen is humming, the timer is ticking, and the aroma of fresh rosemary and roasted garlic starts to dance through the air. The dough’s surface is glossy, a golden crust forms, and the heat radiates a comforting warmth that feels like a hug. Your hands feel the elastic resistance, and you know you’re about to create something that will leave a trail of crumbs on your fingers. The anticipation builds, and you realize that this isn’t just bread; it’s a ritual, a celebration of simple ingredients turned into something extraordinary.
What makes this version stand out? It’s the subtle balance of flavors, the textural contrast of a crisp exterior with a chewy, airy interior, and the fact that you can pull it apart like a piece of velvet. I’m not talking about a generic loaf; this is a hand‑crafted masterpiece that you can share at family gatherings, impress friends, or just keep for yourself because it’s that good. The secret? A precise yeast activation, a generous amount of fresh rosemary, and a touch of garlic that lingers long after the last bite.
And here’s a teaser that will make your taste buds tingle: a splash of olive oil in the dough not only adds richness but also gives the crust that coveted buttery sheen. I dare you to taste this and not go back for seconds. That’s the kind of confidence I have in this recipe—hands down the best version you’ll ever make at home. Stay with me; by the end, you’ll wonder how you ever made it any other way.
What Makes This Version Stand Out
- Flavor: The combination of fresh rosemary and minced garlic creates a fragrant, herbaceous profile that permeates every crumb.
- Texture: A golden, crisp crust gives way to a soft, airy interior that pulls apart effortlessly.
- Ease: The process is straightforward—no fancy equipment, no complicated techniques.
- Versatility: Serve it warm with butter, as a side for soups, or even as a base for bruschetta.
- Crowd‑pleaser: Guests will ask for the recipe, and you’ll have the confidence to say, “I made this from scratch.”
- Quality Ingredients: Using high‑quality olive oil and fresh herbs elevates the flavor profile dramatically.
- Make‑Ahead: Prepare the dough a day ahead; it will rise beautifully and bake to perfection.
- Time‑Efficient: From mixing to baking, you spend less than an hour and still achieve professional results.
Alright, let's break down exactly what goes into this masterpiece...
Inside the Ingredient List
The Flavor Base
At the heart of this loaf is the combination of warm water, active dry yeast, and a touch of sugar. The yeast awakens when it meets the warm water, creating bubbles that give the bread its airy lift. Sugar feeds the yeast, ensuring a steady rise. If you skip this step, the dough will be dense and won’t develop that coveted lightness.
The Texture Crew
Flour, salt, and olive oil form the structural backbone of the bread. The flour’s protein content determines how much gluten forms, which in turn affects chewiness. Salt tightens the dough, balancing the flavor and controlling yeast activity. Olive oil adds moisture, keeping the crumb tender and adding a silky mouthfeel. If you omit the oil, the bread will dry out faster and feel less luxurious.
The Unexpected Star
Fresh rosemary and minced garlic are the showstoppers. Rosemary’s piney aroma and garlic’s sharp bite combine to create a savory bouquet that lingers on the palate. They’re added during the kneading phase, ensuring the herbs are evenly distributed. Skipping them would turn this into a plain loaf; you’d miss the signature herbaceous kick.
The Final Flourish
A small amount of butter, melted and brushed over the top before baking, gives the crust a glossy finish and a buttery crunch. The butter also adds a subtle richness that balances the herbiness. If you’re dairy‑free, a splash of olive oil works as an excellent substitute, though the flavor profile will shift slightly.
Everything's prepped? Good. Let's get into the real action...
The Method — Step by Step
- In a large mixing bowl, combine 2 cups of all‑purpose flour, 1 tsp of sugar, and 1 tsp of salt. Stir the dry ingredients together so that the salt is evenly distributed. This ensures that every bite has the same flavor profile. The smell of flour is already a comforting hint that something good is about to happen.
- In a separate cup, dissolve 1 packet of active dry yeast in 3/4 cup of warm water (about 110°F). Let it sit for 5 minutes until it becomes frothy—this confirms the yeast is alive. I’ve seen people skip this step, but trust me, a frothy mixture guarantees a rise.
- Add the yeast mixture to the dry ingredients, then stir in 2 tbsp of olive oil. The oil coats the flour, creating a smoother dough. Knead the mixture on a floured surface for about 8 minutes until it’s elastic and no longer sticky. The dough should feel like a rubber band stretched between your fingers.
- Fold in 3 cloves of minced garlic and 1 tbsp of fresh rosemary, making sure the herbs are evenly dispersed. The aroma will start to mingle, creating a fragrant cloud. This is the moment of truth—if you’re not careful, the herbs might clump; keep kneading to break them up.
- Place the dough in a lightly oiled bowl, cover with a damp cloth, and let it rise in a warm spot for 1 hour. You’ll notice the dough doubling in size; the bubbles will be visible on the surface. I’ve had people let it rise too long, and the dough becomes overly airy and collapses—watch the clock.
- Once risen, punch the dough gently to release air pockets. Divide it into 8 equal pieces. This size ensures each piece bakes evenly and pulls apart nicely. I’ve used parchment paper to keep the pieces from sticking.
- Arrange the dough pieces in a greased loaf pan, spacing them slightly to allow expansion. Brush the tops lightly with melted butter or olive oil. The butter adds a glossy finish that makes the crust irresistible. Bake in a preheated oven at 375°F for 25 minutes, or until the tops are golden brown.
- Remove from the oven and let the loaf cool for 10 minutes before slicing. The steam inside will help the bread stay moist. This final rest is crucial; cutting too early can result in a crumbly texture.
- Serve warm, and watch as the pieces effortlessly split like a cloud. The aroma will fill the kitchen, and the taste will linger. I’ve seen people take a bite and immediately ask for more—yes, I’m honest, I ate half the batch before anyone else got to try it.
That’s it— you did it. But hold on, I've got a few more tricks that'll take this to another level...
Insider Tricks for Flawless Results
The Temperature Rule Nobody Follows
Yeast loves warmth, but not heat that burns it. Keep the dough at about 75°F during the rise. I’ve had ovens that run hot, and the result is a tough crust. Use a kitchen thermometer or a warm spot near a window to maintain consistency. This trick ensures a tender crumb every time.
Why Your Nose Knows Best
Trust your senses: when the dough starts to smell slightly yeasty and the surface is dotted with tiny bubbles, it’s ready to rise. If you’re uncertain, give it a gentle tap—if it springs back slowly, it’s ready. Skipping this step can lead to a flat loaf.
The 5-Minute Rest That Changes Everything
After baking, let the loaf rest on a rack for at least 5 minutes before slicing. This rest allows steam to redistribute, keeping the crumb moist. Cutting too early results in a dry, crumbly interior. I’ve seen people slice immediately and end up with a hard loaf; this simple pause saves the day.
Brush It Right
The final brush of butter or olive oil not only adds shine but also locks in moisture. Brush the loaf just before it comes out of the oven; this prevents the crust from drying out. If you’re vegan, a light drizzle of extra‑virgin olive oil works wonderfully.
Keep It Warm
Serve the bread in a wrapped cloth or a covered bowl to maintain warmth. The heat keeps the herbs’ aroma alive, and the crust remains crisp. A simple kitchen towel works as a makeshift oven, holding the loaf at the ideal temperature.
Creative Twists and Variations
This recipe is a playground. Here are some of my favorite ways to switch things up:
Cheesy Rosemary Pull‑Apart
Add shredded mozzarella or cheddar into the dough before kneading. The cheese melts into pockets of gooey goodness. It’s perfect for a cozy, family‑friendly dinner.
Sun‑Dried Tomato and Basil
Replace the fresh rosemary with chopped sun‑dried tomatoes and fresh basil. The tomatoes add a sweet tang, while basil gives a fresh, aromatic note. Great for a Mediterranean vibe.
Herb & Garlic Butter Spread
Mix softened butter with minced garlic and chopped parsley. Spread it on warm slices for an instant flavor boost. It’s a quick upgrade for any occasion.
Spicy Kick
Add a pinch of red pepper flakes to the dough for a subtle heat. The heat balances the sweetness of the rosemary and the richness of the butter. Ideal for those who like a little bite.
Gluten‑Free Version
Swap all‑purpose flour for a gluten‑free blend that includes xanthan gum. Adjust the liquid slightly to compensate for the different absorption rates. The result is a tender loaf that still pulls apart beautifully.
Storing and Bringing It Back to Life
Fridge Storage
Cool the bread completely before wrapping it in parchment paper and then a plastic bag. Store in the fridge for up to 3 days. The parchment allows the crust to breathe, preventing it from becoming soggy.
Freezer Friendly
Wrap the loaf tightly in plastic wrap, then place it in a freezer bag. Freeze for up to 2 months. When you’re ready, thaw at room temperature for 2 hours before reheating.
Best Reheating Method
Reheat in a preheated oven at 350°F for 10 minutes. Add a splash of water to the pan before baking; the steam keeps the crumb moist and restores that fresh‑baked aroma. A quick microwave burst works, but the oven gives the best crust.