It started with a kitchen nightmare that I swear still echoes in the back of my mind. I had just finished a week of bland, overcooked chicken tacos and decided to throw caution to the wind, turning my humble casserole dish into a fiesta of flavors. The result? A casserole that smells like a Mexican street market, tastes like a comfort blanket, and looks like a work of culinary art. If you’ve ever been tempted to settle for a plain, forgettable taco dinner, this is the antidote you need.
Picture the scene: a sizzling skillet, the aroma of cumin and garlic rising like incense, the sound of onions caramelizing into a sweet, golden caramel. Your eyes catch the bright red salsa bubbling, the green cilantro leaves shimmering like emeralds, and the tortillas curling like paper boats ready to be filled. The texture is a harmonious medley—crispy edges that crackle like thin ice, creamy cheese that melts into a velvety blanket, and a hearty meat filling that gives a satisfying chew. The final dish is a mosaic of colors, sounds, and smells that instantly transports you to a bustling taquería.
What makes this version stand out is that it isn’t just a casserole; it’s an experience. I dared to layer the ingredients in a way that each bite delivers a crescendo of flavors—taco-seasoned meat, a splash of lime, a whisper of cilantro, and a generous heap of cheese that browns to a golden crisp. The result is a dish that feels like a warm hug from the inside out, with every bite promising a new twist. This isn’t just another recipe; it’s a game-changer that will rewrite your expectations of what a taco casserole can be.
I’ll be honest—my first attempt nearly turned the kitchen into a smoky disaster. I had the tortillas on the counter, the meat on the stove, and the salsa spilling over like a tiny volcano. But once I followed the exact steps, the chaos turned into pure culinary bliss. And now, by the end of this post, you’ll be armed with the confidence to create a dish that will have your friends begging for seconds. Let me walk you through every single step—by the end, you’ll wonder how you ever made it any other way.
What Makes This Version Stand Out
- Flavor: The taco seasoning is a blend of cumin, chili powder, paprika, and oregano, giving the meat a punch that’s both smoky and slightly sweet. It’s not just seasoning; it’s the heart of the dish, turning ordinary ground beef into a flavor bomb. The salsa adds a bright acidity that cuts through the richness of the cheese.
- Texture: The tortillas are toasted to a crisp edge that provides a satisfying crunch, while the melted cheeses create a creamy, gooey center. The corn and beans add a subtle bite that balances the softness of the meat. The result is a textural symphony that keeps you coming back for more.
- Ease: With just a handful of ingredients, the entire process takes less than an hour from start to finish. No complex sauces or long marinating times—just straightforward cooking steps that even a novice can master. I dare you to taste this and not go back for seconds.
- Versatility: Swap the ground beef for ground turkey, chicken, or even a plant-based crumbled protein to accommodate different diets. Add extra veggies like bell peppers or mushrooms for a veggie-packed version. The dish is a blank canvas ready for your creative twists.
- Crowd-Pleasing: This casserole is perfect for family dinners, potlucks, or game day gatherings. The layers of cheese and meat melt together to create a communal experience that brings people together over a shared plate. Picture yourself pulling this out of the oven, the whole kitchen smelling incredible, and watching everyone’s faces light up.
- Make-Ahead Friendly: Assemble the casserole a day ahead, cover it, and refrigerate. When you’re ready to serve, simply bake it for a few minutes to warm it through. This makes it a fantastic option for busy evenings or when you’re hosting a last-minute dinner.
- Ingredient Quality: Using fresh, high-quality ingredients transforms a simple casserole into a gourmet experience. Fresh cilantro, ripe tomatoes, and good-quality cheese all elevate the dish. I’ve found that the difference is like moving from a generic store brand to a boutique kitchen.
- Nutrition: While indulgent, the casserole still packs a balanced profile—lean protein from the meat, fiber from beans and corn, and calcium from the cheeses. It’s a satisfying meal that doesn’t feel guilty, especially when you use a lean protein and control the cheese portion.
Alright, let's break down exactly what goes into this masterpiece...
Inside the Ingredient List
The Flavor Base
Ground Beef: The foundation of this casserole, the beef should be 80/20 lean-to-fat ratio for optimal juiciness. When browned, it releases natural juices that marry with the spices. Skipping this step will leave the dish flat and uninteresting.
Onion: Diced onion brings sweetness and depth. If you’re avoiding onions, try a small amount of minced shallots for a subtler flavor. The onion also helps to balance the acidity of the salsa.
Garlic: Minced garlic infuses the meat with a punch of aroma. If you’re a garlic skeptic, use a garlic-infused oil to achieve a milder hit. Garlic is essential for that authentic taco kick.
Taco Seasoning: A blend of cumin, chili powder, paprika, oregano, salt, and pepper. This mix turns plain beef into a flavor powerhouse. If you prefer a smoky edge, add a pinch of smoked paprika.
The Texture Crew
Tortillas: The tortillas are the canvas—soft yet sturdy enough to hold the fillings. Toast them lightly before layering to prevent sogginess. You can use corn or flour tortillas based on your preference.
Cheese: A trio of cheddar, Monterey Jack, and mozzarella creates a layered melt. Cheddar adds sharpness, Monterey Jack offers mildness, and mozzarella provides stretchiness. If you’re lactose intolerant, substitute with a dairy-free cheese blend.
Beans & Corn: Black beans add protein and fiber, while corn gives a sweet crunch. Use canned beans rinsed and drained for convenience, or cook fresh if you have the time. These add a hearty texture that keeps the casserole from feeling too dense.
The Unexpected Star
Salsa: The salsa is the bright, tangy counterpoint to the rich meat and cheese. Choose a chunky salsa for texture or a smoother one for a silky finish. If you’re a spice lover, opt for a salsa with jalapeños or chipotle for added heat.
Lime Juice: A splash of lime juice lifts the dish with a citrusy brightness. It also helps balance the richness of the cheeses. If you don’t have fresh limes, bottled lime juice works, but fresh is always better.
Cilantro: Fresh cilantro adds a herbal note that cuts through the heaviness. If you’re not a fan of cilantro, parsley can be a mild alternative, though the flavor profile will shift slightly.
The Final Flourish
Sour Cream: A dollop of sour cream adds creaminess and a slight tang. It also cools the heat from the spices. Use a light or Greek yogurt alternative for a lower-fat option.
Lettuce & Tomatoes: These fresh toppings add crunch and freshness. They’re best added after baking to maintain their crispness. If you’re making a vegetarian version, consider adding avocado slices for healthy fats.
Everything's prepped? Good. Let's get into the real action...
The Method — Step by Step
- Step 1: Brown the Meat Heat a large skillet over medium-high heat and add a splash of olive oil. Add the ground beef, breaking it apart with a spatula, and cook until it turns a deep brown. Stir in the diced onion and minced garlic, and cook until the onion becomes translucent, about 3-4 minutes. This is the moment of truth—if the meat is still pink, let it cook a bit longer. Once done, drain excess grease to keep the casserole from becoming soggy.
- Step 2: Season the Meat Sprinkle the taco seasoning over the browned meat, along with a pinch of salt and pepper. Stir until the meat is evenly coated, and let it simmer for 2 minutes to allow the spices to bloom. The aroma at this point should be unmistakably taco-like, with a hint of cumin and smoky paprika. If you prefer a milder taste, reduce the amount of seasoning slightly. This step locks in flavor that permeates the entire casserole.
- Step 3: Add Beans and Corn Stir in the black beans and corn kernels, allowing them to heat through. These ingredients add both texture and nutrition. The beans soften slightly, while the corn pops with a sweet crunch. If you’re using canned beans, rinse them first to remove excess sodium. This mixture will form the hearty core of the dish.
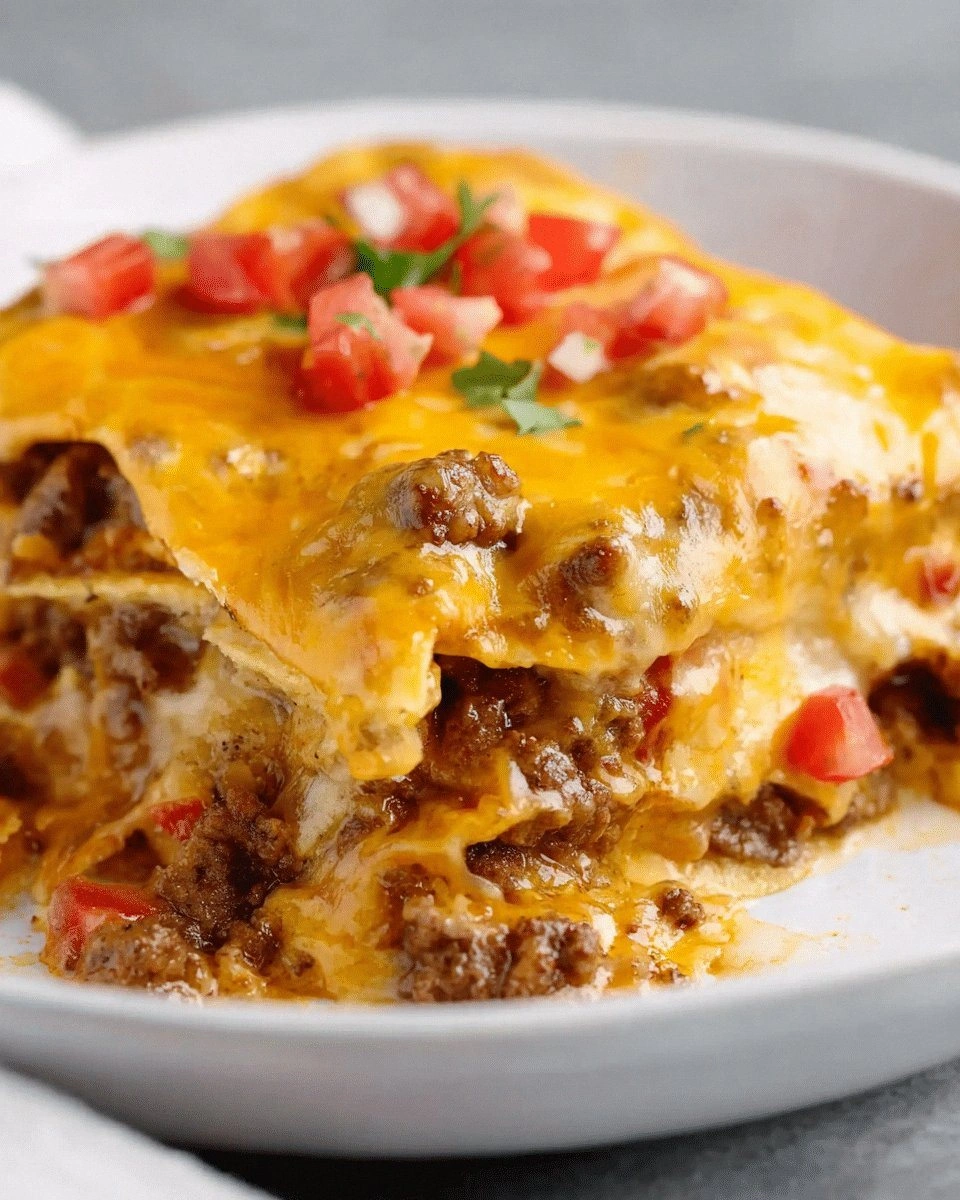
- Step 4: Layer the Casserole Preheat your oven to 375°F (190°C). In a 9x13-inch baking dish, spread a thin layer of the seasoned meat mixture. Place a few tortillas on top, overlapping them like a blanket. Spoon more meat over the tortillas, then sprinkle a generous amount of shredded cheddar, Monterey Jack, and mozzarella. Repeat the layering process until all ingredients are used, finishing with a top layer of cheese.
- Step 5: Bake Cover the dish with aluminum foil to trap moisture and bake for 20 minutes. After 20 minutes, remove the foil to allow the cheese to brown and develop a golden crust. Bake for an additional 10 minutes, or until the cheese is bubbling and slightly caramelized. The edges of the tortillas should start pulling away, creating a crisp border. This step ensures that every bite has a perfect balance of melt and crunch.
- Step 6: Add Fresh Toppings Remove the casserole from the oven and let it rest for 5 minutes. Drizzle lime juice over the top, then sprinkle chopped cilantro. Add dollops of sour cream, diced tomatoes, and shredded lettuce. These fresh toppings bring brightness and a refreshing contrast to the warm, savory layers. The combination of tangy, creamy, and crunchy elements elevates the dish to new heights.
- Step 7: Serve Slice the casserole into squares and serve hot. Encourage guests to add extra toppings like extra cheese, sliced jalapeños, or a splash of hot sauce. The casserole is best enjoyed immediately while the cheese remains gooey and the tortillas crisp. If you’re planning a potluck, keep the casserole in a slow cooker set to warm to maintain its texture.
- Step 8: Clean Up While the dish is still warm, wipe down the skillet and bakeware. This prevents any lingering grease from turning into stubborn grime. A quick rinse with hot water and a gentle dish soap will keep your kitchen spotless. Clean as you go, and you’ll have a tidy space ready for the next culinary adventure.
That's it — you did it. But hold on, I've got a few more tricks that'll take this to another level...
Insider Tricks for Flawless Results
The Temperature Rule Nobody Follows
Why it matters: Many people bake at 400°F, but this temperature can scorch the tortillas before the cheese melts. The sweet spot is 375°F, which allows the cheese to melt evenly while the tortillas crisp just enough. If you’re in a hurry, set your oven to 350°F and bake for a few extra minutes to achieve the same effect.
Why Your Nose Knows Best
What to listen for: A subtle toasty scent indicates the cheese is browning without burning. If the aroma smells burnt, lower the temperature or reduce the baking time. Trusting your nose ensures the casserole has the perfect golden crust.
The 5-Minute Rest That Changes Everything
Why it matters: Resting the casserole for five minutes after baking allows the cheese to set, preventing it from sliding off when you cut the first slice. It also lets the flavors meld together, creating a more cohesive bite. Skipping this step often results in a messy, uneven experience.
The Layering Secret
Why it works: Starting with a thin layer of meat ensures that every tortilla gets coated, preventing dry spots. Alternating layers of cheese and tortillas creates pockets of molten cheese that burst with each bite. If you skip the cheese layers, the casserole becomes a plain meat-and-tortilla mash.
The Quick Heat Hack
When you’re in a rush: After baking, transfer the casserole to a preheated skillet over low heat for 2-3 minutes. This step re-crisps the tortillas and melts the cheese a bit more, giving you that restaurant-quality finish in a fraction of the time.
The Freshness Factor
Why it matters: Adding fresh toppings after baking preserves their crispness and bright flavors. If you add them before baking, they’ll wilt and lose their crunch. The contrast between warm cheese and cool lettuce or tomatoes is essential for a satisfying bite.
Creative Twists and Variations
This recipe is a playground. Here are some of my favorite ways to switch things up:
Mediterranean Taco Casserole
Swap the ground beef for ground lamb and add diced red onions, chopped kalamata olives, and crumbled feta. Use a Greek yogurt sauce instead of salsa for a creamy, tangy base. The result is a fusion dish that marries Mexican heat with Mediterranean herbs.
Vegan Fiesta
Use crumbled tempeh or textured vegetable protein instead of meat. Replace dairy cheeses with a plant-based blend and use a vegan salsa. The casserole remains hearty and flavorful while staying plant-friendly.
Spicy Chipotle Explosion
Add chipotle peppers in adobo sauce to the meat mixture for a smoky, heat-packed flavor. Top with a drizzle of chipotle mayo and a sprinkle of crushed red pepper flakes. This version is perfect for heat lovers who want an extra kick.
Southwest Chicken Casserole
Replace the beef with shredded rotisserie chicken for a lighter option. Add diced bell peppers and a splash of lime juice to the meat layer. Finish with a sprinkle of cotija cheese for a salty, crumbly finish.
Cheesy Cornbread Casserole
Fold a layer of cornbread batter between the tortillas and meat. Bake until the batter rises and turns golden. This twist adds a sweet, buttery element that pairs wonderfully with the savory layers.
Breakfast Taco Casserole
Use breakfast sausage instead of beef, and add scrambled eggs to the meat layer. Top with shredded cheddar and a sprinkle of chives. Serve with a side of hash browns for a hearty breakfast or brunch.
Storing and Bringing It Back to Life
Fridge Storage
Cool the casserole completely before covering it tightly with foil or plastic wrap. Store it in the refrigerator for up to 3 days. When ready to eat, reheat in the oven at 350°F for 15-20 minutes, or until warmed through. The cheese should be bubbly again, and the tortillas should retain their crispness.
Freezer Friendly
For longer storage, wrap the casserole in heavy-duty freezer paper or aluminum foil, then place it in a freezer-safe container. It will keep for up to 3 months. When reheating, thaw overnight in the fridge, then bake at 350°F for 25-30 minutes. Adding a splash of water before reheating helps keep the casserole moist.
Best Reheating Method
The oven is the gold standard for reheating—its dry heat restores the crisp tortilla edges and melty cheese. If you’re in a hurry, use a microwave for 1-2 minutes, then finish in a skillet to crisp the top. A tiny splash of water before reheating steams the casserole back to a fresh, juicy state.