A colorful, crunchy celebration that turns a classic childhood snack into a festive Easter masterpiece.
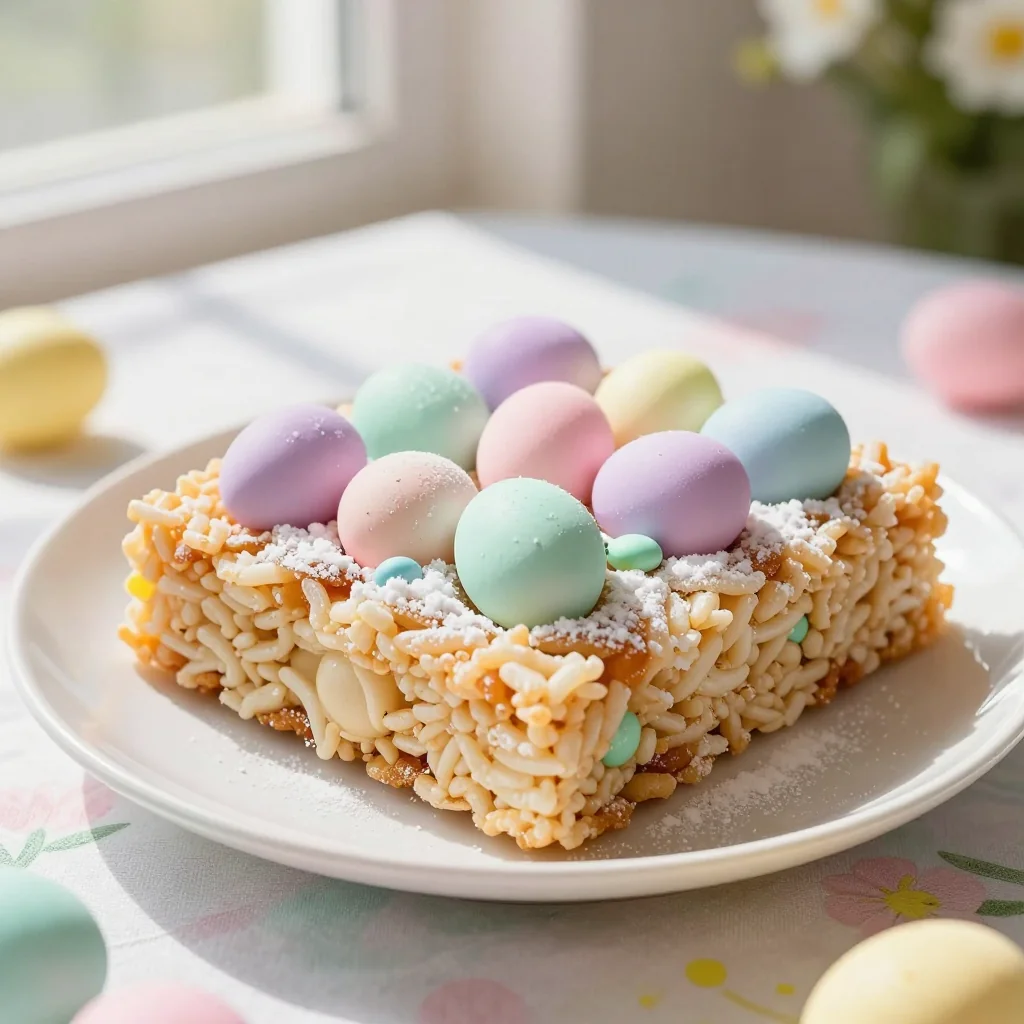
I still remember the first time I saw a tray of pastel‑colored Rice Krispie treats at my sister’s Easter brunch. The glossy, candy‑coated eggs gleamed like tiny sunrise bubbles, and the crack of the crispy base under a bite sparked an instant memory of childhood wonder. That moment sparked a mission: to recreate that magic at home with a recipe that’s both foolproof and spectacularly beautiful.
The tradition of decorating eggs dates back centuries, symbolizing rebirth and new beginnings. By marrying that age‑old custom with the beloved, melt‑in‑your‑mouth Rice Krispie treat, we get a dessert that feels both nostalgic and novel. Whether you’re hosting a family gathering or simply craving a sweet treat that screams “celebration,” these Easter Egg Rice Krispie Treats fit the bill perfectly.
In this guide you’ll learn how to achieve the perfect crunch, how to coat each bite in a smooth, glossy shell, and how to customize colors for any spring palette you desire. I’ll walk you through each step, share pro‑tips for flawless glazing, and reveal a few secret tricks that keep the treats from becoming soggy.
So roll up your sleeves, preheat your imagination, and let’s dive into a recipe that will turn your kitchen into an Easter wonderland.
🌟 Why This Recipe Will Win Your Heart
From texture to visual impact, this treat checks every box for a crowd‑pleasing Easter dessert.
- ✨ Irresistible Crunch: The classic Rice Krispie base offers a light, airy snap that contrasts beautifully with the smooth chocolate coating.
- ✨ Vibrant Visual Appeal: Hand‑dipped in bright pastel glazes, each egg becomes a miniature work of art that delights the eyes before the palate.
- ✨ Simple Ingredients: Only pantry staples—cereal, marshmallows, butter, and chocolate—are needed, making the recipe accessible for any home cook.
- ✨ Customizable Colors: With a few drops of food coloring you can match any spring theme, from pastel pinks to bold turquoise.
- ✨ No Oven Required: The entire process is stovetop and fridge‑based, perfect for hot spring days when you want to keep the kitchen cool.
- ✨ Kid‑Friendly Fun: Little hands love dipping and decorating, turning the preparation into an interactive activity for the whole family.
🥗 Ingredients
📝 Complete Ingredient List
For the Base Treats:
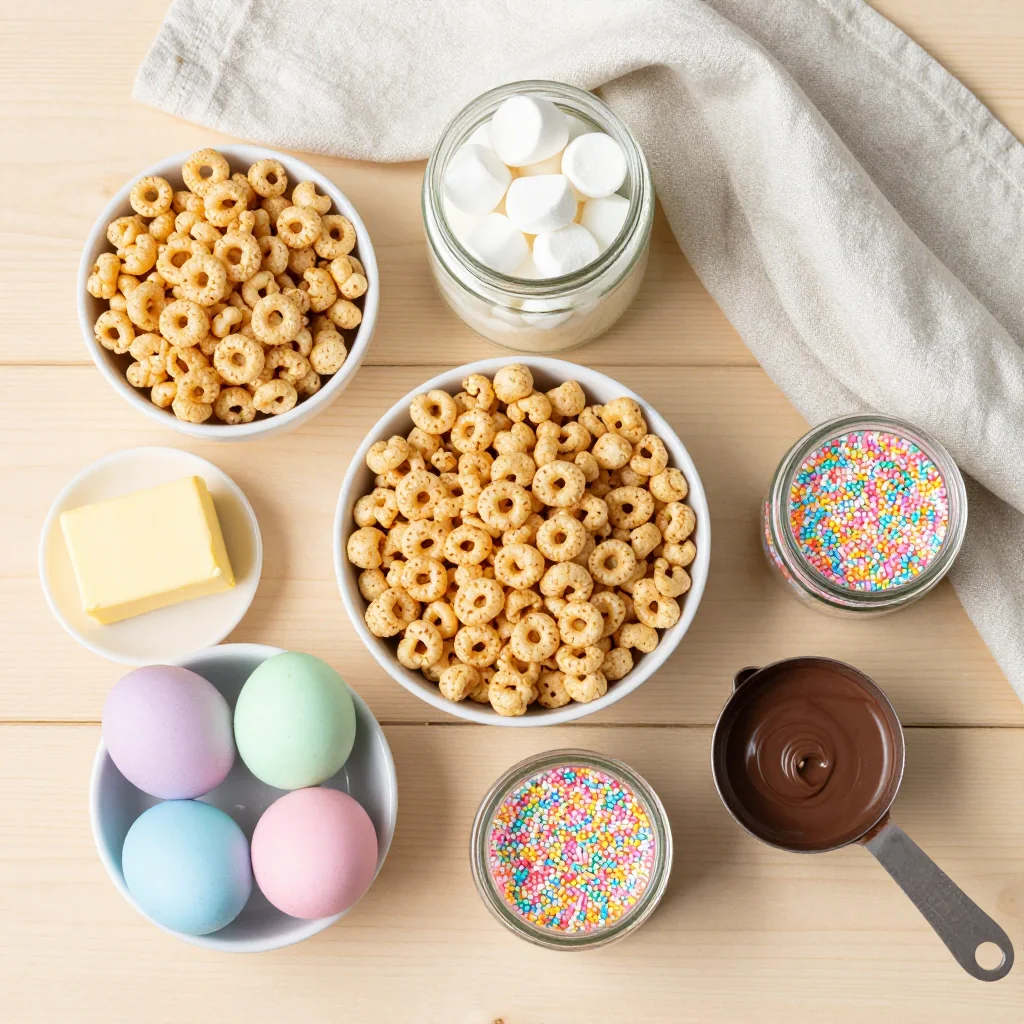
- 6 cups Rice Krispies cereal
- 4 Tbsp unsalted butter
- 340 g mini marshmallows (approx. 10 oz)
- 1 tsp pure vanilla extract
- a pinch salt
For the Egg Coating:
- 170 g white chocolate chips
- 1 tsp coconut oil (helps glaze shine)
- as needed food coloring (pink, blue, yellow, green)
For the Garnish:
- to taste edible glitter or pastel sprinkles
- optional powdered sugar for dusting
🔍 Focus on Key Ingredients
Rice Krispies Cereal
The cereal provides the signature airy crunch that defines a classic treat. Choose the original toasted version for a neutral flavor; if you prefer a slightly sweeter base, honey‑roasted works well but may affect the final glaze’s clarity.
Mini Marshmallows
Mini marshmallows melt quickly and create a smooth binding matrix. Opt for a brand with minimal additives to keep the glaze glossy. For a vegan version, replace with plant‑based marshmallows that melt similarly.
White Chocolate
High‑quality white chocolate gives a creamy, buttery shell that holds food coloring evenly. Look for chocolate with at least 30 % cocoa butter; lower percentages can result in a dull, brittle coating.
🔄 Quick Substitutions
| If you don’t have… | Use instead… |
|---|---|
| White chocolate chips | White chocolate bars, chopped |
| Mini marshmallows | Regular marshmallows, chopped finely |
| Coconut oil | Vegetable oil or butter (slightly less shine) |
👨🍳 Step‑by‑Step Instructions
Follow these detailed phases to create perfectly glossy Easter eggs that stay crisp for days.
📋 Phase 1: Preparation & Mise en Place
Gather tools and prep the work surface before the marshmallows melt.
Prepare the work surface
Line a large 9×13‑inch baking pan with parchment paper, allowing an overhang on two sides for easy lift‑out later. Lightly spray the parchment with non‑stick cooking spray; this prevents the treat from sticking while still letting the glaze slide off cleanly.
Measure dry ingredients
Measure out the Rice Krispies into a large mixing bowl. Ensure the bowl is dry; any moisture will compromise the crispness. Set aside while you melt the butter and marshmallows.
🔥 Phase 2: Cooking & Assembly
Create the sticky base and shape the treats before glazing.
Melting the butter and marshmallows
In a large saucepan over medium‑low heat, melt the butter. Once melted, add the mini marshmallows and stir continuously with a silicone spatula. The marshmallows will begin to foam; keep stirring until they are completely melted and the mixture is smooth, about 3–4 minutes. Remove from heat and stir in the vanilla and pinch of salt.
Combine cereal and marshmallow mixture
Quickly pour the melted marshmallow mixture over the measured Rice Krispies. Using a sturdy wooden spoon, fold the cereal in until every piece is evenly coated. Work fast; the mixture will start to set within minutes.
Press into the pan and chill
Transfer the coated cereal onto the prepared parchment. Using a greased flat spatula or the back of a spoon, press the mixture firmly into an even layer about ½‑inch thick. Refrigerate for 30 minutes to firm up the base before cutting.
✨ Phase 3: Finishing & Dressage
Shape, glaze, and decorate each egg for a professional finish.
Cut into egg shapes
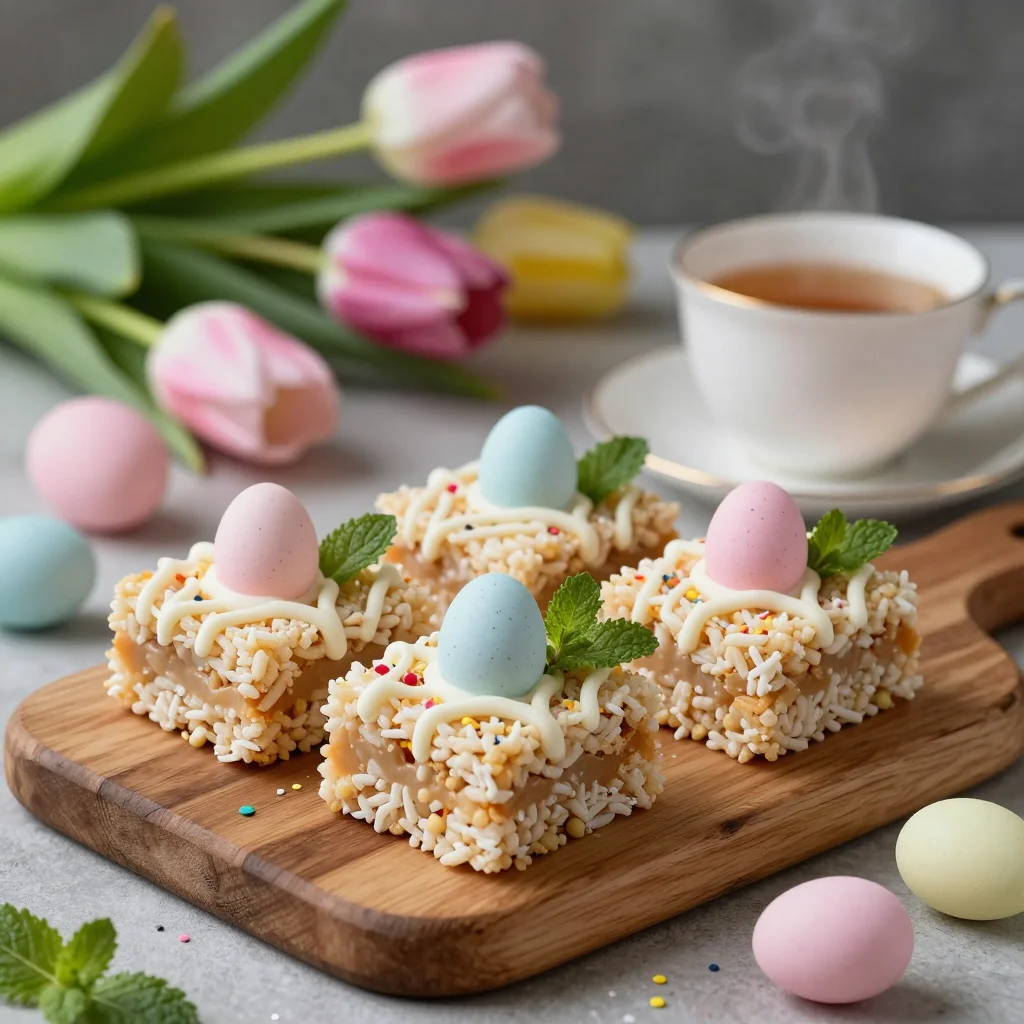
Remove the chilled slab from the pan using the parchment overhang. Place it on a cutting board and, using a sharp egg‑shaped cookie cutter (or a small round cutter for a simpler shape), cut out eight even ovals. If you lack a cutter, use a knife to shape freehand, aiming for a uniform size of about 2 inches long.
Prepare the chocolate glaze
In a heat‑proof bowl set over a pot of simmering water (double boiler), melt the white chocolate chips with coconut oil, stirring until smooth and glossy. Remove from heat and divide the glaze into four separate bowls. Add a few drops of food coloring to each bowl, stirring until the color is uniform. Use pink, blue, yellow, and green to evoke a spring palette.
Dip and glaze the eggs
Holding each egg by the base with a fork or toothpick, dip it gently into the colored glaze, allowing excess to drip off. Place the glazed egg on a parchment‑lined tray. Repeat with all eggs, using a different color for each or mixing colors for a marbled effect.
Add sprinkles and set
While the glaze is still tacky, sprinkle edible glitter or pastel confetti over the surface. Let the eggs sit at room temperature for 10 minutes, then transfer the tray to the refrigerator for an additional 20 minutes to fully set the coating.
Serve
Once the glaze is firm, arrange the Easter Egg Rice Krispie Treats on a decorative platter. They pair beautifully with a light fruit salad or a cup of herbal tea. Enjoy immediately, or store as described below.
💡 Expert Tips & Tricks
🛒 Choosing the Right Ingredients
Opt for a high‑fat white chocolate; the cocoa butter content ensures a smooth, glossy finish that doesn’t crack. When buying marshmallows, avoid those with added corn syrup or gelatin if you need a vegetarian version. Look for “mini” size to reduce melting time and achieve a more uniform base.
🔪 Preparation Techniques
Keep all tools dry—any water will cause the marshmallow mixture to seize. Use a silicone spatula for folding; its flexibility prevents crushing the cereal. When pressing the mixture into the pan, apply even pressure to avoid thin spots that could break during cutting.
🌡️ Mastering the Glaze
Melt white chocolate over low heat; high heat can cause scorching and a grainy texture. Adding a teaspoon of coconut oil not only improves shine but also lowers the chocolate’s viscosity, making dipping smoother. Stir constantly and remove from heat as soon as the mixture is glossy.
🍽️ Presentation & Service
For a polished look, use a silicone egg mold to set the glaze before dipping. This creates a perfectly round shape and reduces handling. Serve on a pastel plate with a dusting of powdered sugar for an extra touch of elegance.
🏆 Pro Tips
A few subtle adjustments can elevate a good treat to a restaurant‑level masterpiece.
- 🎯 Control the Crystallization: Adding a tiny pinch of corn syrup (about ½ tsp) to the marshmallow melt stabilizes the sugar crystals, preventing the base from becoming grainy after refrigeration.
- 🎯 Temperature of the Glaze: Keep the melted chocolate between 30‑35 °C (86‑95 °F). If it cools too much, it will thicken and coat unevenly; if too hot, it may melt the base.
- 🎯 Use a Cooling Rack: After dipping, place the eggs on a wire rack set over parchment. This allows excess glaze to drip away, creating a thinner, more elegant shell.
- 🎯 Color Saturation: For deep pastel hues, let the food coloring sit in the chocolate for a minute before stirring. This ensures even distribution without streaks.
- 🎯 Layered Glazing: For a double‑glaze effect, dip the egg once, let it set for 5 minutes, then dip again in a contrasting color. This creates a subtle marbled appearance.
- 🎯 Storage Moisture Control: Place a thin sheet of parchment between each egg when stacking. This prevents the glaze from sticking together and preserves the crisp texture.
"Desserts are the punctuation marks of a meal; they should be bright, surprising, and leave a lasting impression." — Dominique Ansel
🔄 Variations & Adaptations
The base recipe is a versatile canvas. Below are ideas to tailor it to dietary preferences, flavor cravings, and family-friendly twists.
🥬 Vegetarian / Vegan Version
Replace butter with a plant‑based margarine and use vegan mini marshmallows (available in most health food stores). Swap white chocolate chips for dairy‑free white chocolate made from coconut oil and rice milk. The texture remains identical, and the treat stays 100 % vegan.
- Vegan butter (1:1 substitution for butter)
- Vegan marshmallows (same volume)
- Dairy‑free white chocolate (same weight)
🌶️ Flavor Variations
Play with the glaze flavor profile to match different cuisines or seasonal moods.
Spicy Citrus:
Add a pinch of orange zest and a dash of cayenne pepper to the white chocolate before coloring. The result is a bright, slightly hot glaze that pairs well with a citrus‑infused tea.
Mediterranean Herb:
Mix finely chopped rosemary and a drizzle of olive oil into the base before pressing. The herb‑infused crunch adds an unexpected savory note that complements a glass of crisp rosé.
Asian Matcha:
Incorporate 1 tsp of culinary‑grade matcha powder into the white chocolate glaze for a subtle earthiness and a vibrant green hue. Pair with jasmine tea for a harmonious finish.
⚠️ Dietary Adaptations
Gluten‑Free:
Use certified gluten‑free Rice Krispies (or substitute with puffed quinoa) to keep the treat safe for celiac diets. The texture remains light and airy.
Lactose‑Free:
Choose lactose‑free butter and dairy‑free white chocolate. Coconut oil already replaces part of the dairy fat, making the switch seamless.
Low‑Calorie:
Reduce the marshmallow portion by 25 % and replace half of the white chocolate with a low‑fat white chocolate coating. Expect a slightly firmer glaze but a noticeable calorie drop.
👶 Kid‑Friendly Version
For picky eaters, use only pastel pink and blue glazes and skip the glitter. Offer a side of fresh strawberries for dipping, turning the treat into an interactive snack that encourages fruit consumption.
📦 Storage & Reheating
🧊 Conservation
Refrigerator:
- Duration: 5 days
- Container: Airtight plastic container with parchment sheets between layers
- Tip: Place a paper towel on top to absorb excess moisture
Freezer:
- Duration: 2 months
- Method: Wrap each egg individually in parchment, then place in a zip‑top freezer bag
- Defrosting: Transfer to refrigerator overnight; avoid microwaving to keep the glaze intact
💡 Note: The glaze can become slightly cloudy after freezing; a quick dip in fresh melted chocolate restores shine.
♨️ Reheating
🔥 Oven (Recommended):
- Preheat to 150 °C (300 °F)
- Cover each egg loosely with aluminum foil
- Heat for 8‑10 minutes
- Remove foil and continue for 2‑3 minutes to restore glaze crispness
⚡ Microwave (Quick):
- Place egg on a microwave‑safe plate
- Cover with a microwave‑safe lid
- Heat on medium power for 20‑30 seconds
- Check and repeat in 10‑second bursts if needed
🍳 Skillet:
Warm a non‑stick skillet over low heat, add a splash of water, and cover. Heat for 1‑2 minutes, allowing steam to soften the interior while preserving the glaze.
🍷 Perfect Pairings
🥗 Side Dishes
- Fresh Berry Salad: A mix of strawberries, blueberries, and mint adds a bright, acidic contrast.
- Light Citrus Yogurt: Sweetened Greek yogurt with a drizzle of honey and orange zest balances the chocolate richness.
- Vanilla Bean Panna Cotta: Silky panna cotta provides a creamy counterpoint without overwhelming the treat.
🍷 Wine & Beverage Pairings
- Prosecco: Its bright acidity cuts through the sweetness and lifts the palate.
- Riesling (off‑dry): The subtle fruit notes echo the pastel colors while complementing the chocolate.
- Non‑Alcoholic: Sparkling elderflower water with a squeeze of lemon offers a festive, alcohol‑free option.
🍰 To Complete the Meal
Begin with a light lemon sorbet as a palate cleanser, follow with the Easter Egg treats, and finish with a delicate almond shortbread. The progression from citrus to chocolate to nutty sweetness creates a harmonious dining experience.
❓ Frequently Asked Questions
Q: Can I use regular marshmallows instead of mini marshmallows?
Yes. Chop regular marshmallows into small pieces before melting. The smaller the pieces, the quicker and more even the melt. Expect a slightly thicker base if you don’t reduce the volume, so you may want to add an extra tablespoon of butter to maintain the right consistency.
Q: How do I prevent the white chocolate glaze from turning grainy?
Keep the melting temperature low (no higher than 45 °C/113 °F) and stir constantly. Adding a teaspoon of coconut oil lowers the chocolate’s viscosity and helps maintain a smooth texture. If you notice specks, remove the bowl from heat immediately and keep stirring until the mixture becomes glossy again.
Q: What if I don’t have food‑grade coloring?
Natural alternatives such as beet juice (pink), spirulina powder (green), turmeric (yellow), and blueberry puree (blue) can be blended into the melted chocolate. Use a fine sieve to remove any pulp before dipping to keep the glaze smooth.
Q: My glaze cracked after setting—what went wrong?
Cracking usually occurs when the chocolate cools too quickly or is too thick. Ensure the glaze is thin enough to flow easily; if it feels too viscous, add a few more drops of coconut oil. Also, avoid exposing the glazed eggs to drafts or rapid temperature changes while they set.
Q: Can I prepare these treats a day ahead?
Absolutely. Store them in the refrigerator in an airtight container with parchment sheets separating each layer. The glaze will firm up further, making the eggs even easier to handle when serving the next day.
Q: How can I make the treats less sweet for kids with sensitive palates?
Reduce the marshmallow quantity by 20 % and replace half of the white chocolate glaze with a semi‑sweet milk chocolate. The resulting balance offers a milder sweetness while retaining the signature crunch and visual appeal.
🎉 To Your Kitchen!
This Easter Egg Rice Krispie Treats recipe blends nostalgia with creativity, giving you a dessert that dazzles both the eyes and the taste buds. The combination of a light, airy base and a glossy, colorful shell makes it a centerpiece for any spring celebration. With the detailed steps, pro tips, and variations provided, you have everything you need to tailor the treat to any dietary need or flavor craving.
I can’t wait to see how you personalize these eggs—whether you go bold with neon colors or keep it classic pastel. Share your results in the comments, ask any lingering questions, and don’t forget to rate the recipe!
Have you tried this recipe?
Leave a comment and rating below! Share your photos on Instagram with #EasterKrispieEggs to be featured.
Easter Egg Rice Krispie Treats
Colorful, crunchy treats that bring Easter joy to every bite.
📝 Ingredients
Base Treats
Egg Coating
Garnish
👨🍳 Instructions
- 1. Line a 9×13‑inch pan with parchment and lightly spray.
- 2. Measure 6 cups of Rice Krispies into a large bowl.
- 3. Melt 4 Tbsp butter, add 340 g mini marshmallows, stir until smooth; add vanilla and a pinch of salt.
- 4. Pour marshmallow mixture over cereal, fold quickly until fully coated.
- 5. Press mixture into the pan, chill 30 min.
- 6. Cut chilled slab into eight oval “egg” shapes.
- 7. Melt 170 g white chocolate with 1 tsp coconut oil; divide and color.
- 8. Dip each egg into a colored glaze, let excess drip.
- 9. Sprinkle with glitter or sprinkles while glaze is tacky.
- 10. Chill 20 min, then serve or store as instructed.
🥗 Nutrition Facts (per serving)
*Values are estimates based on standard ingredient data.


💬 Comments & Reviews
Leave a Comment
No comments yet. Be the first to share your thoughts!