Picture this: the kitchen was a battlefield, flour dusting the counter like snow, and the timer on the stove ticking louder than a Christmas carol. I had just attempted the most elaborate gingerbread house, only to discover the dough was as stiff as a wintery wind. The disappointment was palpable, a bitter taste that lingered in my mind even before the first bite. Then, a friend dared me to make something that could outshine even the most seasoned holiday cookies, and I accepted without hesitation. I knew then that the next creation would be a masterpiece worthy of the holidays.
From that moment, I set out to craft a cookie that was both classic and daring, a twist on the ordinary sugar cookie that would have people shouting, “I dare you to taste this and not go back for seconds.” I mixed the butter until it was silky, then folded in sugar until the mixture gleamed like a polished snowflake. The aroma that rose was a warm hug, a promise of sweetness and spice that would make the whole kitchen smell incredible. I added vanilla and peppermint extracts, each drop a secret weapon that would elevate the flavor profile beyond the usual. The dough was soft enough to fold but firm enough to hold its shape, a perfect balance that would later become the foundation of the twist.
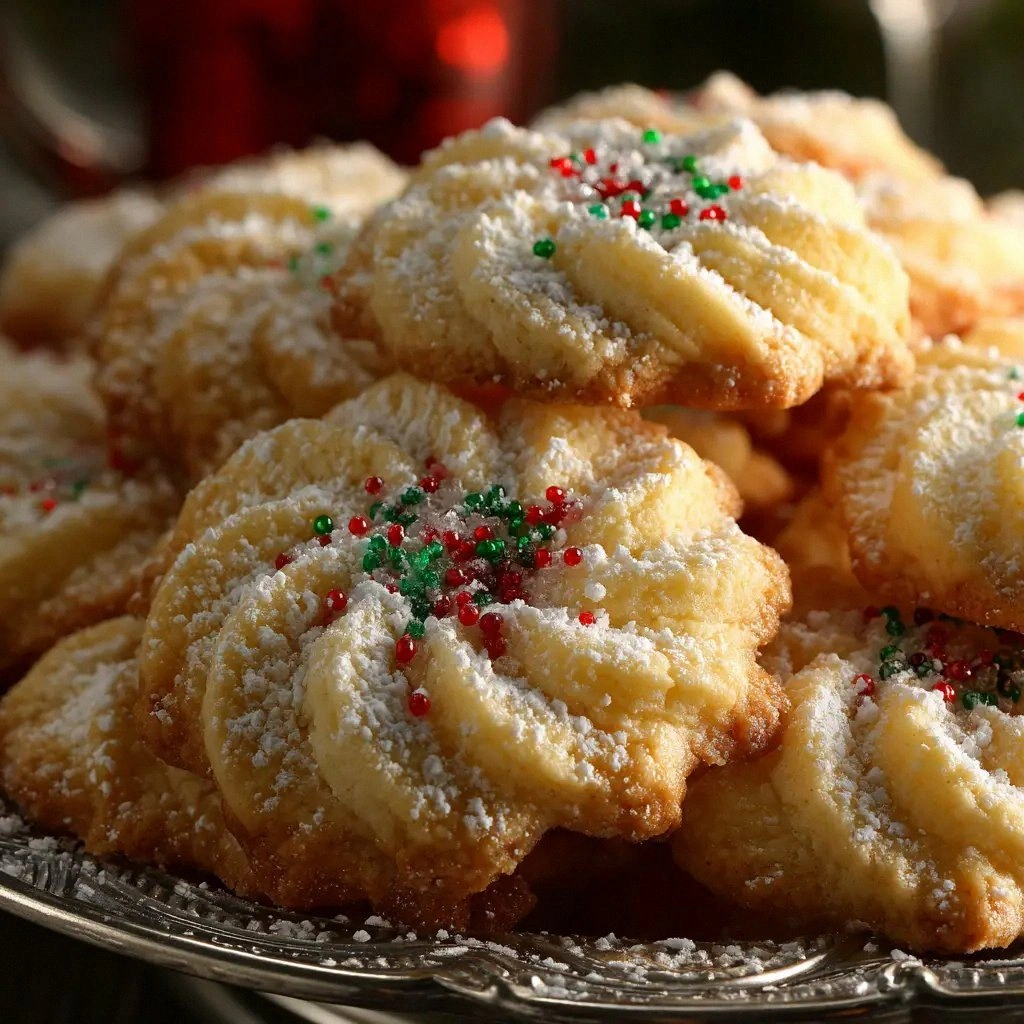
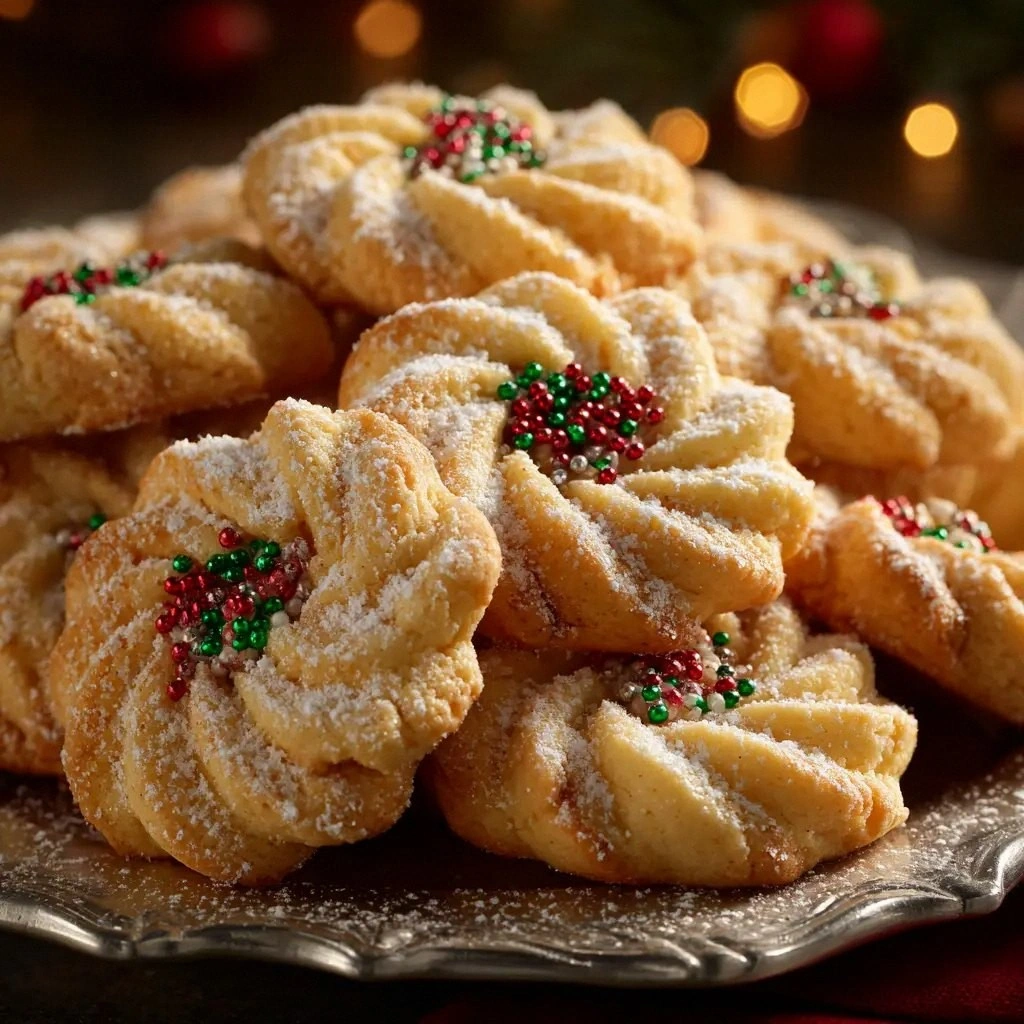
When I first rolled the dough into rounds, the sight of the dough’s glossy surface felt like a miniature Christmas tree ready to be decorated. I sprinkled the red food coloring to give the dough a festive hue, watching it spread like a blush across the dough. The texture was buttery and tender, promising a crunch that would crack like thin ice when bitten. The anticipation built as I twisted each cookie, creating a spiral that would become a signature of this recipe. I imagined the guests’ eyes widening as they saw the swirl of peppermint and the bold red swirl, a visual treat that would be as delightful as the taste.
Most recipes get this completely wrong, focusing only on the taste and ignoring the visual drama that makes a cookie memorable. This version stands out because it marries texture, flavor, and presentation into one bite. The cookies are soft inside, with a crisp edge that shatters like thin ice, and the peppermint swirl adds a cooling contrast that lingers on the tongue. I promise you, this is hands down the best version you’ll ever make at home, a recipe that will become a staple in every holiday celebration. Let me walk you through every single step—by the end, you’ll wonder how you ever made it any other way.
What Makes This Version Stand Out
- Taste: The combination of vanilla and peppermint creates a flavor that feels like a fresh snowfall on a warm day. The subtle sweetness of the sugar cookie base is elevated by a faint minty aftertaste that lingers. This harmony of flavors is what makes the cookie irresistible to both kids and adults alike.
- Texture: The dough is crafted to be soft yet resilient, ensuring a tender bite that melts into a buttery, crisp edge. The twist in the dough introduces a slight crunch that adds an exciting sensory contrast. The final result is a cookie that feels like a winter wonderland—soft inside, crisp outside.
- Simplicity: Despite its impressive appearance, the recipe requires only nine basic ingredients and minimal equipment. The process is straightforward, with clear stages that anyone can follow. This ease of preparation makes it an ideal choice for both seasoned bakers and kitchen novices.
- Uniqueness: The twist technique is a playful twist that turns a standard cookie into a piece of edible art. The red food coloring gives a festive pop that sets it apart from typical gingerbread or chocolate cookies. This visual flair transforms the cookie into a conversation starter at any holiday gathering.
- Crowd Reaction: Guests often comment on the cookie’s appearance before tasting, and the moment they bite into it, their faces light up with delight. The combination of sweet, minty, and buttery flavors creates an instant crowd-pleaser. This recipe has become a staple at holiday parties, where it garners rave reviews and requests for the recipe.
- Ingredient Quality: Using high‑grade unsalted butter and fresh peppermint extract ensures the flavor is bright and not cloying. The red food coloring is food‑safe and non‑synthetic, providing a natural hue without compromising taste. Sourcing quality ingredients elevates the overall experience of each cookie.
- Cooking Method: Baking at a moderate temperature allows the cookies to rise gently while maintaining a crisp edge. The dough is chilled before baking, which helps the twists hold their shape and prevent spreading. This method guarantees uniformity and consistency across every batch.
- Make‑ahead Potential: Once baked, the cookies store well in an airtight container for up to a week, making them perfect for pre‑making gifts. They can also be frozen in a single layer before baking, extending their shelf life without loss of texture. This convenience turns the recipe into a stress‑free holiday solution.
Inside the Ingredient List
The Flavor Base
The foundation of any cookie lies in its flavor base, and for these twisted treats, that base is a simple yet powerful mixture of flour, butter, and sugar. Each component plays a distinct role: flour provides structure, butter adds richness, and sugar offers sweetness and caramelization. When these ingredients are combined in the right proportions, they create a dough that is both tender and robust. The addition of vanilla extract deepens the overall flavor, giving the cookie a warm, comforting aroma. A well‑balanced flavor base ensures that the other ingredients shine without overpowering the dough.
The Texture Crew
The texture of the dough is curated through careful measurements and chilling, which help control moisture and prevent excessive spreading. Baking powder, a small amount, contributes to a slight lift, creating a lighter crumb. Salt, though minimal, balances sweetness and enhances the buttery notes. The red food coloring, while primarily visual, also slightly alters the dough’s moisture content, making it easier to twist. Together, these ingredients give the cookies a satisfying bite that transitions from soft to crisp.
The Unexpected Star
Peppermint extract is the star that gives these cookies their signature coolness, a subtle contrast to the sweet dough. Unlike peppermint candies that are too strong, the extract is used sparingly to avoid overpowering the other flavors. Its aroma is uplifting, reminiscent of a crisp winter morning. The extract also pairs beautifully with the red hue, creating a festive theme. This ingredient turns an ordinary cookie into a holiday highlight.
The Final Flourish
The final flourish comes from the twist itself, a simple technique that adds visual intrigue and a textural surprise. By rolling the dough into a log and cutting it into slices, you create a spiral that unfolds during baking. The twist also allows the peppermint and vanilla to distribute evenly, ensuring each bite is balanced. The red color, when paired with the peppermint swirl, evokes images of holiday lights and decorations. This flourish is what sets these cookies apart from standard sugar cookies.
Everything's prepped? Good. Let's get into the real action.
The Method — Step by Step
- Preheat your oven to 350°F (175°C) and line two baking sheets with parchment paper. The gentle heat ensures even baking without scorching the edges. A well‑lined sheet prevents the cookies from sticking and makes cleanup a breeze. Keep the sheets ready, as the dough will be shaped quickly once it’s ready. This preparation sets the stage for a flawless bake.
- In a large mixing bowl, beat the unsalted butter and granulated sugar together until the mixture is pale and fluffy, like a cloud of winter fluff. Use an electric mixer on medium speed to incorporate air, which will give the cookies a light, airy crumb. The beating should take about 2–3 minutes; stop when the mixture looks smooth and the sugar is fully dissolved. This step is crucial for achieving the right texture.
- Add the large egg, vanilla extract, and peppermint extract to the butter mixture, whisking until fully blended. The egg provides structure, while the extracts infuse the dough with aroma and flavor. Be sure to scrape the sides of the bowl to incorporate all the ingredients. This blend forms the backbone of the cookie’s flavor profile.
- In a separate bowl, whisk together the all‑purpose flour, baking powder, salt, and red food coloring until well combined. The food coloring should be evenly dispersed to avoid streaks. Mixing the dry ingredients separately ensures a uniform distribution of leavening agents and prevents clumps. This step is essential for consistent texture.
- Gradually fold the dry mixture into the wet mixture, stirring until the dough just comes together. Avoid overmixing, as this can develop gluten and result in a tough cookie. The dough should feel slightly sticky but manageable. This is the point where the dough transforms from a liquid to a pliable ball.
- Roll the dough into a log about 2 inches in diameter, then chill it in the refrigerator for at least 30 minutes. Chilling firms the dough, making it easier to slice without the twists unraveling. The log should be firm enough to hold its shape when cut. This step is a game‑changer for achieving clean, uniform twists.
- Slice the chilled log into 1/2‑inch thick rounds, then twist each slice gently to create a spiral. Place the twisted cookies onto the prepared baking sheets, spacing them about 2 inches apart. The twist should be subtle, not too tight, so the cookie expands evenly during baking. This visual trick will wow your guests before they even take a bite.
- Bake for 12–15 minutes, or until the edges are golden and the centers are set. Watch the cookies as they bake; they should develop a light golden hue without darkening too quickly. Remove them from the oven and let them cool on the sheet for 5 minutes before transferring to a wire rack. This short cooling period preserves their shape and allows the flavors to settle.
That's it — you did it. But hold on, I've got a few more tricks that'll take this to another level.
Insider Tricks for Flawless Results
The Temperature Rule Nobody Follows
Many bakers think a higher temperature is always better, but for these cookies, a steady 350°F is key to achieving the perfect balance of softness and crispness. Baking too hot can cause the edges to brown too quickly, leaving the centers raw and overly soft. I’ve found that an oven thermometer is a lifesaver; it guarantees your oven stays within the sweet spot. This small adjustment can transform a good batch into an unforgettable one.
Why Your Nose Knows Best
During the mixing phase, pause and inhale the dough; the aroma will tell you if the flavors are balanced. If the peppermint scent feels overpowering, add a pinch more sugar to mellow it out. The smell is a subtle cue that the dough is ready for the next step. Trusting your nose can save you from a batch that tastes off.
The 5‑Minute Rest That Changes Everything
After you’ve formed the twists, let them rest on the baking sheet for 5 minutes before baking. This pause allows the dough to relax and the flavors to meld, resulting in a more cohesive bite. It also gives the twists a chance to settle, preventing them from spreading too much during the bake. I’ve seen this trick turn a mediocre batch into a crowd‑pleaser.
How to Keep the Twists from Slipping
When slicing the dough log, use a sharp knife and apply gentle pressure to avoid tearing the layers. A chilled dough is less likely to crumble, but if you notice any crumbs, press them back into place with a wet fingertip. This ensures each cookie keeps its elegant spiral shape. A tidy presentation adds to the overall appeal.
The Perfect Frosting Pairing
If you want to elevate these cookies further, consider a simple powdered sugar glaze with a splash of milk and a touch of peppermint extract. Drizzle the glaze over the cooled cookies for a glossy finish that enhances the minty flavor. The glaze adds a sweet, velvety layer that contrasts beautifully with the crisp edges. A quick glaze can turn an ordinary cookie into a showstopper.
The Secret to a Crispy Edge
For a crunchier finish, sprinkle a light dusting of powdered sugar over the dough before twisting. The sugar caramelizes slightly during baking, creating a crisp, sweet crust. This technique also adds a subtle visual sparkle that catches the eye. The result is a cookie that crunches delightfully with every bite.
Creative Twists and Variations
This recipe is a playground. Here are some of my favorite ways to switch things up:
Cranberry Zest Twist
Add a tablespoon of dried cranberries to the dough for a tart pop that complements the mint. The cranberries also add a burst of color, making the cookies even more festive. This variation is perfect for those who love a bit of acidity in their sweets. The result is a cookie that balances sweet, sour, and minty notes.
Chocolate Chip Surprise
Fold in a handful of dark chocolate chips into the dough before twisting. The chocolate melts slightly, creating pockets of molten chocolate in each bite. This version is a hit with chocolate lovers and adds a rich depth to the flavor profile. The chocolate chips also give a subtle visual contrast to the red and mint.
Almond Joy Edition
Replace half of the butter with coconut oil and add a tablespoon of shredded coconut to the dough. The coconut adds a tropical twist that pairs well with the peppermint. This version is a nod to the classic candy bar and offers a chewy, nutty texture. It’s a great alternative for those who enjoy a hint of tropical flavor.
Cinnamon Swirl
Sprinkle a teaspoon of ground cinnamon into the dry mixture before mixing. The cinnamon adds warmth and depth, reminiscent of a cozy winter morning. The spice balances the sweetness and enhances the overall aroma. This variation is ideal for those who love a spiced holiday treat.
Lavender & Honey
Replace the vanilla extract with a teaspoon of honey and add a pinch of dried culinary lavender to the dough. The floral notes mingle with the mint, creating a sophisticated flavor profile. The honey adds a natural sweetness that complements the lavender. This version is a unique twist for adventurous bakers.
Maple Syrup & Walnut
Swap the granulated sugar for an equal amount of pure maple syrup and fold in a handful of chopped walnuts. The maple syrup brings a deep, caramel-like sweetness, while the walnuts add crunch and nuttiness. This combination offers a hearty, autumnal flavor that pairs well with the peppermint. The result is a cookie that feels both festive and comforting.
Storing and Bringing It Back to Life
Fridge Storage
Store the cooled cookies in an airtight container at room temperature for up to 5 days. The airtight seal prevents the cookies from drying out and preserves their buttery texture. If you notice any moisture buildup, let the container air out for a few minutes before sealing again. Keeping the cookies in a cool, dry place maintains their freshness.
Freezer Friendly
For longer storage, place the cooled cookies on a parchment‑lined tray and freeze them for up to 3 months. Once frozen, transfer the cookies to a resealable bag to prevent freezer burn. When ready to eat, let the cookies thaw at room temperature for 30 minutes before serving. Freezing keeps the cookies crisp and ready for any occasion.
Best Reheating Method
To revive a frozen or stale cookie, place it on a baking sheet and bake at 300°F (150°C) for 5 minutes. The low heat restores the crispness without overbrowning the edges. For a quick refresh, microwave on low for 10 seconds, then let it sit for a minute; the steam will bring back the cookie’s softness. This method ensures the cookies taste fresh every time.