Picture this: I was halfway through a batch of banana bread, the oven timer blaring, when my phone buzzed with a text from a friend daring me to recreate the legendary banana pudding they swore was the pinnacle of comfort desserts. I stared at the glowing screen, my mind racing through all the generic recipes I’d seen, each promising a creamy, dreamy treat but falling flat on the taste test. I knew I had to do something different. I decided to abandon the ordinary and dive headfirst into a version that would make even the most skeptical palates swoon.
The kitchen smelled of ripe bananas and vanilla, a fragrant promise that something sweet was about to unfold. The sound of the blender whirring, the gentle hiss of milk steaming, and the faint crunch of wafers being crushed together created a symphony that made my mouth water. I could almost taste the custard thickening, the banana slices sinking into a silky base, and the wafers becoming a crunchy crown atop the dessert. Every sense was on high alert, and I felt the anticipation building like a secret that was about to be revealed.
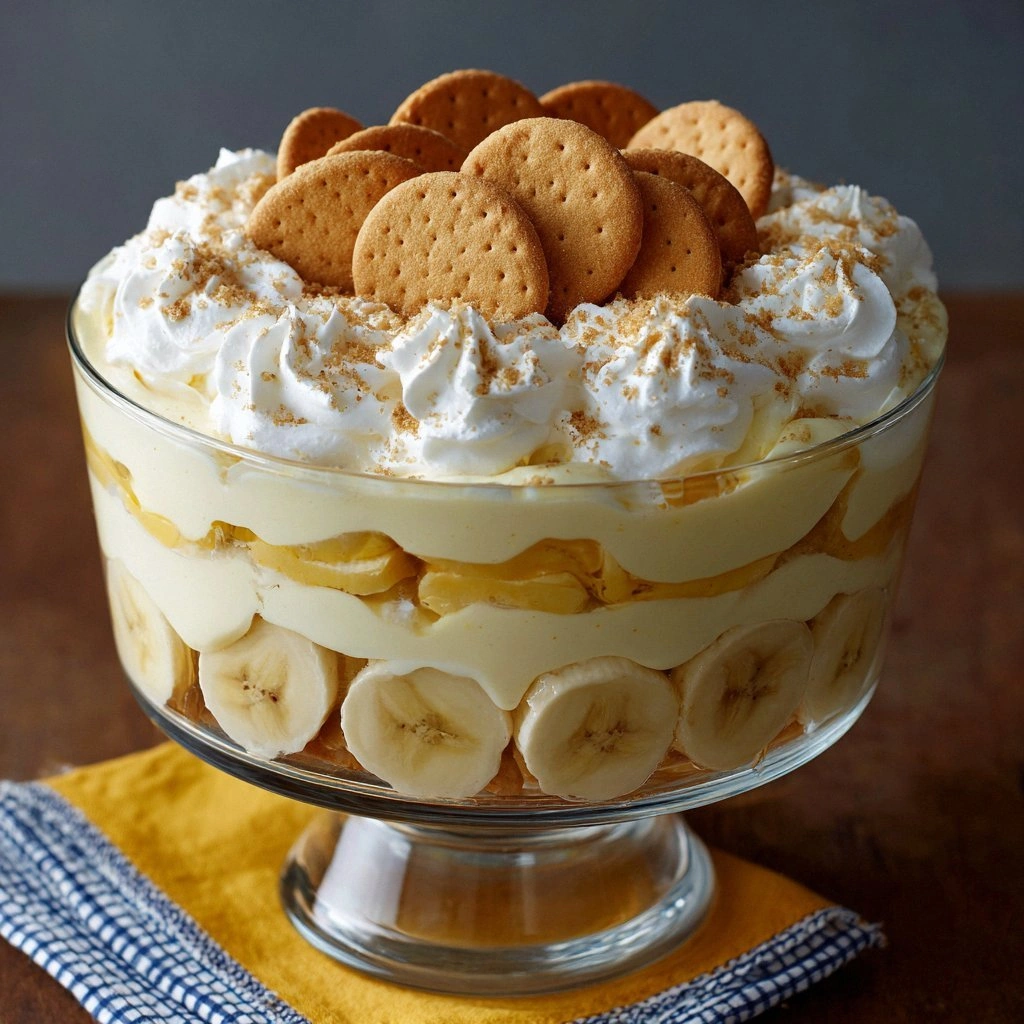
This isn’t just another banana pudding; it’s a revelation that turns a humble dessert into a showstopper. The secret lies in a meticulous layering technique, a touch of cornstarch to achieve the perfect silky consistency, and a splash of vanilla extract that elevates the flavor profile to something unforgettable. It’s a recipe that respects the humble banana but treats it like royalty, giving it the richness of cream and the crunch of wafers in a single bite. The result is a dessert that is simultaneously light and indulgent, with a texture that feels like velvet on the tongue.
What you’re about to learn includes a trick that most recipes overlook: the use of a small amount of heavy cream to give the custard a luscious mouthfeel and a subtle caramelization when the wafers toast in the oven. I’ll walk you through every single step, from selecting the perfect bananas to achieving that golden crust, and by the end, you’ll wonder how you ever made it any other way. Let’s dive in and transform your kitchen into a dessert laboratory.
What Makes This Version Stand Out
- Flavor: The combination of ripe bananas, vanilla, and a hint of cinnamon creates a layered taste that’s both sweet and slightly spicy, reminiscent of a warm summer afternoon. The custard’s richness is balanced by the lightness of the wafers, making each spoonful a delightful contrast.
- Texture: The custard is silky and thickened with cornstarch, yet it remains pourable enough to coat the wafers without turning into a dense pudding. The wafers add a satisfying crunch that melts into a buttery softness as they soak.
- Visual Appeal: The golden crust that forms on top of the wafers is a visual cue that signals the dessert is ready, while the translucent layers of custard and banana slices create a rainbow of colors that look as good as they taste.
- Time Efficiency: With a prep time of just 15 minutes and a cook time of 30 minutes, this dessert can be made in less than an hour, making it perfect for last-minute gatherings or spontaneous cravings.
- Make‑Ahead Potential: The pudding can be assembled up to 24 hours ahead, allowing the flavors to meld together. When ready to serve, a quick bake will restore the crispness of the wafers.
- Ingredient Quality: Using fresh bananas, real butter, and a high-quality vanilla extract elevates the dish, ensuring that each bite is full of authentic flavor.
- Versatility: The base recipe can be tweaked with chocolate chips, nut butter, or a splash of rum to create new variations that cater to different tastes.
- Kid‑Friendly: The dessert is naturally sweet and free from artificial additives, making it a safe treat for children and adults alike.
Alright, let’s break down exactly what goes into this masterpiece…
Inside the Ingredient List
The Flavor Base
Bananas: Ripe bananas are the star of the show, providing natural sweetness and a creamy texture when sliced. If you use overripe bananas, the custard will be sweeter and the flavor more intense. Skipping bananas would turn this into a vanilla custard with no fruit kick, leaving the dessert flat.
Vanilla Extract: A splash of pure vanilla extract amplifies every flavor component, adding depth and a warm aroma that lingers on the tongue. Replacing it with vanilla powder will diminish the aroma and give a more artificial taste. Using too much can overpower the banana, so measure carefully.
The Texture Crew
Vanilla Wafers: These cookies provide the essential crunch and a subtle buttery flavor that balances the custard’s richness. If you omit them, the pudding will lack texture and become a plain custard. Toasting the wafers before layering will enhance their flavor and give a golden crust.
Cornstarch: Cornstarch is the secret thickening agent that gives the custard its silky, pourable consistency. Without it, the mixture will be thin and watery. If you have a gluten‑free diet, you can use arrowroot powder as a substitute; it behaves similarly and produces a clear, glossy finish.
The Unexpected Star
Heavy Cream: Adding heavy cream elevates the custard’s richness and creates a silky mouthfeel that coats the wafers. Skipping the cream will make the custard lighter but less indulgent. If you’re watching calories, replace half the cream with whole milk to reduce fat while maintaining flavor.
Eggs: Eggs bind the custard together and give it a smooth, velvety texture. Without eggs, the custard will not set properly, leading to a runny dessert. For a vegan version, use flaxseed eggs or a commercial egg replacer, but the texture will differ slightly.
The Final Flourish
Butter: Butter adds a rich, savory note that balances the sweetness and helps the custard set properly. If you omit the butter, the custard will be less flavorful and may not thicken as well. Using salted butter will add a subtle salty contrast that enhances the overall taste.
Granulated Sugar: Sugar sweetens the custard and caramelizes slightly during baking, adding a subtle depth. Too much sugar can cause the custard to set too quickly, resulting in a grainy texture. If you prefer a lower‑sugar dessert, reduce the amount by a quarter but keep an eye on the consistency.
Everything’s prepped? Good. Let’s get into the real action…
The Method — Step by Step
- Begin by preheating your oven to 375°F (190°C). While the oven warms, slice the ripe bananas into thin rounds; the thinness ensures they soften quickly and blend seamlessly into the custard. Place the banana slices in a shallow dish and set aside. I dare you to taste this and not go back for seconds—trust me, the aroma alone will have you hooked.
- In a medium saucepan, melt the butter over medium heat until it foams and turns a light golden brown. Add the cornstarch to the melted butter and whisk vigorously for about a minute until the mixture becomes a smooth paste. This step is crucial; a lumpy paste will ruin the custard’s silky texture. Watch the color change—once it’s translucent, you’re ready to move on.
- Pour in the milk and heavy cream while whisking continuously to prevent lumps. Bring the mixture to a gentle simmer, letting it thicken as it heats. The custard should be thick enough to coat the back of a spoon but still pourable. If it thickens too quickly, lower the heat and keep whisking; this keeps the texture perfect.
- Add the sugar and vanilla extract, stirring until the sugar dissolves completely. The custard should emit a sweet, comforting scent that makes the kitchen feel like a bakery. Taste a small amount—if it’s too sweet, add a pinch of salt to balance the flavors. Salt is a subtle enhancer that brings out the banana’s natural sweetness.
- Beat the eggs in a separate bowl until the yolks and whites are fully blended. Slowly pour a ladleful of the hot custard into the eggs while whisking constantly to temper them. Then return the mixture to the saucepan, stirring until it’s smooth and glossy. This technique prevents the eggs from curdling, ensuring a silky custard.
- Remove the saucepan from heat and let the custard cool for a few minutes; it should still be hot enough to melt the wafers but not so hot that it burns your fingers. Pour the custard into a 9×13 inch baking dish, spreading it evenly. The custard’s thickness will dictate how many layers of wafers you can add.
- Arrange the banana slices over the custard, overlapping them slightly to create a cohesive layer. Sprinkle a generous handful of vanilla wafers over the bananas, pressing them gently to ensure they sit snugly. The wafers will soften during baking, turning into a chewy, buttery crust that’s simply irresistible.
- Transfer the dish to the preheated oven and bake for 25–30 minutes, or until the wafers are golden brown and the custard has set. The top should develop a light crust that crackles slightly when you touch it—this is the sign that the pudding is perfectly baked. Keep an eye on it; the last few minutes are critical for achieving that golden finish.
- Once baked, remove the dish from the oven and let it cool at room temperature for 15 minutes. This resting period allows the custard to firm up, making it easier to slice and serve. The aroma during this time will fill your kitchen with a sweet, buttery scent that’s almost too good to eat.
- After the pudding has cooled, refrigerate it for at least 2 hours before serving. Chilling not only firms the custard but also allows the flavors to meld together, creating a richer, more cohesive taste. When you’re ready to serve, slice the pudding into wedges, and enjoy the harmonious blend of banana, vanilla, and buttery crunch.
That's it — you did it. But hold on, I've got a few more tricks that'll take this to another level…
Insider Tricks for Flawless Results
The Temperature Rule Nobody Follows
Many people bake banana pudding at a high temperature, which can cause the custard to curdle or the wafers to burn. I always set my oven to 375°F (190°C) and keep a close watch on the color of the wafers. The golden crust forms without scorching, and the custard sets evenly. This trick ensures a consistent texture every time.
Why Your Nose Knows Best
The scent of the custard as it bakes is a reliable indicator of doneness. When the custard starts to emit a warm, caramelized aroma, the wafers are almost ready. Trust your nose; it will tell you when the pudding is perfectly baked and ready to cool.
The 5-Minute Rest That Changes Everything
After baking, let the pudding rest on the counter for 5 minutes before refrigerating. This short rest allows the custard to set fully, making it easier to slice without tearing. A quick rest also lets the flavors meld, creating a deeper, more complex taste profile.
Layering Like a Pro
When arranging the banana slices, overlap them slightly to create a cohesive layer. This technique ensures each bite contains banana, custard, and wafer, giving the dessert a balanced flavor. I used to stack them too tightly, which made the custard soak through too quickly; now I spread them evenly for optimal texture.
Finish with a Dash of Spice
Adding a pinch of ground cinnamon or nutmeg to the custard enhances the banana’s natural sweetness. The spice adds warmth and complexity, making the dessert feel like a holiday treat even in summer. If you’re feeling adventurous, try a splash of espresso for a mocha twist.
Serving Tips for the Perfect Bite
Serve the pudding in shallow bowls or glasses to showcase the layers. Garnish with a sprinkle of crushed wafers on top for an extra crunch. A dollop of whipped cream or a drizzle of caramel sauce can elevate the dessert into a showstopper.
Creative Twists and Variations
This recipe is a playground. Here are some of my favorite ways to switch things up:
Chocolate Banana Pudding
Swirl in a handful of chocolate chips into the custard before baking. The chocolate melts into the custard, creating pockets of rich, molten chocolate that contrast beautifully with the banana. Perfect for chocolate lovers who want a double indulgence.
Nutty Banana Delight
Replace half of the vanilla wafers with crushed almond or pecan cookies. The nutty crunch adds depth and a subtle earthy flavor that complements the banana. This variation is great for guests who enjoy a nutty twist.
Rum‑Infused Pudding
Add a tablespoon of dark rum to the custard for an adult version. The rum brings a warm, caramelized note that pairs wonderfully with the banana’s natural sweetness. Be sure to let the pudding cool before adding the rum to preserve its flavor.
Vegan Version
Use coconut milk, maple syrup, and a flaxseed egg to replace dairy and eggs. The coconut milk gives the custard a tropical flavor, while maple syrup adds a subtle caramel sweetness. This version is dairy‑free and vegan, yet still creamy and indulgent.
Seasonal Citrus Twist
Add a tablespoon of orange zest to the custard for a bright, citrusy lift. The zest’s bright aroma brightens the dessert, making it feel fresher and lighter. This variation is especially delightful during the spring and summer months.
Low‑Sugar Option
Replace granulated sugar with a natural sweetener like stevia or monk fruit. Use a small amount, as these sweeteners are much sweeter than sugar. This low‑sugar version still delivers the same comforting flavor with fewer calories.
Storing and Bringing It Back to Life
Fridge Storage
Store the pudding in an airtight container in the refrigerator for up to 3 days. The custard will firm up, making it easier to slice. If the wafers start to soften, place a sheet of parchment paper between layers to keep them crisp.
Freezer Friendly
For longer storage, wrap the pudding tightly in plastic wrap and place it in a freezer‑safe container. Freeze for up to 2 weeks. Thaw overnight in the refrigerator before serving to maintain texture.
Best Reheating Method
To reheat, place the pudding in a microwave on medium power for 30–45 seconds, or warm it in the oven at 300°F (150°C) for 10 minutes. Add a tiny splash of water before reheating to steam the custard back to perfection. The wafers will regain some crunch, and the custard will taste fresh.